Up next in 10

Angular 13 FileSaver.js Project to Download Uploaded Files & Images From Express & Node.js Server
Dec 22, 2025
Buy the full source code of application here:
https://buy.stripe.com/9AQ17obZv1So2Zidit
Show More Show Less View Video Transcript
0:09
Uh hello friends, today in this tutorial
0:11
I will be showing you that how to
0:12
download the file which is uploaded
0:16
inside the express server inside NodeJS
0:19
inside our angular application. So this
0:22
will be a totally mainstack application
0:26
where you will be looking at how to
0:28
download the uploaded file inside your
0:30
angular application and we will be using
0:33
this library which is called as files
0:35
saver.js.
0:37
So basically it's a browser side library
0:40
which allows you to download files as
0:42
attachments inside your browser. So it's
0:45
a JavaScript library but it can also be
0:48
used inside your ReactJS applications or
0:50
Angular applications or NodeJS
0:52
applications as well. So we will be
0:55
looking at how to use this library
0:56
inside our Angular app in order to
0:59
download the file as as the attachment.
1:02
So you can see we are using this inside
1:04
our Angular application. We are using
1:06
this inside a Angular service. So let me
1:09
just start this angular application by
1:12
there this command which is called as
1:14
ngserve. So I need to go into the
1:17
project folder. So we will simply go to
1:21
the project folder. So you will see that
1:25
if you see cd back end
1:29
cd download file and then we need to
1:32
start this uh
1:34
you will see it is present inside our uh
1:38
first of all we need to start our back
1:40
end which is a nodejs application. So
1:43
the server is listening on port 80801.
1:46
So inside this backend application guys
1:49
nothing is there inside our public
1:50
folder we have a picture which is
1:53
profile jpg. So this picture will be
1:56
downloaded on the angular front end and
1:59
inside this index.js we are using the
2:02
express server and basically we are uh
2:05
just having this get request. So
2:07
whenever you hit this get request this
2:10
picture will be downloaded. It is stored
2:12
inside the public folder profile.jpg.
2:15
And now coming back to our front end
2:17
guys, it is very easy. Let me open this
2:19
inside uh file explorer and uh this is
2:23
our project folder. So here we just need
2:26
to run this. So we can simply run
2:28
ngserve. So now this will start our
2:31
angular application. So this will start
2:34
at per port number 4,200.
2:38
So just wait the application is just
2:40
starting. So you will see compiled
2:42
successfully. So it is listing on
2:45
localhost 4200. So I just need to open
2:48
this port number guys. So localhost
2:51
4200. So now basically you will see this
2:54
download button. So if I hit this button
2:56
what you will find out that as I hit
2:59
this button. Let me put this right here.
3:02
So if I click this download button you
3:04
will see that uh the picture will be
3:06
downloaded. And you will see that uh if
3:09
I open this image, this is the same
3:11
image which is stored inside the uh
3:14
NodeJS server inside our public
3:16
directory. So basically we are
3:18
downloading this image inside our
3:19
angular application as a attachment. So
3:22
for this tutorial we are using our uh
3:26
file saver library which is a very
3:29
awesome little library which is used by
3:31
many developers in order to download
3:33
files at the front end or at the back
3:35
end. So basically this is the module we
3:38
are using for this application. It's a
3:40
very popular module. You will see how
3:42
much weekly downloads are there. Over 1
3:44
million weekly downloads are there. So
3:47
for this we are using this file saver.js
3:50
library. So let's start building this
3:52
application from scratch. So I have
3:54
given this source code in the video
3:56
description guys. So all the
3:57
step-by-step instruction I have given in
3:59
the video description. So if you want to
4:01
download all the source code, you can go
4:03
to the video description link to follow
4:05
along with the live stream and video.
4:09
So all the source code is given. So now
4:11
let's get started guys. So I will first
4:13
of all uh just uh
4:16
stop this and start from scratch. So I
4:21
will go into my projects directory and
4:24
also just close this as we don't need
4:27
this. So this also I will close and this
4:31
also I will stop this and start from
4:34
scratch. So the very first thing guys we
4:36
need to do we need to make a new
4:38
directory for our project which we will
4:40
call this as download project. I will cd
4:43
into this folder and first of all we
4:45
will make two directories. First will be
4:48
for uh back end and the second for the
4:51
front end. So this is our visual studio
4:54
code text editor. You can use any text
4:55
editor of your choice. So first of all
4:58
we will make uh back end directory back
5:00
end. Then we will make uh front end.
5:06
So two directories are there. Now we
5:07
will go into the backend directory and
5:10
first of all initialize the package.json
5:12
file for our express application. So now
5:16
it is initialized. So first of all we
5:19
need to install
5:21
express and also we need to install
5:23
course module which is very much
5:25
necessary in order to download images
5:27
from cross domain. So this is very much
5:30
necessary. So now if you open the
5:32
backend directory you will see that
5:33
package.json file and all of these
5:36
modules are installed here. So now we
5:39
simply need to make the index.js file
5:42
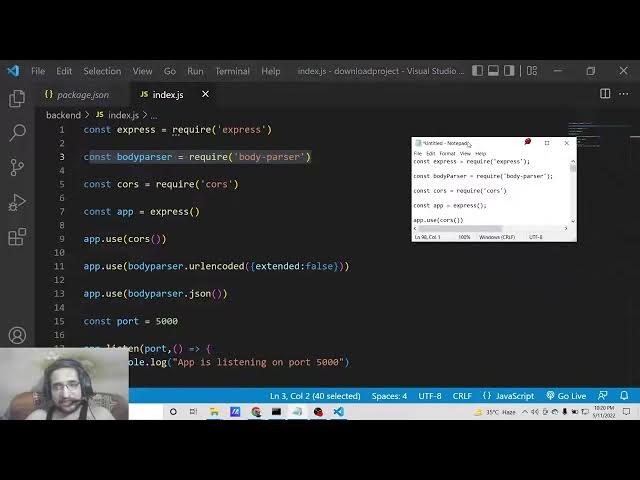
which is simple express app. So we need
5:45
to import the express module right here.
5:50
So this we need to require it. We need
5:53
to start this express application at
5:55
port number. You can use any port number
5:58
of your choice. So I will use port 5,000
6:02
and app.listen
6:04
and add this port number. So we will
6:08
simply say that uh
6:11
app is listening on port number
6:15
5,000. So this is the code guys. So now
6:19
we can start this express application.
6:22
Simply we need to write uh node more
6:24
index.js. So you will see app is listing
6:26
on port 5,000. So basically this is
6:30
simple express application. We haven't
6:32
done anything here. So right here we
6:34
need to first of all initialize some
6:36
middleares first for making this as
6:39
crossplatform. So we need to cross
6:41
domain. So we need to require the course
6:43
module which we have installed and also
6:46
we need to use this course module. So
6:48
app dot use course. So we are using this
6:51
middleware and also we need to install
6:54
sorry include the body passer middleware
6:56
which is a part of express. So you
6:59
simply need to require it like this body
7:02
passer and also we need to use this
7:06
middleware of body passer which is body
7:08
passer dot URL encoded extended to false
7:12
and uh app dot use body passer.json.
7:17
So these two lines you need to write for
7:19
using this body passer middleware which
7:21
is very much necessary in order to
7:24
download files or work with files.
7:30
So here you can also pass a attribute
7:34
which is of type. So this you can say
7:36
application/json.
7:38
That's it. So after that guys we will
7:41
make a public directory. Here we will
7:43
store the image file which needs to be
7:45
downloaded at the front end of the
7:47
angular application. So basically here
7:50
we can download any image of your
7:52
choice. So here we can go to my website
7:55
and download a image which needs to be
7:58
downloaded. So you can download your own
8:01
image. Simply download it at a directory
8:03
wherever this is present. So I will go
8:07
to the projects directory. So just put
8:10
the path here which is download project.
8:15
So this is the project. We will go to
8:17
the public folder and store this image
8:20
profile. JPG. So now this image is
8:23
stored guys you will see profile.jpg
8:26
this file will be downloaded once we
8:28
load the front end. So in order to do
8:31
this we need to make this public
8:32
directory a static. For for doing this
8:35
it is very easy. We just need to say uh
8:38
this line app dot use express
8:42
dot static and here we need to pass the
8:47
directory name which is public. So we
8:49
have made this directory as static. So
8:52
now we just need to write a simple get
8:54
request guys which is simple app.t get
8:58
uh get file or I can also say download
9:01
file. So basically whenever you hit this
9:04
route inside this NodeJS application
9:07
this function will execute callback
9:09
function.
9:11
So here we will download this file as
9:15
attachment.
9:17
So for doing this it is very easy inside
9:20
express they offer a download method
9:22
response. Download and simply you need
9:24
to provide the address from which we
9:26
need to download our image file. So it
9:29
is present inside the uh public folder /
9:33
profile
9:36
jpg. So then this callback function will
9:40
execute once you download this. So error
9:43
variable will be there. So if no error
9:46
is there then uh if a error is present
9:49
then we can simply say next and we can
9:52
pass this error that's it and also guys
9:55
what we can do is that we can also bind
9:58
a middleware function which is simply
10:00
will
10:02
be getting all the request which is
10:03
coming from the front end. So simply it
10:06
will give you the status of the request
10:08
whether it is successful or not
10:10
successful. It will give you the status
10:12
of the error like this. We can send this
10:15
like this. That's that's all that you
10:18
need to do inside your uh NodeJS
10:21
serverside code guys. So now we can
10:23
simply move on to the front end. So
10:25
front end folder. So right here if you
10:28
see
10:30
we can uh open a new terminal window.
10:39
I can open uh like this. So reveal in
10:42
file explorer. So right right here guys
10:45
we can say ng new uh followed by the
10:49
project name which is download file. So
10:52
just hit this command. So it will make a
10:55
new project inside your directory which
10:57
is download file. So it is just saying
10:59
that would you like to add angular
11:00
routing. So I will say no. We will use
11:03
the CSS stylesheet. So basically now
11:05
this will create this uh it will install
11:08
all the dependencies. it will create
11:10
this project. So it will hardly take 15
11:13
to 20 seconds guys. So simply wait.
11:16
After that you can see it has created
11:18
this app folder. So inside this we don't
11:21
want this uh garbage code. So we only
11:24
need a simple button inside our
11:26
app.component
11:27
HTML file. So we will have a simple
11:30
button which will simply say download
11:32
file. And uh here we can bind a on
11:36
click. So when we click this button what
11:38
will happen? we will execute this method
11:40
which is download file like this. So
11:44
here here we are just binded a simple
11:47
button which will simply say to the user
11:49
download file. Once you hit this button
11:51
this function will execute. Now we need
11:54
to write the definition about this uh
11:56
method which is download file inside our
12:00
app.component.ts
12:01
file. But before that guys we also need
12:04
to include some modules. So simply go to
12:07
app domodule.ts. ts file. So here we
12:10
need to include this uh module which is
12:12
very much necessary for this application
12:14
which is HTTP client module. So HTTP
12:19
client module. So this needs to be
12:22
integrated from add the rate angular
12:26
/http.
12:29
So this is the module and then inside
12:31
your imports array you need to add this
12:33
module like this. That's it. That's all
12:36
that you need to do guys. In order to
12:38
make HTTP request in Angular, you need
12:40
this module. So we have added this
12:42
inside app.module.ts.
12:44
Simply close this file. So right here
12:46
you need to go to app.component.ts file.
12:49
So simply you need to write the
12:51
definition about the method that you
12:53
have uh
12:56
put that method which is download file.
12:59
So we need to write this method. It is
13:01
simply download file. This is a method
13:04
and inside this file guys we need to
13:07
make a service external service which
13:09
will actually call the API to download
13:12
the file. So for making a service it is
13:14
very much easy. So first of all go to
13:17
the directory of the project and here
13:20
you need to first of all install this
13:22
library which is file saver which is the
13:25
actual library which is used to download
13:27
files as attachment inside angular.
13:29
Simply install this using npmi file
13:32
saver. That's it. And now basically you
13:35
need to include this at the very top. So
13:39
inside app.component.ts
13:41
file. So we will simply say save as. So
13:44
we need to import this library for for
13:47
file saver. So this will create a error
13:50
guys. So simply click on the quick fix
13:52
and you need to install this types file
13:55
saver. So once you install this this
13:57
error will go away. Visual Studio will
14:00
instantly install this and it this error
14:02
will go away. And now guys you need to
14:05
create external service. So for creating
14:07
external service inside Angular there is
14:09
a command ng generate service
14:14
download file. So this will create this
14:17
service in the root directory. You will
14:19
see that it has created these two files.
14:22
So you have created this service here.
14:24
you will see inside this service we need
14:27
to actually call the actual request
14:32
get request of the API. So here inside
14:35
this uh inside our constructor we simply
14:39
need to make a variable of HTTP. This
14:43
will be of the type HTTP
14:47
client. So this will be automatically
14:49
imported. You will see import http
14:51
client from at the rate angular common
14:54
http. So just include this line at the
14:56
very top. And now we will make a simple
14:59
method guys which will be download file.
15:04
This is a method and it will return the
15:07
this http.get
15:09
and simply here you need to provide the
15:11
address of your server. This is the
15:14
request we are running here /d download
15:16
file and it is running on the port
15:18
number uh 5,000. So this will make a
15:23
request here. Simply you need to write
15:25
this address full address http
15:29
localhost 5000/d
15:32
download file. So this is the full
15:34
address you need to write guys. So from
15:36
this address we need to download this.
15:39
So there is a second parameter you need
15:41
to provide which is called as response
15:44
type. So this response type will be a
15:47
blob object. So just make this
15:49
adjustment.
15:51
So basically this is a parameter. This
15:54
is a object. So we need to put a set of
15:57
curly brackets. So inside this you need
15:59
to write response type blob. So just
16:03
make sure that you do this.
16:06
That's all that you need to write inside
16:08
this service guys. So now we need to
16:10
include this service inside our
16:12
app.component.ts
16:13
file. So this is very easy guys. So
16:16
simply you need to make a ng oninit
16:19
method.
16:23
So this will be a void
16:28
and also we need to make a constructor
16:30
guys for this application for this
16:32
component. So private service of the
16:35
type download file service. So this will
16:39
be automatically imported from the
16:41
download file service file which is
16:43
there inside the same directory. You
16:45
will see automatically it is imported
16:47
the service.
16:55
So we need to close this constructor
16:57
with the put curly brackets here like
16:59
this. So right here inside this guys we
17:02
need to call this service method which
17:03
is this or dots service dot download
17:06
file and we need to subscribe to this.
17:09
So we will say subscribe and here the
17:11
data will come. So data will be of blob
17:16
blob type. So we need to convert this to
17:20
a media source
17:23
media source like this.
17:27
So basically this will be a arrow
17:30
function
17:33
if you see
17:38
this is a parenthesis. So just make sure
17:42
that you do this.
17:45
So this will be a arrow function guys.
17:47
So inside this arrow function guys what
17:50
we need to do is that we need to make a
17:53
new variable which is download URL. So
17:56
this will be window dot url dot
17:59
createobject url. So basically it will
18:03
create a unique string for us and here
18:05
we need to pass the data which is coming
18:10
like this which is of the type blob. So
18:14
now we need to save this as attachment.
18:18
Save this
18:20
file as attachment. For doing this it is
18:22
very easy. We will use the actual
18:24
library which we have imported which is
18:26
save as. So we will pass this URL inside
18:30
this save as download URL. That's it.
18:33
That's all that you need to do guys
18:35
inside this application. So this is
18:37
complete. So now we can test out this
18:39
application. We will simply say ngserve.
18:43
So
18:45
hopefully you will see that uh once this
18:49
starts already our back end is al
18:52
already running on localhost 5,000. So
18:56
this will start at port number 4200.
19:00
So once we click the download button it
19:02
will definitely download the image file
19:04
for us. So you will see it has started
19:06
this. So we can simply go to our local
19:10
host 4200.
19:12
So now you will see there is a download
19:15
file button. So if I click this button
19:18
you will see that image is downloaded.
19:21
If I open this image this is the image
19:23
that is downloaded inside this
19:25
directory. So you can do this do this
19:28
for any file guys. It can be any PDF
19:31
file text file also. So depending upon
19:34
which file you are downloading it. It
19:37
will be downloading it as it is. All the
19:41
source code will be there inside video
19:43
description. Please hit the like button,
19:44
subscribe the channel as well.
19:47
And uh if you have any sort of question,
19:49
you can ask in the comment section.
19:52
And uh I will be seeing you in the next
19:56
video.
19:58
Until then, thank you very much.