Up next in 10



https://www.proshaper.com
Our Amazon Storefront: https://www.amazon.com/shop/proshaper
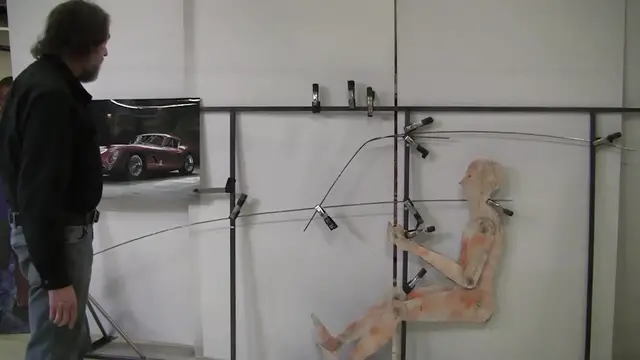
AI Alfa Romeo Scratch Build Series: Wireform build out
AI Alfa Romeo Scratch Build Series:
Episode 4: https://youtu.be/7tqW1T9h-ZE?si=9S0EK_F7ENNg_R20
Episode 3: https://youtu.be/4yMznAPvzUc?si=CZ0kgO_r3qx-oDCq
Episode 2: https://youtu.be/PYjL-wc3nNg?si=Ri6qafYgl01Fy-IZ
Episode 1: https://youtu.be/ZDhw39NwezU?si=aixpztZaRJh4Glac
How to design your own AI Car: https://youtu.be/PG3VM0JxMlE?si=QftZq899Bt7ImHdP
Email: [email protected]
Website: https://www.proshaper.com
Facebook: https://www.facebook.com/ProShaper/
Instagram: https://www.instagram.com/proshaper/
Twitter: https://twitter.com/ProshaperM
Linkedin: https://www.linkedin.com/company/pros...
Show More Show Less View Video Transcript
0:00
hi it's Ray from Pro shaper Workshop in
0:02
Char Massachusetts we're working on the
0:04
AI Alpha Romeo this is all we got done
0:07
so far this is all the real preliminary
0:09
steps we put uh Joe adjustable in I made
0:14
him about 20 years ago he's got all uh
0:17
uh Wing nuts that you can tighten up and
0:20
you can adjust them every which way but
0:22
it's all got to be human scale will take
0:25
in uh we don't have the ability to put
0:29
the actual Alpha motor Obi and number
0:31
one it's so heavy but I can make a
0:34
little uh cardboard template profile of
0:38
the Alpha motor I can measure it up
0:40
really quickly make a little template
0:42
I'll cut it out on the band saw I can
0:45
set that in place uh but what I want to
0:48
do in this video is uh all these wires
0:52
are still temporary this might go down 4
0:54
in and this windshield can change the
0:56
angle all that stuff is all adjustable
0:59
when not going to set anything in stone
1:02
until we get more context and how we
1:05
going to get that context number one we
1:07
got to come up with a design for the
1:09
back here because the picture really
1:11
doesn't show it we'll we'll make a
1:14
preliminary back line and we'll have the
1:17
total length to go by we'll have the
1:20
height give or take two or three Ines
1:23
and we'll do a preliminary line for the
1:25
front but what I want to try to do on
1:28
this one this series of the video or
1:31
this segment of the video is make this
1:34
fendel
1:35
line and put that Fender line in this
1:39
proper place out here and also the wheel
1:42
opening lines and maybe the rocker line
1:45
connect those together and those all
1:48
have to be a little bit of adjustable
1:49
too they're going to be adjustable in
1:51
and out cuz we got to set our track with
1:54
and um we got to set our height right
1:58
height is generally about five inch or
2:00
so but we can you can go a little lower
2:02
but the lower you go unless you got an
2:04
airbag suspension or something you're
2:06
going to be hitting curbs or something
2:09
that's going to cause damage so you got
2:11
to always pay attention to that I'm
2:13
going to bend up a few wires it's a
2:16
pretty simple process we just got the
2:18
quarter inch hot roll wire right here
2:21
I'm going to bend it over my knee so I'm
2:23
going to do this fendel line first and
2:28
uh Mark might get some of it on camera I
2:30
don't know and and it comes around it
2:33
goes up it's a little hump right here
2:36
and then it goes back down and then we
2:38
got another hump here we'll try to make
2:41
that Fender line uh let's see this could
2:44
be maybe one piece the whole way there
2:48
and then this would be another piece and
2:49
then another piece doing the return and
2:52
maybe uh another piece under here for
2:54
the return under here we get that in
2:57
position and we can kind of hold it up
2:59
with again with the quarter inch wire we
3:02
can make that
3:03
adjustable and we put the cardboard the
3:06
White cardboard behind here so you can
3:08
see really good so next I'm going to
3:10
start bending that
3:18
wire I got to find out where this is
3:21
going to
3:22
be um this spot is pretty good so I'm
3:26
going to put some tape on the floor
3:28
there showing us that's where it's set
3:31
and then I need to know the track width
3:35
and this is going to be scented over the
3:37
tire so off to Center so
3:44
much okay so I I cut the wire that I'm
3:47
going to use for the fender line to the
3:49
front fender I started uh preliminary
3:52
bending it I overdid it a little bit
3:53
again that's not a big disaster so just
3:57
going to straighten it out a little bit
3:59
and
4:00
what I need to do is we're going to go
4:03
by the gtv6 track WID and I got to find
4:07
out what that track wi is we have it on
4:09
the paper over there we'll measure off
4:12
the center line we'll put some tape over
4:15
here on the floor of magic marker lines
4:17
and tape and then we have to put this in
4:21
position and we're not going to build an
4:24
elaborate Centerline piece here to hold
4:27
this so we'll just use some quar inch
4:29
wire and we'll make a little u x on the
4:34
on with the wire to to as a leg support
4:38
foot and leg support system come up with
4:41
a straight wire and then we'll be able
4:43
to grab it with the the clamps and all
4:46
we need is probably two or three of
4:47
those uprights and that will hold this
4:50
in space right where it needs to be so
4:54
uh that's a a necessary evil is to make
4:57
those little support systems I could
5:00
come off of here and I was thinking of
5:01
doing that before with a support system
5:04
but that's more expensive I got to spend
5:07
the money for that nice tubing and cut
5:09
it all up this is uh just a simple uh
5:13
$36 Hot Roll quar inch Hot Roll piece so
5:16
I got to make three supports I'll need
5:19
one or two for probably two for each
5:22
wheel well opening but if we get these
5:25
made you and and we get that wire in the
5:28
back made you're going to start seeing
5:30
the car it just it appears out of
5:32
nothing so we're going to make those
5:34
supports right now all right we made uh
5:37
a few of these little upright stands
5:39
with the quarter inch wire just bent a
5:41
little bit so we got a nice four point
5:43
that we can bend down to to get any
5:44
wobble out of them got them coming up
5:46
pretty vertical and we can position
5:48
these anywhere we want and this is the
5:51
beginning of the fender wire and I'm
5:54
going to clamp this on here and
5:56
hopefully it all stays together and it
5:58
might be able to to also put the uh the
6:02
wheel openings on these two so we might
6:05
need a couple more for the back so we
6:08
have something there we'll do a
6:09
preliminary wire for the front so we'll
6:11
have something there and the I is the
6:15
judge here the ultimate judge so I put
6:17
this up and we'll we'll have maybe a
6:19
half an hour or 45 minutes for this
6:21
video today and we'll have these
6:23
preliminary wires and the greatest thing
6:27
is living with these a little bit
6:29
because then your eye starts to become a
6:31
real strong critic and we know that
6:34
these are not where they're supposed to
6:35
be but your eye will will look at this
6:39
as I'm doing other jobs in the shop and
6:41
there's a great story I remember reading
6:43
about uh William Lions the founder of
6:46
jaguar and um he had a design department
6:50
but he was the ultimate final Arbiter of
6:53
what was going to get produced and he
6:55
would have his design Department design
6:57
up uh the new Jaguar and then he would
7:00
have a prototype Department make up a
7:03
model of the design that the stylists
7:06
had come up with and he they would make
7:09
one side one way and the other side a
7:12
little bit different and it was just a
7:15
static model there was no motor or
7:17
anything there might have been shaped
7:18
panels that were painted I don't know
7:20
exactly what what they did but it looked
7:22
like a real car had wheels and
7:24
everything and he would tow it to his
7:26
house where he lived and he had like a
7:29
little l in his driveway and he would
7:31
park that in the l section of his
7:33
driveway and he would leave in the
7:35
morning and he would come in come home
7:37
at night and he would look at that car
7:39
and he'd be thinking about it and he'
7:41
know what the problem was and he would
7:43
tell that that he had a low of this line
7:45
a half an inch raised this line a
7:47
quarter of an inch and that's how some
7:49
of the Jaguars were were uh ultimately
7:52
styled until Malcolm seya came along and
7:55
he he was responsible for the E type and
7:58
the C type and the type and and even the
8:01
xj13 so uh but William Lions had a
8:05
really uh big imprint on early Jaguar
8:08
styling all right we made five upright
8:11
stands now they're really kind of stable
8:14
it's not bad at all they wiggle a little
8:16
but that's okay and we've got the
8:19
preliminary wire in for the top of the
8:22
fender we still have the uh back Fender
8:26
that's going to have to go in and next
8:28
the most important part will be the
8:31
wheel well wheel well openings so we got
8:34
to factor what size wheel we're going to
8:37
put in here and it to me it looks like
8:39
at least a 15in wheel it might be a 16 I
8:42
don't know the gtv6 had 14 I believe uh
8:46
they're metric size but about I'd say
8:48
about 14 and I think the 15 will look a
8:52
little have a little more muscle look to
8:54
it and I think that'll be better now we
8:56
do have some uh wire wheels that I
8:58
picked up
8:59
I'm maybe going to try to use those as
9:02
just mockup wheels and that'll give us a
9:05
really nice look to work with so the
9:07
next step will be I got the wire already
9:10
I got to bend this front wheel well
9:13
opening and I said I'd probably do that
9:15
in four sections and weld them together
9:18
so we'll get that one done and then the
9:20
back one done I we set these off at 27
9:23
in is at half the track with the beauty
9:27
of this system is
9:30
uh you know people say there's no human
9:32
interaction when you get all this AI
9:34
stuff here's the human interaction we
9:37
don't have a CAD program maybe two years
9:40
from now maybe a year the AI stuff will
9:42
kick out a CAD program but that doesn't
9:45
mean you have to be a slave to this
9:47
design you can have the freedom to
9:49
design it any way you want so it becomes
9:52
your vision of what you want and that's
9:55
what we're going to try to do here we're
9:56
going to try to make it as good as what
10:00
the picture looks like or better because
10:04
we're not in a race here there's no
10:06
there's uh no deadlines this doesn't
10:08
have to be done next month so take your
10:11
time and uh that's the fun of it so
10:15
we'll get those wheel openings done and
10:17
then we'll go on to the next step I had
10:20
Mark dig out some tires from the back of
10:22
the shop uh we got a three different
10:24
sizes here this was the original Alpha
10:27
uh on the GTV 6 it's a metric size it's
10:31
about 14 in I believe though uh I didn't
10:34
measure it and this is a vks wagon wheel
10:38
tire here combo and this tire is a
10:41
little bit taller than the
10:43
GTV 6 and this one I don't know where
10:47
this one came from or what it is it
10:49
might be a 16 I'm not sure but it has a
10:53
a good OD size so I'm going to make the
10:57
uh wheel well opening to fit this one
11:00
we'll put that in and we'll see what
11:02
that looks like oh use a roller to get
11:05
this into
11:11
play we can bend it with our little two
11:14
pin Bender but we're using a roller on
11:17
this
11:23
one there's
11:28
one
11:33
two that's that all right this is the
11:36
first out of the roller it's pretty
11:39
close I'll close it up just a little bit
11:41
manually here so all I got to do is just
11:46
tweak it a little bit and we'll get it
11:48
really nice got to do that for both of
11:51
them and uh before I do that we've got
11:56
to figure out exactly where that's going
11:59
to
12:00
go
12:02
and say it goes about here we did half
12:07
of this
12:08
videoing uh yesterday which was Monday
12:11
today is Tuesday the video hopefully is
12:13
going to go up
12:15
Wednesday
12:16
uh and these are all preliminary wi and
12:21
the great thing about this is everybody
12:23
that looks at it said oh that's wrong
12:25
that's wrong that's wrong that's wrong
12:26
that's and the audience is going to be
12:28
saying that too
12:30
that's all part of the
12:33
plan so we're going to adjust the why is
12:36
we have the windshield way too forward
12:39
we have the back end way too
12:42
long uh we don't have the curve here
12:45
right uh this is the top piece of the
12:49
fender and we got to get that apex of
12:52
the curve right at the right spot and we
12:55
got to put the the rear fender curve in
12:58
so we I want to I want to do that
13:00
probably now I'll get the uh the wire
13:03
for that and the more wires you put in
13:06
you see the relationships between them
13:09
and just observing them tells you what
13:12
is wrong and what needs to happen your
13:15
eye will dictate to you exactly the
13:19
course that you need to be on all right
13:22
we cut a a piece of the quarter inch
13:24
wire for the rear fender line and we put
13:27
the little Bender in here so we have the
13:29
the Bender for the
13:30
fender so let me take a look see over
13:33
there again I got to see what it looks
13:34
like okay it comes up pretty
13:38
quick
13:41
now what we're going to do is this line
13:45
here is probably about halfway that's
13:49
your top of your front fender line
13:50
that's halfway over the
13:53
wheel uh and it'll be the same here so
13:57
we've got a nice line here where it's
13:59
meeting the roof
14:01
line but we're not going to be using
14:04
that line because we're going to have a
14:07
singular line that will go all the way
14:09
it'll be about halfway in that Fender
14:12
right where I'm pointing with the rod
14:14
right there and it's going to be a
14:18
guesstimate so we'll Bend this up a
14:20
little
14:21
bit we will be
14:24
wrong be
14:27
assured that you will be wrong
14:30
wrong
14:31
but nothingness doesn't teach you
14:34
anything you got to have somethingness
14:37
in order to know what you did
14:41
wrong so we'll transform this wire which
14:46
was
14:46
flat to what we think it's supposed to
14:50
be and then our I will tell
14:53
us that were're not on the money
14:58
yet
15:02
so let's put that over there it's got to
15:06
be about right here
15:18
somewhere and you got to make sure that
15:21
you don't put a compound in there see
15:23
that's a little bit of a compound there
15:25
you want this laying flat so that's easy
15:27
to fix you can put it in the viice and
15:29
just give it a little whack with a
15:32
hammer but try to
15:35
maintain one plane as you're bending
15:38
this all right this
15:40
Fender is going over this
15:43
wheel so we have the wheel to show us
15:46
what we're at where we're
15:50
at take a little bit out
15:57
there
16:07
look too
16:08
bad now we got to get this compound out
16:11
the floor is pretty flat in here we're
16:14
going to use these little 2x4s to
16:15
straighten that out so we'll put one 2x4
16:20
on the end over here one 2x4 over
16:23
here and we'll give it a little whack
16:25
right
16:26
there let's see what that says
16:29
that's better all right there's my
16:32
rocking
16:43
Point
16:46
hey all right that's close
16:51
enough so we need some
16:57
clamps
17:06
so I probably have that too
17:09
high uh I got to make the returns that
17:12
go underneath where the Rock The Rocker
17:18
is let's see how clamp that on there
17:21
yeah that'll clamp right on it
17:27
nicely
17:29
all right
17:31
um last
17:33
night we put the 74in wheelbase Mark in
17:38
with this
17:39
tape
17:40
so we've got to get that right
17:45
um if I put this
17:48
here this should technically should be
17:51
scented over that 74in wheel
17:55
Baseline so it looks like if I put this
17:59
over
18:02
here I'm going to have to adjust that
18:04
line back there I can bring this whole
18:07
assembly this way but I think I'm going
18:10
to put
18:14
this I'm going to put it right about
18:19
here now if you were using a CAD program
18:23
to to build these lines or design
18:27
this uh you could like in solid works or
18:31
uh some of the other ones like um um
18:35
rhino you could import the picture and
18:38
then copy a lot of the curves with the
18:39
lines and everything you can create the
18:41
shape that way there's going to be a lot
18:44
of exactly what I'm doing here but this
18:48
is intuitive it's really simple I've
18:51
never mastered a CAD program I don't
18:53
think uh it'll be 73 in a week or so so
18:57
I don't think I'm going to be taking any
18:58
CAD intensive CAD lessons to learn CAD
19:02
because it takes a long time to get
19:04
really proficient at it I've played
19:06
around with it and I've just made no
19:08
Headway with it whatsoever there's
19:10
Fusion 360 I guess I haven't even played
19:12
with that uh and maybe uh somebody can
19:16
have luck with that uh but I love this
19:19
process and I think if you give this
19:21
process a try you'll be really impressed
19:24
it's it's essentially the same thing
19:26
you're creating all the lines by I and
19:29
on on Tad you're essentially pulling and
19:32
pushing the lines and and getting them
19:34
in place but you do have the aid of the
19:37
original drawing you can copy some of
19:39
the lines but there's not much to copy
19:41
in this uh we got a 3/4 low 34 view of
19:46
what we're doing so we'll have to just
19:49
keep evolving the design we'll try to
19:52
get the results that we want that
19:57
way
20:01
yeah I'm going to try to carefully pull
20:04
this assembly forward to try to get um
20:08
these wheel openings more in line with
20:10
the 74 in these were kind of arbitrary
20:14
lines I thought where the the center of
20:17
the wheel the 74in wheelbase would be I
20:20
could be off 3 or 4 Ines either way so
20:23
carefully try to move this whole
20:27
assembly
20:30
oh that doesn't happen in
20:34
CAD my line fell all right so I put the
20:37
tire in place and it becomes obvious
20:40
that I'm way too high so I'm going to
20:42
lower that down a little
20:49
bit now we got the tire in there this
20:52
line is way too high so I I think I had
20:55
the line here before so it's pretty
20:57
close before
20:59
so let's bring that down some
21:10
more now using these clamps which are
21:14
not really uh super effective that hold
21:17
in The Wire so once we get them closer
21:21
we might uh resort to using a little U
21:24
duct tape on them my favorite is gorilla
21:27
tape it really holds good might be doing
21:30
that now let's adjust the windshield
21:35
back
21:36
and we'll see what that looks like the
21:39
roof line and the windshield line are
21:42
better again not perfect but it's
21:46
closing
21:47
in and what jumps out at me right now is
21:52
I still need to enhance this line a
21:54
little bit right here this line I'm not
21:56
happy with and I'm not happy with that
21:59
line as well uh there's more roll in or
22:03
more radius in that line right there
22:06
I've got it a little too flat and we got
22:08
to add a more hump right here more
22:11
radius right about here is supposed to
22:13
be the
22:14
peak so I got to pump that up a little
22:19
bit
22:20
and it's possible this needs to come
22:24
down a little bit
22:26
more let's see
22:29
not too much just a little
22:31
bit so that's what we'll do now is we'll
22:34
Bend those wires up and we'll put them
22:36
back up and we'll see what they look
22:38
like all right so I took the uh the
22:42
front fender line it goes all the way
22:44
back to the rear fender off I've got it
22:47
marked where it intersects with the
22:50
uprights and uh I want to change the
22:54
curve but I want to document the curve I
22:57
got
22:59
so I got this big giant piece of
23:01
cardboard and I'm going to trace that
23:05
line in and that way they I'll be able
23:06
to watch my progress as I adjust this
23:10
lines I'll have a
23:13
uh written document here showing where I
23:17
was and where I'm
23:26
going okay so
23:29
I'm going to bend that
23:31
line in
23:34
here a little
23:44
stronger take a little bit out and then
23:46
compare
23:48
that what we
23:56
had okay so I added about about an inch
24:00
of uh height there on that
24:03
line put that back on I need your help
24:10
here on the front of the wire there I
24:14
keep it up the same spots
24:20
yeah all right we rais that wire just
24:22
one in it's looking a little
24:25
better uh most of the the bending was
24:27
from here to here here just to to Crown
24:29
that a little more and now I want us and
24:33
again we might have to do it again but
24:35
uh right now I want to pump this one up
24:39
and relocate that one a little bit so I
24:43
need more Bend right in this uh front
24:46
the third of the wire or so so I'm going
24:49
to mark it with the magic uh with the uh
24:52
tape we'll do the same procedure we'll
24:55
we'll put the the the existing line
24:59
on the cardboard and be able to document
25:02
how much of a change we actually made so
25:05
this is the actual center line through
25:07
the hood and we're going to pump it up I
25:10
marked it right there that's where
25:12
similar to that I need to pump it up
25:15
right
25:24
there now if you don't have patience do
25:27
not do this
25:29
because you have to be patient you have
25:32
to let the process unfold and as it
25:35
unfolds it reveals as it reveals you get
25:39
the
25:44
satisfaction so that added about I'd say
25:47
2 and 3/4 of an inch of curve to that
25:52
line
25:55
and I think it needs a little more I'm
25:58
really flat right in this back section
26:01
so I'm going to add a little bit in here
26:04
too not much
26:06
just this is the lever that's my knee is
26:09
the full from
26:20
here okay so now I got a totally
26:23
different
26:24
line and I didn't document the second
26:27
line
26:29
this is number
26:31
one Hood Center
26:33
Line we got that wire adjusted we
26:36
documented it we'll call that number two
26:40
I forgot to document the the revision of
26:43
the fender top of the fender line so
26:46
Mack and I will put this back on with
26:48
the clamps he'll give me a little hand
26:50
and we'll see what we
26:52
got uh if we lower the roof
26:56
line I think that that's
26:59
um that's going to help us in
27:01
punch so we got to lower that roof
27:05
line that and then shortening the
27:07
windshield up at the same time we made
27:10
two stands for Mr adjustable cuz he was
27:14
up against the center frame the center
27:17
line we brought him out more we're in a
27:20
realistic position so he's right there
27:23
now I want to put the wheels in so I'm
27:26
going to these uh this this is the 5 in
27:29
uh bottom line of the body the ground
27:32
clearance line I'm going to cut that out
27:34
and put a a temporary little mig weld
27:37
which we can break if we have to uh I
27:40
got to set set the wheel openings at 942
27:44
in uh this one's got to be adjusted a
27:48
little bit I'm going to cut that one out
27:50
and that one out so we can set the
27:52
wheels in place we're going to do that
27:53
next all right I I cut the uh ground
27:58
clearance Rod allowed me to put the
28:01
wheel in
28:03
position and then this is the wheel
28:06
opening I kind of spaced that even this
28:09
one we made in the the the
28:12
roller and this actually needs to be out
28:16
here
28:17
somewhere and then then there'll be a
28:20
curve coming up to this Fender line but
28:22
if you look at if this if this is the
28:25
wheel opening the outer position if you
28:28
you look at this relationship right here
28:30
uh we have too much distance here
28:32
compared to the pitcher so this looks
28:35
like it's going to have to come down a
28:37
little bit but before I do that I'm
28:39
going to try to adjust the back a little
28:41
bit more bring this back down to match
28:44
the front we'll do that
28:47
now all right we copied the uh wheel
28:52
opening line same as the front it's 272
28:55
in to the top of this and um that just
28:59
gives us the visual obviously that
29:01
Fender the rear fender is bad now uh we
29:04
got to play around with that
29:06
wire uh looking from the far View
29:10
getting a a good 10t view or
29:14
so I'm beginning to wonder whether it
29:17
might have to lengthen the wheelbase a
29:20
little bit it looks a little short but
29:23
I'm not going to make that decision yet
29:24
until I put some door lines in and see
29:27
what the prop portions look like so
29:30
that's what I'm going to do
29:34
next actually I need to put the door
29:37
line in I can put this in
29:46
preliminary I should to go way down I
29:49
redid the re Fender line it's still not
29:53
perfect but I adjust it a little bit it
29:56
get a little bit better view now but but
29:58
I think I'm going
30:00
to orient myself towards the front here
30:03
I I'm not happy with this this needs a
30:05
little more Crown in it but it's
30:07
difficult to Crown that big long wire
30:11
and disrupt the whole system so I'm
30:14
going to make a small modulus section
30:17
and then I can do a Ab comparison by
30:19
doing that uh I need a lot of stuff
30:23
which will be coming up in the later
30:25
videos where we put the actual F Well
30:28
opening wire in and we're going to have
30:30
one coming like this to hang that off of
30:33
this wire but I got to get this is a
30:35
primary wire I got to get that right
30:37
first and I also got to get the door
30:42
front edge and the door back Edge in so
30:45
I can see the proportions if the
30:47
proportions don't look right I might
30:50
have to move the wheel bit maybe four to
30:53
6 in so we're at 942 we might have to go
30:57
to 98 or maybe a 100 inches but we're g
31:01
to keep picking away I'm gonna try to
31:03
get this front fender a little bit
31:06
better all right we played around a
31:08
little bit with this front fender line I
31:10
put a new section in here we're probably
31:13
going to do it over again but now my
31:15
preliminary line I've cut out and I've
31:18
put in my second version of my line
31:20
which is not perfect but I think it's
31:22
closer and I think I'll make a new one
31:25
using that as a guide and and I like to
31:28
drop the slope here and the next time we
31:32
do this is uh segment five the next time
31:36
we do segment six I have some 15-inch
31:39
wire chrome wheels and we'll Mount them
31:42
up on some junk tires or whatever we'll
31:44
have both uh wire wheels in place with
31:48
tires that'll help the visual out quite
31:51
a bit and we decided that you know we
31:56
got a consensus here everybody readed
31:58
that we had to lengthen the wheelbase so
32:00
we lengthened it to 100 in this is the
32:03
94 1/2 here and that's 100 so we move
32:08
the wheel opening back a little bit I
32:10
lowered this Fender the next thing I'm
32:12
going to do and then we'll probably end
32:14
the video is we're going to reposition
32:16
that windshield so it makes that long
32:18
hood and lower the roof a little bit and
32:21
I think it'll start to be looking really
32:23
good and the next time episode 6 we
32:28
refine these lines a little bit more and
32:30
then we'll start putting some of these
32:32
secondary fill lines in uh which i'
32:35
mentioned before I want to get the door
32:37
lines the opening and closing door lines
32:39
and the bottom closing door line and
32:42
those will add the actual 3D shape to it
32:45
too so that that'll be a big improve but
32:48
right now we're going to lower the roof
32:50
and move the windshield back all right I
32:53
like the way that looks now we did we
32:55
did a whole bunch of little adjustments
32:57
moved the windshield back we put more
32:59
rake in the windshield we brought the
33:01
roof down uh all of these lines are
33:05
still all temporary lines we're going to
33:08
refine them even more but it's really
33:10
starting to look sporty now and as we
33:14
live with it for the next couple days
33:16
we'll see the problems and we'll make
33:18
mental note of it and we'll make the
33:20
changes in episode six so episode 6
33:23
we're going to have the wire wheels in
33:26
and uh that'll be a big improve we at a
33:28
100in wheelbase we'll refine some of
33:31
these wires more and we'll start adding
33:33
some of the secondary wires maybe and uh
33:37
I think all the relationships are
33:39
getting real close we put these dual
33:41
lines we'll be able to see the
33:43
proportional relationships from the
33:45
pitcher to the wire form so I've HED you
33:48
enjoyed the video it's Ray from Pro
33:50
shaper Workshop in Charon Massachusetts
33:53
tell all your friends about the video
33:54
channel and please share it and please
33:57
subscribe thanks for watching
Autos & Vehicles