Up next in 10


https://www.proshaper.com/
EPDM Rubber https://geni.us/EPDM
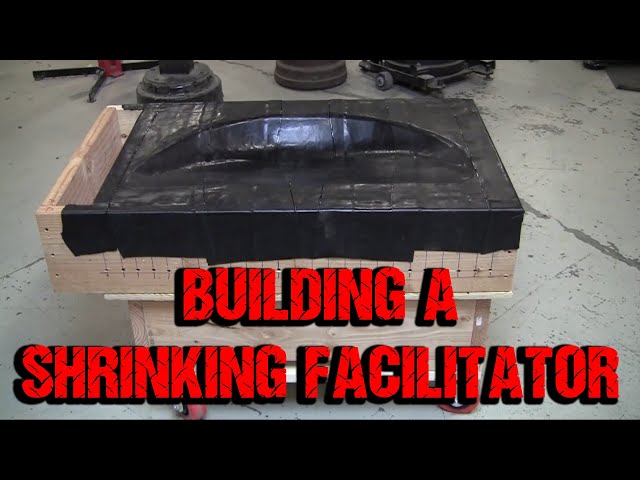
Coachbuilder’s Trick: The Wooden Shrinking Facilitator You Can Build in a Day
Watch as Wray builds a simple but highly effective wooden shrinking facilitator using 2x10 lumber. In this video, he walks you through the entire process—from stacking and screwing the boards together to carving out the center with an angle grinder. Once the hollow is formed, Wray demonstrates how the setup works using a mallet to shrink metal over the wooden form.
This modern take on the traditional stump method is quick to build, easy to use, and perfect for any metal shaping shop.
✅ Great for coachbuilders, fabricators, and DIY metalworkers
🛠️ Built using common materials and tools
📏 Designed to replicate classic shrinking techniques with updated accessibility
Email: [email protected]
Website: https://www.proshaper.com
Facebook: https://www.facebook.com/ProShaper/
Instagram: https://www.instagram.com/proshaper/
Twitter: https://twitter.com/ProshaperM
Linkedin: https://www.linkedin.com/company/pros...
Show More Show Less View Video Transcript
0:10
Hi, this is Ra Shelene from
0:11
proshaper.com.
0:13
I'm in Charlton, Massachusetts. I have
0:16
uh coach building classes. I make metal
0:18
shaping tools and I do custom coach
0:21
building work for clients. This is a
0:24
video on my shrinking facilitators which
0:27
uh I actually invented about five or six
0:30
years ago or so and I've kind of evolved
0:32
the design. These are not called stumps
0:35
because they're not a stump. So I call
0:38
them shrinking facilitators. What you're
0:41
seeing here is a is a large shrinking
0:44
facilitator that we made the the video
0:46
around. I have a whole bunch of other
0:49
ones. This one here would be a perfect
0:52
tool for making uh tire covers or wheel
0:56
wells, inner wheel wells. It allows you
1:00
to shrink very easily. What you're
1:03
looking at is the completed shrinking
1:05
facilitator, which is made from just
1:09
regular construction wood. Now, in the
1:11
US and Canada, this is how we build
1:14
houses. This is a 2x10 stock. What else
1:17
you see here is besides the the assembly
1:21
of all that 2x10 stock with a nice
1:24
casters to roll it around the shop is a
1:28
coating. This was an evolution. I've
1:30
tried a bunch of different coatings.
1:31
First, I made these with no coating. The
1:34
regular construction lumber is not as
1:36
hard as hardwood stumps. So, with abuse,
1:40
uh the regular construction lumber will
1:42
start to split and it's a modular
1:45
design. So, you'd have to take out a
1:46
couple screws. And I did that probably
1:49
three or four times or so. And I got
1:51
bored with that. I said, "There's got to
1:53
be a better way. There's always a better
1:55
way." So, I found this material that was
1:57
a asphalt based material. Figured, well,
2:01
I'll give that a shot. That'll give us
2:02
some protection for the wood. So, I used
2:05
that and it worked really, really good.
2:08
Now what it did was it provided
2:10
protection for the wood but it also uh
2:14
grabs the metal so it holds the metal
2:16
with a regular concave depression in a
2:19
regular stump your metal kinds of slides
2:21
around and jumps and everything but when
2:24
you have this coating on here it it will
2:26
hold the metal very well. So this
2:28
asphaltbased
2:30
material which was a roofing material
2:32
that I'd found that worked good but it
2:35
left a residue on all the panels. So I
2:37
I'm teaching the classes and I'm telling
2:40
the students about it and I said, "Okay,
2:42
you can do your shrinking here, but then
2:45
we're going to have to wash the panels
2:46
with laca because the residue would go
2:49
on all the panels, which was a something
2:51
that really wasn't that good. You know,
2:54
there was the benefit of easy shrinking
2:56
and protecting the wood. But now we had
2:58
this problem of the residue of of the
3:01
asphalt sticking to all the panels and
3:03
you had to spend the time cleaning it
3:05
off. So, I hunted around and I went to
3:09
Home Depot and they have a roofing
3:11
section at Home Depot and I found this
3:14
stuff, EPDM.
3:17
You look it up online, you'll get all
3:18
the info about it. It's it's a material
3:21
that's sold all over the world. It's a
3:23
rubberbased material and it has a
3:26
self-adhesive on the backside. It comes
3:29
in rolls. This particular large
3:32
shrinking facilitator took two rolls
3:35
after getting this uh EBTM for the first
3:38
time. I tried it. I was like ah aha
3:41
moment because now there was no residue
3:44
on the panel and it was holding the
3:47
panel even better than the asphalt and
3:50
it protects the wood. And I've had this
3:53
on some of my shrinking facilitators for
3:56
several years now. And you know,
3:58
literally hundreds of students have been
4:01
shrinking panels. And in these shrinking
4:04
facilitators, not one of them has
4:06
failed. And the students can be pretty
4:08
rough sometimes with the the shrinking
4:10
facilitators. They don't always hit in
4:12
the right spot and stuff. You're
4:14
supposed to hit right in the center at
4:15
the deepest point. They'll they'll hit
4:18
other points. So, I do hit hit on the
4:20
top that you see later in the video,
4:23
you'll see uh me hitting uh on the flat
4:26
section squashing the the gathers down.
4:29
What this will do is it it allows a
4:33
method for easy shrinking without having
4:36
to buy an expensive power hammer or
4:39
other type of shrinking tool, which is
4:42
of often considered as a way that is
4:45
like the only way to shrink. In my
4:47
classes, I show that these really work
4:50
really well. You can see in the video
4:52
the results I get after less than 10
4:55
minutes. We're we're we've got probably
4:57
80% of the shape in this panel in in
5:01
less than 10 minutes. So, they do work
5:04
amazingly well. Now, we're going to go
5:06
into the actual build and construction
5:08
technique of this shrinking facilitator.
5:12
And this would be a common method on all
5:15
the other designs which we can also show
5:19
some of the other ones I have. This
5:21
wouldn't be a universal one. You might
5:24
want to consider having several of these
5:26
shrinking facilitators in your shop.
5:29
Just like you might have several stumps
5:31
in your st in your shop. You can have
5:33
several of these and they would have
5:35
different circumstances that you would
5:37
use them for different parts. If you're
5:39
a motorcycle guy, you can make them so
5:42
that they look similar to a motorcycle
5:45
tank. That will be a specific use for it
5:47
is just to make motorcycle tank paths.
5:50
Make one of these to make uh fenders
5:52
very easily. So, you can do your
5:54
shrinking on any of those motorcycle
5:56
parts. And if you're doing just smaller
5:58
patch panels, you can make a big one
6:00
like this and you could have three or
6:03
four different concave depressions in
6:06
the surface so that it would give you a
6:10
wide variety of circumstances for
6:12
different panels and it wouldn't take up
6:15
too much space. Just having, you know,
6:17
five or six of these is not a problem
6:18
for me. So, so now we're going to go
6:20
into the actual construction technique,
6:23
which is relatively simple. Just a few
6:25
tools you can see here. Here's the list
6:27
of materials that you would need. These
6:29
are all common materials in the United
6:31
States. There'll be metric measurements
6:34
in the rest of the world except for
6:35
Canada. I guess Canada uses the inch
6:38
method, too. So, and I've read maybe
6:41
even Australia and lumber is with the
6:43
inch. So, here's the the basic stack of
6:45
lumber. I got a radio lamp. So, here I
6:48
am cutting the first pieces. I've
6:51
decided on the size I want for the
6:54
shrinking facilitator, which is going to
6:56
be doing these tire covers. These are
6:58
the modular center sections. So, what I
7:02
did is to ensure it's a very important
7:04
that you have nice square cuts on this
7:07
and that they're all the same size. So,
7:09
I just sheared up a little master
7:12
measuring tool out of a piece of sheet
7:15
metal. And I use that measuring tool
7:18
over and over again until I get enough
7:20
uh modular segments. So here I am
7:23
putting the uh the wood in against the
7:25
back of the saw. And then I've got the
7:27
measuring tool and I'll go to edge of
7:29
the carbide blade on the radial saw
7:31
there. So they'll all be the same based
7:34
on this instead of using a tape measure.
7:36
Tape measures are very iffy. You can be
7:39
16th of an inch or better off and this
7:41
will put it right on the money and you
7:43
want them pretty close. So here we go.
7:45
you're cutting through. So, uh, here is
7:49
the assembly now. And what we're doing
7:52
is we've got all the modular inserts
7:54
cut. And we have a picture frame of the
7:58
2x10s surrounding the modular inserts.
8:02
And now it's time to screw it together.
8:05
So, I clamped one end with a bar clamp.
8:08
We got that clamped to start with. And
8:11
now all these boards, they not they're
8:14
not dead flat. So, they're kind of
8:16
cupped a little bit. So, you got to
8:17
clamp them up. And I've tried clamping
8:19
them together before. So, on this one, I
8:22
did a little bit different deal. I made
8:25
uh the sideboards a little bit longer
8:28
here. Well, here here I am. Uh just uh
8:31
making sure everything's even and square
8:33
here. I got a nice flat steel top bench.
8:36
Just feeling with my thumb there that
8:39
it's all flush. And I'm going to put my
8:41
initial screws in in the picture frame
8:43
here. I'm going to pre-drill them. so I
8:45
don't crack them. Um, these are sheet
8:48
met sheetrock screws and sometimes you
8:51
you can run them in without pre-drilling
8:53
them. I'm just pre-drilling the outside
8:56
picture frame part, not the end grain
8:58
that I'm going into. That will go right
9:00
in without cracking. So, just to be a
9:03
little insurance it doesn't crack. Drive
9:06
that in. That's flush down there. And
9:08
then I'll adjust it and get the bottom
9:13
drilled and and put in. A little little
9:15
process you have to go through. Make
9:17
sure everything's nice and square. Um,
9:21
again, making it flush. And I'm on the
9:24
other side now. Putting my screws in on
9:26
the other side.
9:29
And these are, I think, 3-in long
9:32
sheetrock screws. Um, they're pretty
9:34
common here in the US, too. So, I think
9:36
they'd probably be there something
9:38
equivalent all over the world. They're
9:40
harden sheetrock screws or screw nails
9:44
sometimes they're called too. They're
9:46
about uh a number 10 or number 12 size
9:49
sheet. I think 10 number 10 sheetrock
9:52
screws. That's the diameter. Again, that
9:54
might be a different measurement in
9:55
metric in the metric part of the world.
9:59
So, we're flush on this end.
10:01
Again, we're doing the pre-drill, trying
10:04
to drill into the center of the uh the
10:08
end of the picture frame there.
10:11
So, we bite into the center of the end
10:13
grain. Now, the overall size of this
10:16
whole uh shrinking facilitator was
10:18
determined by its end use, which was
10:21
going to be these spare tire covers or
10:26
in a wheel wells. So that made it I
10:29
think a 31 inch diameter I think I
10:32
chose. So it's basically I just took a
10:36
big compass and I made a cardboard
10:39
template. I think you'll see that later.
10:41
It can do smaller and a little bit
10:44
larger
10:45
um size than that also even though it's
10:47
you geared towards 31 in. So here we are
10:50
still putting the screws in on the
10:52
picture frame. Now I believe this is the
10:55
other end. Now, with bringing that tight
10:57
up bar clamp, you can see the wood's cup
11:00
there. Um, depending on how well you
11:03
select the wood, some of the wood that's
11:05
available is always going to have a
11:07
little bit of a cup to it. So, and
11:09
that's not going to hurt anything. So,
11:11
we're going to get the hammer probably
11:13
and drive that, manipulate it a little
11:15
bit with the hammer. Yeah. Get that down
11:17
a little. And sometimes they're a little
11:19
bit difference in width, too. So, you
11:21
can see it might be a little proud on
11:23
the top a little bit here and there.
11:25
that doesn't mean anything on this this
11:27
circumstance.
11:30
So, tightening that up and and the
11:32
wood's not really given. It's still
11:34
going to be remaining cup, but the the
11:36
screws will hold everything together
11:38
very well. So, that's the screw there.
11:41
That's a 3-in sheetrock screw or screw
11:44
nail it's called. And these boards are
11:47
inch and a half wide. So, you can see
11:49
the penetration it's going to give you.
11:51
So, continue to put the uh screws in on
11:53
that end. This picture frame is is
11:56
really important and and as as the cuts
11:59
of the modular units, you want this all
12:03
nice and square and nice and tight. So
12:07
now we got the picture frame done. And
12:09
now what I'm doing is like I said
12:12
before, I made a little change on this
12:14
one. I made the side pieces of the
12:16
picture frame a little longer. And now
12:19
I'm making these um little wedges to
12:22
actually do the clamping for me by
12:24
utilizing that longer length side piece,
12:28
which you'll see in a minute here. So,
12:30
these are just little quick wedges that
12:31
I'm making. Uh turns out these are 2x4
12:35
construction lumber, giving it that
12:36
little bit of angle there.
12:40
I'm going to make two of these, one for
12:42
each side. And this will give a a real
12:45
nice uniform clamp to clamp all those
12:48
modules nice and tight so I can screw
12:50
them into the side pieces.
12:55
So I got it all marked out. Now we're
12:56
just going to bandsaw it. If you don't
12:58
have a band saw, a little jigsaw will
13:00
work fine. So bandsaw this out. And the
13:04
initial cut turned out to be a little
13:07
wide. So now I'm trimming them about a/4
13:11
of an inch or so.
13:13
because they wouldn't go in the slot.
13:14
They were just a little too wide. So,
13:17
going to trim those down about a quarter
13:19
of an inch. So, I got the taper on the
13:21
other side. And this is the uh straight
13:25
piece, I believe.
13:32
So, now you can see the wedges have been
13:34
made, and
13:36
there's the end of the picture frame,
13:38
which is a little longer. And my intent
13:41
is to cut this off after I'm all done
13:44
and just leave the the last piece of the
13:47
modular piece which will become the end
13:49
of the picture frame. You'll see later
13:51
on it turned out that having this extra
13:54
was a real good thing because it makes
13:56
like a built-in handle to roll this
13:58
around and if I ever have to take the
14:00
the modules out ever again, I I'll be
14:03
able to use that clamping uh capability
14:06
there. So, so you drive those wedges in.
14:10
Turns out I had to drive them in a
14:11
bunch. So, I had to slide it over to the
14:14
edge of the bench, which allowed one of
14:16
the wedges to go below the edge of the
14:18
bench.
14:20
So, it tightened it up really nice.
14:23
And it'd be really awkward doing this
14:25
with clamps. I've tried it before cuz
14:28
you have a clamp, you only have access
14:30
to one side, which was here I am trying
14:33
to massage them a little bit. So if you
14:35
try to clamp it just on the top, it
14:37
squeezes the top, but then the bottom
14:39
kind of hinges out on you and you can't
14:41
get to the bottom because it's sitting
14:42
on the table. So you have to have a real
14:45
special setup to be able to use clamps.
14:48
So these wedges are much superior. And
14:49
that it just turns out that that little
14:52
extra on the picture frame, leaving that
14:54
little opening for the wedges to use
14:58
turned out to be a really good thing.
15:00
So, anyone any one of these I make in
15:03
the future, it's definitely going to
15:04
have that little feature.
15:07
So, I get a built-in handle and I have
15:09
the ability to really clamp it up really
15:12
easily.
15:14
So, it's starting to look kind of cool,
15:16
too. And remember, this is soft wood.
15:19
This isn't hardwood at all. It's um I
15:21
believe it's spruce. It can be some
15:23
pines, too. And it's, like I said, it's
15:26
it's soft construction lumber. They
15:28
usually use uh this to for roof rafters
15:31
or something up on the roofs of just
15:33
about every American home that's wood
15:35
wood stick built home they call them
15:38
which is the predominant type of home in
15:40
the United States. Uh
15:43
so you can see now that wedge has to be
15:45
driven below the bench surface. That's
15:48
why I had to can lever it off the edge
15:50
of the bench a little bit. We're driving
15:52
that down, squeezing it up. And that's
15:54
given a nice even squeeze both the top
15:57
and the bottom there. Like I said
16:00
earlier, there's a lot of cupping in
16:01
this wood. So you can see a little gap
16:03
on some of them, but that's not a big
16:05
deal. So we got it all clamped. And now
16:07
I've numbered it. You can see each
16:09
module has a number. And that locates
16:11
the module for for uh which side it goes
16:14
into. also 24 modules I believe al
16:17
together cuz number 25 is actually the
16:20
end of the
16:22
of the picture frame. Now I'm marking
16:25
the center of where each module comes up
16:28
on the side of the picture frame. The
16:31
reason for this is I'm going to have a
16:33
little square and then project that line
16:35
down. So when I screw them all together,
16:38
I'll make sure I try to hit as close as
16:40
I can the center of each little module.
16:43
These are necessary little tasks. So now
16:45
you see the projected lines, a little
16:47
square there. Then I'm going to put
16:50
three screws per each module, right?
16:52
They go just going approximately in the
16:55
center of each module. And then I'll put
16:57
some lines which will give me a little
16:59
guide for where I put the put the
17:02
screws.
17:04
I get a straight edge. I'm going to
17:06
connect those little dots.
17:08
And as you can see, I don't follow along
17:11
perfectly, but uh I'm close. I'm in I'm
17:15
in the ballpark here. So,
17:18
all right. So, I got my line. So, all
17:20
those intersections are where screws are
17:22
going to go. And this will make this
17:23
thing a really super strong structure
17:27
cuz there's quite a few screws in there.
17:29
Okay. So, now you've seen the lines. Um
17:31
I'm deviated from the the intersection
17:34
points a little bit. So there's all the
17:36
screws, three per module, and we did
17:39
this on both sides. So now you can see
17:43
that that's a really, really structure.
17:46
Now I've tipped it over here. U this is
17:49
the bottom now because it's really
17:50
solid. We flipped it over on the bench.
17:53
And now what we want to do is measure up
17:56
a plywood bottom for it. So, I've
17:59
measured that assembly box, the
18:02
perimeter of it, and I'm going to cut
18:04
this plywood
18:06
to close off the bottom. I use a little
18:10
skill saw here, and cut this plywood
18:14
first, the end length, and then the
18:16
width. So, now the wood's all cut. We're
18:20
pretty flush,
18:22
and we left that handle extended section
18:25
open because the wedges are in there. So
18:28
now we'll put three or so screws in in
18:31
the uh the bottom on each end. And then
18:34
also now what we're doing is um on the
18:37
the bottom plate we're also making the
18:40
stand which will hold the casters.
18:43
So cut up some more uh 2x10 stock with
18:47
in offset it a little bit inboard.
18:52
Cut some more stock up. So there we have
18:55
the riser for the the shrinking
18:57
facilitator. And this we're going to
18:59
screw nail together also. And we'll
19:02
clamp this up. We'll put three screws
19:04
per each board for each intersection.
19:08
So there'll be 12 screws holding this
19:10
together. And eventually we're going to
19:13
put a top piece on it. You'll see this
19:15
in a minute after we get the screws in.
19:20
And the top piece is the interface for
19:22
the casters.
19:27
So, we're getting this all screwed
19:28
together. Now, here the are the top
19:31
pieces. These are 2 by sixes or 2x8s. I
19:35
can't remember. I think they might be
19:36
2x8s.
19:38
No, they're 2x six's. Yeah, 2x six's
19:42
uh which is big enough for the casters
19:44
that I'm using. So far, uh I think I'm
19:47
in the ballpark as far as what the
19:49
finished height is going to be. But um I
19:51
measured my other shrinking facilitators
19:53
and some of them are low and if they're
19:55
low you got to bend over more and I'm
19:57
tall so I get a lot of complaints from
19:59
my students that as tall as I am that
20:02
all my stuff is high so I've got a
20:04
little bit of variety in the shop but it
20:07
favors being tall in my shop pretty
20:10
much. So this one I decided I was going
20:12
to go a little bit taller. So, uh, we
20:15
put, uh, this piece on here to hold the
20:18
casters, and I said, maybe I could make
20:21
it a little taller. So, I threw another
20:24
piece on top of those. That gained me an
20:26
inch and a half more height. And the
20:29
caster, I think, is about 6 in tall
20:31
total. Nice, nice quality caster. We're
20:35
We're fitting up the casters here with
20:37
just that. And then we decided, okay,
20:39
we're going to put the extra wood on.
20:40
So, we screwed the first set of 2 by
20:43
six's on. And now we've added an
20:46
additional set of 2 by six's
20:49
and we're going to screw the cast is
20:52
using um lag screws, which are heavyduty
20:56
screws. We're going to pre-drill these.
20:59
Again, we don't want the wood to crack.
21:04
And uh general rule of thumb is if you
21:07
try to do something like this without
21:09
pre-drilling, you're going to get a lot
21:10
of cracking going on. So it's just a
21:12
good safe bet to uh insurance to
21:15
pre-drill a little bit. So
21:19
I measured the screws. They were about
21:21
uh 3/8 or I think no 5/16 lag screws. So
21:25
they were 200,000
21:27
drill or so. Um I used to do a pilot
21:31
hole. So now I think I got all the holes
21:33
drilled and we get these located. These
21:36
are nice high quality casters.
21:40
They're pretty rugged. You want a pretty
21:42
good caster on there. If you um go on
21:46
the inexpensive side on the caster and
21:48
the thing fails, um you know, it's a
21:50
pain to have to tip it all over again
21:52
and put another set of casters on it. So
21:56
I bought these nice high quality
21:58
heavyduty casters. I got a driver
22:01
driving those lag screws in.
22:05
I think they had a 9/16 head. That would
22:08
be 14 mm. So, I got some flat washers
22:11
and I got lock washers. There's the
22:13
setup there. The lag screws I believe
22:15
were 2 in long. Um 5/16 lag screws, 5/16
22:20
diameter. That' be 8 mm. All right. Now,
22:23
see there's the whole assembly. That
22:25
plywood has to be screwed first to the
22:29
the base support system with the casters
22:32
and then lastly to that plywood will be
22:36
screwed to the the shrinking facilitator
22:38
which we do last. Mark that piece of
22:42
plywood. I know where that is going to
22:44
interface. I'm going to tip it upside
22:46
down.
22:47
And I'm going to put the plywood on
22:49
there
22:51
using those uh magic marker lines to
22:54
locate myself.
22:57
And I'm going to screw nail that down.
22:59
These ones uh I didn't pre-drill. They
23:02
generally go through plywood without
23:04
splitting or anything. There's no
23:05
splitting problem with plywood. So,
23:07
we're trying to aim for the center of
23:10
each board. So, now we got that all
23:13
secured. Now, this is a 31 inch circle I
23:17
did with a compass.
23:19
And this is I'm getting the placement of
23:22
where I'm going to do the depression,
23:25
the concrete concave depression in this
23:28
uh shrinking facilitator assembly.
23:32
So, I'm trying to line it up. And right
23:33
now, I can see I'm offset a little bit.
23:35
So, I'm not right. This is a mistake.
23:38
You can see the modules. I'm to the left
23:41
too much by one board. So, I don't know
23:43
what I was thinking and I'm doing a
23:45
video and I'm trying to do a couple
23:47
things and I made a mistake. So, okay.
23:50
Now, I've it looks like I've adjusted it
23:52
over a little bit. I changed the color
23:54
of the pen. You can see the first line
23:56
was a mistake and then the second line.
23:58
So, now those are my
24:01
where my cuts are going to be. And now,
24:04
unfortunately, to cut them uh with a
24:06
stump, you have to take a chainsaw or
24:09
and you have to hog out the whole inside
24:12
of of this whole uh top surface, and
24:16
it's a real pain. But this one, uh
24:18
you're going to have to unscrew the
24:19
whole thing again with a screw screw
24:21
gun. It comes apart pretty quickly. So,
24:24
everything's numbered, and it's going to
24:26
go back the same way and everything. So,
24:30
take all the screws out and we're going
24:32
to release all these modules and we're
24:35
going to start in the center
24:39
and we're going to cut the modules on a
24:41
band saw. Again, you can use a jigsaw.
24:44
You can even use a hand jigsaw if you
24:46
don't have a jigsaw. So,
24:49
there's always a way to do it
24:50
inexpensively. So, now I have the mark
24:53
from the cuts. You can see the two
24:56
little red marks there. And this is the
24:59
profile gauge I made for the center.
25:03
And the center two modules are going to
25:05
be cut to this one. So I've taken the
25:08
center two modules out. I'm going locate
25:10
it. I'm going to trace that line. And
25:13
then I'm going to bandsaw that out.
25:24
So now I have the center modules cut.
25:28
They go back right where the number is.
25:31
And using that cut, I take the offset of
25:34
the pen. And this is how I've made a lot
25:37
of them in the past. And I wasn't really
25:39
thinking this is this was actually a
25:41
little different because I didn't take
25:43
into account that the ark line was going
25:46
to come down a lot faster.
25:49
So, I ended up overcutting a lot of the
25:52
pieces. It was a mistake and I said, "Oh
25:55
boy, I got to do this all over again."
25:57
So, I use about a quarter inch offset
26:00
just by using the pen.
26:03
And what I needed to do was to project.
26:22
You can see the arc cut. So I'm cutting
26:25
again another module here on the band
26:27
saw.
26:30
And it it the mistake didn't really
26:32
manifest itself until about eight eight
26:35
modules in or 10 modules in.
26:42
So it's looking good there. But you'll
26:44
see in a little bit that there's a
26:46
little mistake. Now you see there's a
26:48
mistake here too. I should have observed
26:50
it right away was that that red line
26:55
is my stop line. And I my cut should be
26:58
going all the way to that red line.
27:01
See, I'm I'm about 4 in away from that
27:04
red line. My this offsets at least a
27:06
quarter or so.
27:10
And they don't have to be perfect.
27:13
So, one after another, I did them. About
27:17
3/4 of the way through, I said, "Uhoh,
27:20
this isn't what I want. I made a
27:22
mistake." So, as you can see, as you're
27:25
developing this, the cuts become less
27:28
and less and less because you're losing
27:29
a quarter of an inch less every time.
27:33
So, they get really kind of small at the
27:35
end. So, most of the mistake was right
27:37
in these these U modules here. What
27:41
happened was I went with my cut beyond
27:44
where the arc line is and I'm not
27:47
anywhere near the red line. So I have to
27:50
cut the the long part out again too.
27:54
So cutting the long part out was not a
27:56
problem. But overcutting
27:59
this end here, you can see right about
28:02
here. I think I believe I'm already
28:04
overcutting. And for some reason I was
28:06
just blind to it. Um, it's a part of the
28:09
problem when you're doing anything. You
28:11
got to be constantly vigilant for
28:14
mistakes because the little vigilant uh
28:16
the little demon of uh mistakes jumps up
28:20
all the time trying to foil your plans.
28:22
So, you can see here uh I'm way beyond
28:26
that arc line and I just didn't see it.
28:29
I was thinking about doing the video
28:30
more than anything else. I think we
28:32
continue on and we get all the end ones
28:35
done. And you can see now I'm so far
28:38
beyond the ark line. It's just
28:40
ridiculous. And for some reason, I was
28:42
just totally blind to it. Totally blind
28:45
to it. Okay, now now you can see what
28:48
happened. My my nice half circle has
28:51
turned into something. It's not like a
28:53
half circle at all. And I go, "Oh boy,
28:55
what did I do?"
28:57
So, at this point, I'm saying, "Oh, I'm
29:00
going to scrap this thing and start the
29:02
whole video all over again." But there's
29:05
always a fix. So, you got to think about
29:07
it a little bit. And I decided that uh I
29:11
could put little inserts in and uh cut
29:14
it again with the inserts. or because it
29:18
these cuts were so small, all they had
29:20
to do is turn the modules over and use
29:23
the other side of them, which did
29:25
they're not going to get any abuse on
29:27
those ends anyways. Those ends are not
29:30
where the work is performed. Now, what
29:33
I've decided is, okay, so now I've
29:35
redone the line and now it's in blue.
29:39
And now I've made the correction by
29:41
flipped the modules over and I'm
29:44
recutting them. Now you can see I
29:46
instead of going the quarter inch over
29:48
here, I have to be uh aware of that
29:51
descending line from the arc on the
29:54
other side. So I can't go beyond the the
29:56
lowest point of that arc line. So you
29:58
can see instead of a/4 in offset right
30:01
on the end there, it's like half to 3/4
30:03
of an inch offset. So the correction was
30:06
good, but I'm supposed to be down to the
30:09
blue line, too. So I'm going to have to
30:11
recut the ends the other end a little
30:13
bit. But that was pretty simple. So I
30:16
ended up even though I made a major
30:18
mistake and was pretty frustrated. Here
30:20
it is all fixed. Um there are some cuts
30:24
on the other side, but they they're not
30:26
going to have any significance
30:27
whatsoever. And I saved the wood. Don't
30:29
don't be despared. Uh if you make a
30:33
mistake, there's always a fix somewhere.
30:35
So you can see the little segmentation
30:38
here. Now that has to be all ground out.
30:41
I use a little uh Milwaukee 5 in grinder
30:45
with a 24 grit. And you can see if you
30:49
if you angle the band band saw or angle
30:51
your jigsaw, you can probably not have
30:54
to grind so much. But I've always found
30:56
that to be a little bit of problem doing
30:58
the angle. So, but uh somebody's a
31:01
little more proficient at wood cutting
31:03
might get it better. So, now I'm outside
31:05
because it's really dusty and we This
31:08
was a December day. It was actually
31:10
about 45 or 50 degrees out there, so it
31:14
wasn't bad at all. No snow, nice clean,
31:17
fresh air.
31:19
And this 24 grit does a quick number on
31:21
this soft wood. It just bites it out
31:24
really good. You got to be careful with
31:26
these little grinders that u they they
31:30
don't get snagged with one of the edges
31:32
and it'll it'll jump and it'll bite you.
31:35
So, you know, get hit in the leg or
31:37
something with it. So, you got to be
31:38
really careful. So, I'm holding it
31:39
really good. I try to be careful about
31:42
the angle that I'm attacking the wood
31:45
at. It's uh
31:47
a lot of dust. So, I got a dust mask on.
31:50
I've got a nice shield on and protect my
31:53
eyes. I I got a jacket and everything.
31:57
And I got air hose out here. We're going
31:59
to blow the the dust away. You can see
32:02
how fast that will clean up that that
32:04
mess. If you do this with hardwood, it's
32:06
a lot slower.
32:08
So that 5 in works really good for this
32:11
nice little curve. So I could, you know,
32:13
walk it in like you see there. And later
32:15
on I run it uh right in the arc of the
32:19
depression. So I'm roughing it out here.
32:22
Probably took all total about maybe half
32:25
an hour or so. Uh doing this I took a
32:28
little break. You know, you get a lot of
32:29
dust on you. So I blow the dust off and
32:33
I came inside, got warmed up a little
32:35
bit and took a little break. And then I
32:38
came back out and
32:40
did it some more. Found found a little
32:43
few high spots here and there. And we're
32:46
checking it all out.
32:53
So here I am using the uh the 5 in
32:57
size of that grinding disc to get a nice
33:01
arc in there.
33:03
Now, it turns out I should have spent
33:05
probably about 10 more minutes grinding.
33:07
There was a few little high spots I left
33:09
in it, but they're in spots that I'm not
33:11
really going to use the capacity of the
33:14
concave shrinking facilitator surface
33:16
of, so it really didn't matter too much.
33:19
I I try to do everything in as nice as
33:22
possible, always, but you know, you're
33:24
always under that gun of getting a job
33:26
done, so you have to make some
33:29
compromises. So, I could have sanded a
33:32
little bit more, but it actually came
33:34
out pretty good. Now, you can see right
33:36
there, I've got a little spot. There's
33:38
like a little notch from the cutting. I
33:40
think there was three notches left that
33:43
I didn't sand out. Again, if I went
33:45
another 15, 20 minutes or whatever, I
33:47
would have got those out, but they're
33:50
not going to be uh uh of any consequence
33:53
either. So, it's starting to look pretty
33:55
nice, too. It's a nice little sculpture
33:57
in itself. So, now I have it in the
33:59
shop. It's all finished. We're just
34:02
admiring it. Now, you can see that I
34:04
knocked the edge off, the lip edge on
34:06
the uh radius. And I want that knocked
34:09
off because um if any any place where
34:11
it's going to chip, it's up there. So,
34:14
and I wanted a soft edge there. So, uh I
34:17
knocked that radius ba basically all the
34:20
way around, but mostly on the radius
34:22
part, but even on the uh inboard part of
34:24
it, too. So, as far as the depression
34:26
itself, it's probably about 4 in. I
34:29
didn't measure it yet, but I think it's
34:31
4 4 1/2 in deep. Now, this is the uh
34:34
EPDM uh rubber roofing material I spoke
34:38
about earlier that I find at Home Depot,
34:41
but it's it's available world worldwide.
34:43
I checked it out on on a search on on
34:45
Google. It comes with this backing which
34:48
protects the self adhesive. And it's
34:52
pretty thick, too. It's uh 16th of an
34:54
inch thick or so, maybe a little bit
34:56
thicker. So, you want to have this uh
34:58
shrinking facilitator all dusted off
35:00
good. We've blown it off really good.
35:02
It's nice. Of course, it's all clean,
35:04
fresh lumber. Even sanded the top a
35:07
little bit. You see some of the numbers
35:08
are sanded off. You got to be careful
35:10
when you take this uh backing off that
35:12
it doesn't stick to itself. If it sticks
35:14
to itself, you will not get it apart.
35:16
So, so I'm going to have about a 3 or 4
35:19
inch overhang on the edge. I was
35:22
intending to put um some heavyduty
35:25
Gorilla duct tape
35:27
um securing all that, but it turned out
35:29
that self adhesive was so good that I I
35:32
would I didn't need to duct tape it. So,
35:35
it and this stuff uh is rubber, so it
35:38
actually stretches, so it'll conform to
35:41
these concave double curvature surfaces.
35:46
So, we scoot around and we pull that
35:48
backing pad off. And we want to try not
35:50
to get any air bubbles. So, we got to
35:52
work work it good. We don't want any
35:54
kinks or anything. So, it's almost like
35:57
upholstery work here. Making sure that
35:59
you get it nice and smooth.
36:04
Burnishing it in a little bit.
36:08
Trying to get all the air bubbles out.
36:11
No kinks, no wrinkles.
36:20
And I pre-cut those. So now I got the
36:22
first one down. Now I'm doing the second
36:24
one. And I'm going to do about an inch
36:27
and a half, half of overlap.
36:35
So I don't know which way this thing's
36:37
going to ride on me. And it turns out it
36:40
it uh the inch and a half worked good.
36:42
So, I didn't have a a gap anywhere. You
36:44
got to be very careful, like I said,
36:46
when you're putting this down, not let
36:48
it stick to itself when you're taking
36:50
off the back or not to uh put it down
36:54
prematurely in the wrong spot because it
36:57
doesn't want to come up. I think there
36:58
might be a little shot of me trying to
37:00
manipulate it and it just it doesn't
37:03
want to cooperate. So, it's it's a once
37:06
it's set, it's set. That said, if you
37:08
ever have to change this, um I think you
37:11
can take a heat gun and and heat it up a
37:15
little bit with a heat gun and then it
37:17
would release
37:18
and you can get this off and you could
37:21
put another coating if you had to. But
37:24
once I started using this, I've never
37:26
had a module crack ever again. prior to
37:29
not having any surface uh treatment such
37:33
as this EPDM, um the modules would crack
37:36
like every class I'd have to replace a
37:38
module or two. And so that got old and
37:41
that was the incentive to figure out
37:44
what to do and uh I just found this the
37:47
first roofing material which I mentioned
37:49
before was the asphalt base which worked
37:51
fine but it had the the problem of
37:54
leaving the residue on the panel. Now,
37:56
this this doesn't have any asphalt
37:59
except you can see this little shiny
38:02
black edge on it. There's a there is a
38:05
little bit of of asphalt or something
38:07
showing on those black edges. They here
38:10
my here I'm trying to pull it apart and
38:12
it just doesn't want to cooperate
38:13
because I wanted to move it but it it
38:17
just wasn't coming the right the way I
38:19
wanted it to. So, I think
38:22
let's see.
38:24
I got it up that far. Now I'm trying to
38:26
pull it over here. It ain't It's not
38:29
coming. So you can see how strong that
38:32
stick is. So I says, "Oh, forget about
38:34
it." So we we stuck it back on. And what
38:39
we had to do because it's rubber, you
38:41
can actually turn it a little bit. You
38:42
see I wasn't going to overlap on that
38:44
back pos portion of it there. So now I'm
38:47
turning it a little bit and I was
38:49
worried about wrinkles. But because it's
38:51
rubber and it stretches, it's um walking
38:55
right in where I want it to. So, it's
38:57
not bad at all.
38:59
So, it's a nice little feature of it.
39:01
And this overlap doesn't have any effect
39:03
on its use later on. So, so we started
39:06
in the center and we work our way out.
39:08
Now, we're down to the edge. And uh
39:14
we're doing the edge pieces.
39:18
And it turns out I got two rolls of
39:19
this. Um, and that was a guesstimate.
39:22
Um, and it turned out to be perfect. I
39:24
only had like maybe a foot and a half of
39:27
material left over. So, it worked out
39:31
absolutely perfect. It was no plan or
39:33
anything. It was just a good guess, I
39:35
guess.
39:37
So, you can see I've got a little
39:39
showing on the right side. The left side
39:41
now I've got done. Doing a little bit of
39:43
crude upholstery work here. Trying to
39:45
get the corners to lay down good. So,
39:47
I'm going to make a little relief cut.
39:50
And I need some of this material. That's
39:52
all I got left. So, I need that material
39:54
for the other side.
40:01
It'll give you a lifetime of service,
40:03
too. The these things uh like I said,
40:06
this my my students, they do everything
40:09
possible to abuse these, and it takes
40:13
them. So, um, the idea is to hit it
40:17
always at like the 12:00 to center of
40:19
the radius position, right at the
40:21
bottom. I find students hitting them
40:23
every which way. I don't know why they
40:25
do that, but they do. So, I have to keep
40:27
correcting them. And you don't want to
40:29
hit up by the edge is that's where it's
40:31
more fragile. So, um, but even that even
40:35
say like the students do hit up by the
40:38
edge and they don't break. I've never
40:40
had one break since I've been using this
40:42
material.
40:44
Now, what I'm doing here
40:46
is that that's all completed. And now
40:48
I'm making a paper patent for the piece
40:53
of sheet metal that I'm going to use to
40:56
try out the new shrinking facilitator.
40:58
So,
41:03
I'm making a nice little arc. I could
41:05
have used a compress, but I just wanted
41:08
to do this is a quick little exercise.
41:10
is I didn't get the compass and I knew
41:12
what I wanted to do. So, I got a nice
41:14
little semicircle there.
41:23
That's the extra I figured I needed.
41:26
And I got a little extra there.
41:29
Now, I'm going to show you a cool little
41:32
tool. This is Anybody doesn't have
41:34
electric scissors. These are cordless
41:36
electric scissors. You got to get
41:38
yourself a cordless electric scissor. My
41:41
wife bought me a pair about 10 years ago
41:43
and she showed up one day with him on
41:46
the the dining room table. And I said,
41:49
"What's that?" She says, "Oh, it's
41:51
electric scissors." I says, "Oh, that's
41:52
just what I need." I says, "Why don't
41:54
you just throw the money away?" How much
41:56
did that cost? She says, "$11."
41:59
I said, "Just go out to the street and
42:01
throw it in the street." And I tried
42:04
them and I said, "Get me a pair." So,
42:07
I'm a I'm an electric scissors guy now.
42:09
There's nothing better than electric
42:11
scissors. So, now uh I'm using this P
42:14
paper to not only be my uh model for my
42:17
patent for the blank, but now you can
42:20
see what's going to happen as we use the
42:22
shrinking facilitator. See how that
42:24
paper bunches up? Well, the metal is
42:27
going to do the exact same thing. Exact
42:30
same thing.
42:36
It's going to ruffle up just like that.
42:38
Actually, the metal ruffles up better
42:40
than the paper. So, I've got I've got my
42:43
paper. And now, this is a first my first
42:46
sample piece that this isn't anything
42:48
like the semicircle. It's just got a
42:50
little arc on it. And using one of my uh
42:54
ProShaper mallets that we make and sell.
42:57
Here we are. These got delrin ends in
42:59
them. And
43:01
you know, you can see there's probably
43:03
like 25 hammer blows here. And it holds
43:07
the panel really well.
43:10
And you see these I call spontaneous
43:12
gathers.
43:13
And what the trick is to uh knock those
43:16
gathers down. Now, this is uh just
43:20
standard generic uh 20 gauge sheet
43:23
metal. It's 35,000.
43:26
That's I've been using a lot with the
43:28
class. 19 gauge was what I used to use,
43:31
but 19 gauge has become difficult to
43:33
find since they put the tariffs in. And
43:36
maybe it'll come back hopefully. Um, and
43:39
maybe it's available at a higher price,
43:41
but uh I I I have some 19 gauge, but 20
43:46
gauge is just really easy and generic to
43:48
get. And all my projects are most of
43:50
them are all going to be aluminum. You
43:52
can see that just like 25 hammer blows.
43:54
You can see how much shape has has
43:56
happened on that panel. Now, that
43:59
brought in English wheel and that's all
44:01
shrinking. There's only about, you know,
44:03
1% of stretch or so. So, here's the the
44:06
the the actual semicircle.
44:09
Um, that'll be a tire cover.
44:13
And
44:15
we're just going to hit it on that red
44:17
line. That's going to pop up these
44:19
spontaneous gathers,
44:21
which we're going to take advantage of.
44:25
So, that's 1 2 3 4 5 6 7
44:30
8
44:32
nine hammer blows.
44:36
Nine hammer blows. put 10 11
44:41
12. This is a hefty hammer, too. It uh
44:44
moves the metal really well. Um if it
44:47
was aluminum, u you can be using
44:49
aluminum on this situation. And
44:52
aluminum, you could anneal that whole
44:54
edge that has to be worked if you choose
44:57
to. You don't have to, but it makes it a
44:59
lot easier. And the by the time you get
45:01
it done, it's all going to be back to um
45:05
a non-nealed state. So now we're using
45:08
the shrinking facilitator to
45:11
crush these gathers up. And we want to
45:14
make it so that we don't tip the metal
45:17
over on itself. As you tip the metal
45:19
over on itself, uh it'll it'll cause a
45:22
crack later on. So you can't you can't
45:24
allow a tip over. Now, I'm going to do a
45:28
really comprehensive shrinking video uh
45:31
in the future. I'll show a um a very
45:34
comparative
45:37
video on shrinking with various methods.
45:40
I've got my power hammer with my shrink
45:42
die and I've got uh another power hammer
45:46
uh which is a magio or hell hammer. I
45:49
can show you how they shrink there. And
45:51
I've got my my gathering tool that I use
45:55
and I got, you know, so it's going to be
45:56
a pretty comprehensive shrinking video
45:58
showing you the advantages and
46:00
disadvantages of every method. Now, this
46:03
method uh is very inexpensive.
46:07
That's what I like about it. 95% of my
46:09
students uh really don't want to spend a
46:12
whole lot of money on tools. So, this um
46:16
empowers you and inspires you to be able
46:20
to make a panel like this for
46:22
inexpensive money. So,
46:27
you can see that edge is coming over
46:28
pretty fast. And
46:32
I had a big supper, so I'm getting a
46:34
little winded, too. So, I'm taking my
46:37
time here. And I actually uh sat back
46:41
and uh relaxed a few minutes after. So,
46:43
we did this in a couple stages, not all
46:45
in one go.
46:47
So,
46:57
so I'm continuing to knock these shrinks
46:59
down or gathers down.
47:02
You can see the center section is
47:04
humping up a little bit. And the
47:07
situation here is that center section
47:10
will hump up and that'll be fixed by
47:13
more shrinking right where my left hand
47:16
is with the glove. That's all that
47:18
region from say
47:21
uh 8 uh 10:00 to 2:00 needs a lot more
47:25
shrinking. these regions from 9:00 to
47:28
the left side of the panel as you're
47:30
looking at it now to uh 10:00. Uh that
47:35
doesn't need as much shrinking. As you
47:36
can see, there's less uh gathering going
47:39
on there.
47:42
It's just in the center that you're
47:44
going to need a little bit more.
47:47
So, we got to do some here. So, we're
47:48
going to catch a little bit of it here.
47:52
And these just pop up amazingly fast.
47:55
And they go down pretty quick, too. But
47:58
you always got to be careful that you
48:00
don't tip the metal over. And you want
48:04
to see this hard spine, too. The hard
48:06
spine is the like the tectonic plates of
48:10
of uh earth movements. It's uh where
48:13
mountains are formed and or earthquakes
48:16
happen. It's the the the uh collision of
48:20
of the uh two tectonic plates and
48:23
they're basically going into each other
48:26
and thickening.
48:28
So the metal is thickening here. So now
48:30
uh if it looks like it's going to tip
48:32
over, I'll bring it up onto the flat
48:34
section and I'll knock those down. I
48:37
don't let every single hammer blow you
48:40
got to keep vigilant that that end of
48:43
the gather doesn't look like it's going
48:45
to tip over. So you it's very important
48:50
that you stagger your hits one side then
48:52
the other. I call it the half of the ice
48:54
cream cone. So you go one side of it.
48:57
You start at the tail and you work your
49:00
way towards the front. You can jump to
49:01
the front a little bit and close it up.
49:03
I call that coraling.
49:05
And um and you can see this is all
49:09
shrinking. There's been, you know, a
49:10
little bit of stretching when you hit it
49:12
with the hammer blow, which uh causes
49:14
the original u gathering.
49:18
Now, this one's a little steep, so you
49:20
got to be careful on this one. You see
49:22
that angle of the outer edge of it? If
49:25
it gets too steep, it'll tip over on
49:27
you. So, I'm crushing it down.
49:30
And I do have a regular stump, a big
49:33
one. And uh often times I'll knock those
49:36
down on the regular stump, but the
49:38
evenness works really good. So So all
49:41
this unevenness and roughness and stuff
49:44
um will once we finish our shrinking uh
49:50
procedure, then we will go to the
49:52
English wheel and smooth this out. to
49:54
get from this stage to, you know, like a
49:57
mirror finish on this thing on the
49:59
English wheel is probably about another
50:01
10 15 minutes to get that to be all
50:04
settled down. But we still need more
50:06
shrinking. You see how the center is
50:07
arked a little bit. So now we hit it
50:10
again. And uh this loves to shrink. You
50:14
can see when you hit it, all these
50:16
gathers pop up because now the metal has
50:18
already been trained that you wanted
50:20
shrunk. And all these gathers will just
50:23
keep popping up, popping up, popping up.
50:25
And I can't say enough about how good
50:28
that rubber EPDM works because it uh
50:32
just holds that panel for you so well.
50:38
And I got these nice thick gloves on.
50:40
They insulate the hammer blows and
50:43
they're very protective of your hands
50:45
and they really hold the panel. They're
50:47
kind of a gummy rubber glove. I found
50:50
them and uh at a discount store.
50:54
Work really, really nice. Now, sometimes
50:57
you'll see me flipping the hammer. I've
50:59
got um the low crown end and what I call
51:01
the medium crown end. I also have two
51:04
other ends, a um chisel end and a high
51:08
crowned end uh which I use for specific
51:12
applications. This is more of a general
51:14
application here. So, we're using these
51:17
two ends, but I flip them around. So,
51:20
now see, I can I'm using the low crown
51:22
to to throw the gathers up. See the
51:25
gathers jumping up and pointing to them.
51:31
So you can keep sending that edge up. So
51:34
it's probably about four or five in four
51:36
inches or so up now. And uh I can get
51:40
that to keep going just by where I place
51:43
it on the shrinking facilitator. That'll
51:45
keep coming right around. Okay. So in
51:48
this video I've shown you how well the
51:50
shrinking facilitator works. I'm not
51:52
going to smooth the panel out. Um
51:55
another round of of shrinking might
51:57
might be needed. But generally what I do
51:59
is I'm making a panel like that is I'll
52:03
do probably uh a good portion of the
52:06
shrinking in one go. And I try not to do
52:10
it 100%. I I do a good portion of it.
52:13
Then I'll bring it to the English wheel,
52:15
smooth it all out and then I'll go in
52:18
and give it another round on the
52:20
shrinking facilitator. And all total I
52:23
call this u step one in my class is the
52:26
u gross development of the shape. And
52:29
that's to get it to somewhere between 80
52:32
and 90% or so of development. If you if
52:35
you really got your skill sets honed and
52:37
you have the right tool there, a good
52:39
mallet, uh a shrinking facilitator, and
52:42
an English wheel, and those are all
52:44
inexpensive tools, too. They can be more
52:48
expensive. if you want more deluxe
52:49
stuff, but uh you can make them or or
52:51
buy them pretty inexpensively
52:54
and and make a part such as this that um
52:57
is very difficult to make uh in and with
52:59
other without using this type of method
53:02
or more expensive tools. I I'll do a
53:04
second round of shrinking and another
53:07
second round of planishing in the
53:08
English wheel. That will bring the panel
53:11
by this by the second time up to a nice
53:14
mirror finish. That is what I love so
53:17
much on on about the English wheel. So,
53:20
but this this video was all about um the
53:23
shrinking facilitator, both the
53:25
construction and its it's its
53:27
capability. I'm going to have another
53:29
video showing the comparative shrinking
53:32
methods later on this year. I hope you
53:35
enjoy this video and I hope you can
53:37
continue to watch uh this videos I make
53:39
in the future. constantly coming up with
53:42
new ideas and new techniques. Teaching a
53:44
class with people from all over the
53:46
world uh really inspires me. I get a lot
53:50
of my uh ideas and also um inspiration
53:55
from from those students. So um I'm like
53:58
a vessel for for the whole uh deal to to
54:03
keep getting it better and better and
54:04
better. It's not a stagnant craft by any
54:07
means. There's still so much to learn,
54:09
so much to improve, and I'm trying to
54:12
make a a contribution there. So, thank
54:16
you very much for your support if you
54:17
buy the video or any of my tools, and
54:20
we'll be seeing you and talking to you
54:22
soon. Thank you.