Up next in 10


Learn how to crochet a checkerboard baby blanket. Get the PDF - https://lullabylodge.etsy.com/listing/4314392580 coupon YOUTUBE35. Get the yarn - https://www.lovecrafts.com/en-gb/p/paintbox-yarns-simply-aran?utm_medium=affiliate&a_aid=7f83a24a Grab a FREE blanket size chart https://tinyurl.com/blanketsizechart
Join the NEW Facebook group and share your makes - https://www.facebook.com/groups/10087175301364318
Shop my favourite crochet & craft tools and materials -
USA - https://www.amazon.com/shop/lullabylodge?ref_=cm_sw_r_cp_ud_aipsfshop_6NYZ15JWQW8AH4XC7WZZ
UK - https://www.amazon.co.uk/shop/lullabylodge?ref_=cm_sw_r_cp_ud_aipsfshop_6NYZ15JWQW8AH4XC7WZZ
These links are affiliate links.
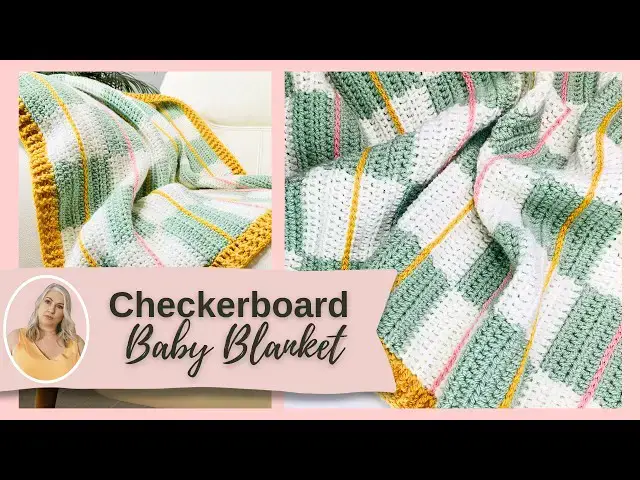
Get ready to make the most adorable and modern baby blanket with this step-by-step tutorial for my brand new Checkers Plays Pop baby blanket! If you've been searching for how to crochet a checkerboard baby blanket that's both fun to make and looks fantastic, you've found it!
In this video, I'll guide you through each stitch, helping you create a beautiful blanket with a playful checkerboard design. This pattern is perfect for adding a pop of colour to any nursery and makes a wonderful handmade baby shower gift. Even if you're a beginner, I'll show you exactly how to crochet a checkerboard baby blanket with clear instructions, making this project accessible and enjoyable.
Join me as we learn how to crochet a checkerboard baby blanket that will be cherished for years to come. This modern crochet baby blanket pattern uses simple stitches to create a stunning visual effect.
00:28 Stitch multiples
01:08 Start crocheting here
09:28 Surface crochet
13:01 Border prep
15:05 Ribbed border
Show More Show Less View Video Transcript
0:00
this baby blanket has a hidden trick
0:01
that's super simple but totally
0:03
addictive and it's all done with surface
0:05
crochet let me show you how to make this
0:07
eye-catching design without losing your
0:09
mind over color work so today I'm going
0:11
to be using some paint box yarns simply
0:14
Aaron you can use any Aaron or worsted
0:16
weight yarn you're going to need two
0:18
colors to make the checkerboard effect
0:21
and then you can use any colors you like
0:23
to add the surface crochet this is done
0:25
at the end so it's a great way to use up
0:28
some of those little odds and ends that
0:29
you've had lying around in your stash
0:31
for ages also going to need a a 5mm hook
0:35
some scissors and a darning needle to
0:36
sew in those ends so I've got this small
0:38
swatch here to help show you how we're
0:40
going to be making our blanket so we're
0:43
going to be starting off with the green
0:44
color and alternating between the green
0:47
and the cream ending with the green and
0:49
then the same in the rows you start with
0:52
the green and you end with the green on
0:55
at the
0:56
edge so we're going to be working in
0:59
multiples of 12 so you need to chain a
1:02
multiple of 12 plus one extra stitch but
1:05
you need to have those you need to have
1:09
an odd number of the multiples of 12 if
1:12
that makes sense okay so I'm going to
1:14
start with the
1:16
green just going to put a slip knot on
1:18
my hook
1:19
so for the purpose of the tutorial I'm
1:21
going to chain
1:22
37 which is three 12s plus one extra
1:27
stitch so you need multiple of 12 plus
1:29
one extra stitch but then make sure you
1:31
have an odd number of checks so I've got
1:35
my 37 chains and I'm going to start by
1:37
putting a half double crochet in second
1:39
chain from the hook so we've got one two
1:42
so a half double
1:46
crochet into
1:48
that second chain and I'm going to put a
1:51
half double crochet into the
1:55
next 10 stitches
2:08
so I'm going to keep going until I've
2:11
got 11 half double crochet okay so once
2:14
you've got your 11 half double crochet
2:16
we're then going to change to our next
2:19
color which in this case is going to be
2:21
the cream so we're going to work the
2:23
first part of our next stitch so it's
2:25
half double crochet into this next
2:27
stitch
2:29
and before we finish off that stitch by
2:31
yarning over and pulling through all of
2:32
those loops we're going to just drop the
2:35
green and pick up the cream and then
2:39
finish off that stitch with the
2:42
cream like
2:46
so and now we're going to continue with
2:49
a half double crochet in the next the
2:51
next 11
2:53
stitches but at the same time you want
2:55
to be working over that green tail we're
2:57
going to carry that across with
3:07
us okay so I've got a total of 11
3:10
stitches now in the cream so we're going
3:12
to change back to the green again on the
3:14
next stitch but before you do that I
3:17
like to just turn over the back here and
3:19
just make sure that this green yarn that
3:21
we've carried is lying flat sometimes it
3:24
starts to poke out through the stitches
3:25
so just give it a gentle tug just to
3:28
make sure it's completely flat and then
3:30
we're ready to change color on the next
3:32
stitch that's half double
3:35
crochet into that next
3:37
stitch just the first part of the stitch
3:40
and then we're going to drop that cream
3:42
to the back and
3:44
then pull through that stitch with the
3:47
green now you might need to just kind of
3:49
like tug this cream a little bit just to
3:52
adjust it to get the tension right and
3:53
then we're going to carry
3:54
on in the
3:56
next 12 stitches cuz we're at the end
3:59
now so we don't need to worry about
4:00
changing color at the end into our last
4:03
remaining 12
4:06
stitches and make sure you're working
4:08
over the top of the
4:10
cream as you go
4:17
along so I've worked my next 12 stitches
4:20
in the green and before we start the
4:22
next row I'm just going to turn it over
4:23
and have a look at the back and you can
4:25
see there's a few places where the white
4:27
is poking out so I'm just going to
4:28
gently pull that so it just lies flat
4:32
and then we're ready to start the next
4:34
row so we want to carry this white up
4:36
the side of our work and we don't want
4:38
to have any long floats while we're
4:39
doing this so the way that you can avoid
4:41
those long floats is just rest the cream
4:44
over the top of your hook and then chain
4:47
one and turn and this just carries that
4:50
white up the side without leaving long
4:52
floats and then we're going to start
4:53
with our half double crochets again so
4:55
half double crochet into that first
4:56
stitch working over that that white and
5:00
just gently pull that just so that it's
5:03
nice and snug and then we're going to
5:06
keep working our half double crochet
5:09
stitches and now we can clearly see um
5:12
where we need to change color cuz we're
5:13
just going to work a half double crochet
5:15
in all of the green stitches that we see
5:24
once you finish that first row it's very
5:26
easy to um work your color changes you
5:29
don't have to do so much
5:30
counting so we're going to keep going
5:32
until we get to that last
5:36
stitch and as again I'm just going to
5:38
check you can see look there's a few
5:40
places where that white is popping out
5:42
so just gently give it a little
5:46
tug before you change color and again
5:49
we're going to work the first part of
5:50
our half double crochet drop the green
5:53
and I'm bringing the green to the front
5:56
and finishing off that stitch now you
5:58
need to It doesn't make any difference
5:59
which color goes to the front or which
6:00
goes to the back but you always want one
6:02
of the colors to go to the front and the
6:04
back and this will save your yarn balls
6:07
getting all tangled up together
6:10
so now we're going to continue with a
6:12
half double
6:13
crochet working over that
6:17
green as we
6:25
go now you will notice that you you will
6:28
see um particularly with the white
6:31
you'll see little dots of the green
6:32
showing through you little dots of the
6:35
green showing through but I think it
6:36
actually looks quite pretty with those
6:37
little green dots
6:39
i think it adds to the overall
6:40
appearance of the finished
6:44
blanket okay so I'm at my last stitch
6:46
here i'm just going to give that green a
6:49
little tug to make sure that's
6:52
snug and then we're going to swap colors
6:55
again on this last stitch so cream is
6:58
going to the
6:59
back finish off that
7:04
stitch and then continue
7:09
in the
7:12
green so I'm at the end of the row again
7:14
so you really now you're just going to
7:16
continue and repeat that last row that
7:19
we did until you've got a total of eight
7:22
rows i'm just going to show you how to
7:23
carry that yarn again just so that just
7:25
to be sure that you know so you're just
7:27
going to lay that cream over the hook
7:30
chain one for your turning chain and
7:32
turn and then you're ready to start
7:35
putting your half double crochets again
7:36
for the next for the next row so you go
7:39
ahead and keep going until you've got a
7:41
total of eight rows so I'm going to
7:44
assume that you've gone ahead and done
7:46
your eight rows and I'm going to show
7:47
you how you now swap the colors over so
7:49
that you're starting with the cream and
7:52
working cream green cream
7:54
instead so let me just pull back this
7:56
last stitch so you're going to change
7:58
color on this last
8:01
stitch so we're going to put our half
8:03
double crochet into that last stitch
8:05
we're going to drop the green remember
8:06
we're always bringing one of the colors
8:08
to the front and one to the back so I'm
8:09
having the green to the front the cream
8:11
at the back finish off that stitch and
8:14
then again we're going to carry the
8:15
green up so we lay the green over chain
8:18
one for our turning chain and turn and
8:21
now we're going to start with half
8:22
double crochet in the first stitch as
8:24
normal we're just going to give our
8:27
carriage on a little tug just make sure
8:29
it's snug and then carry
8:32
on working in our stitch pattern as
8:36
normal working over the green
8:38
yarn and don't forget to check and
8:40
always pull that carriage yarn so that
8:43
it's not popping out anywhere and as you
8:47
can see here we've come to our last
8:49
green stitch so we're now going to
8:51
change from the cream to the
8:57
green like so and then carry
9:02
on with the
9:10
green so you're going to keep working
9:12
across and every time you get to the end
9:14
of the white you're going to switch to
9:16
green when you get to the green end of
9:18
the green you're going to switch to the
9:19
white so you're just going to continue
9:21
working a total of eight rows in that
9:23
color sequence and then you will change
9:25
back to the original color sequence so
9:28
once you've made your blanket as big as
9:29
you would like it to be you're ready to
9:32
add the surface crochet stripes and
9:36
these are even though it's an advanced
9:38
technique they they are much easier than
9:40
you you would
9:41
think so we're going to be working
9:46
along the width of the blanket and you
9:49
can see I've counted here one two three
9:52
four rows and let me just count here
9:55
where you can see one two three four
9:58
rows and where you have the gaps where
10:00
the stitches are coming from the
10:02
previous from from the following row
10:04
this is where you're going to insert
10:05
your
10:07
hook so I've alternated between the
10:10
mustard and the pink in my stripes but
10:12
you can use any colors you like so I'm
10:14
going to work this next stripe in the
10:16
pink so we're looking for the rows one 2
10:18
3 four so here you can see there's a
10:22
little hole here where the stitch is
10:23
going in so I'm going to put my hook in
10:26
there and I'm going to pull the yarn
10:29
through from
10:31
underneath like
10:33
so now don't worry about this first
10:35
stitch it's going to be a bit loose but
10:36
you we're going to finish that off at
10:38
the
10:39
end so you need to hold your yarn as you
10:41
normally would underneath your
10:44
work and then you're looking for the
10:46
next hole which is the next stitch and
10:49
you're going to go in pick up that yarn
10:51
from underneath and pull it through to
10:54
make a stitch now you want to work these
10:56
quite loosely otherwise you could end up
10:57
with the blanket puckering if you find
11:00
it easier you can go up a hook size to
11:01
do this so go into the next
11:04
stitch find that yarn from underneath
11:07
pull it through
11:11
whoops and you're just really it's like
11:14
drawing on the top of your crochet with
11:16
yarn
11:19
so you're just going to keep going
11:21
through each stitch
11:25
across working your surface surface
11:28
surface
11:33
crochet so you just keep working your
11:35
surface crochet
11:39
stitches all the way
11:41
across your blanket just coming up to
11:44
the edge now so I'm just putting my
11:47
chain stitches in those last few
11:49
stitches and then you're going to
11:52
finish by fastening off and this is
11:55
going to go over the edge of your
11:57
blanket like so so the chain stitches
11:59
are going all the way to the edge now
12:02
you need to kind of make that happen at
12:04
this end as well so we're going to use a
12:05
darning needle to do that so you just
12:07
want to thread your
12:11
tail onto a wool needle and then you're
12:14
just going to
12:15
go underneath the two
12:19
loops like
12:28
so and then you can just secure that at
12:32
the back and weave weave that end
12:34
in now when you work your border you
12:37
will work across the very edge of that
12:39
so you don't need to worry about the the
12:40
very edge of that and there you have
12:43
your surface crochet so you're going to
12:45
go ahead and do this in the middle of
12:49
your checks all the way across your
12:51
blanket you could add you could add more
12:53
of these if you wanted you could put two
12:55
rows along each check or three rows it's
12:57
really up to you how how much surface
12:58
crochet you want to add to your blanket
13:01
now before we add the border I'm going
13:02
to do a little bit of um border
13:06
prep that I like to do when we're
13:08
working along the raw edges here i like
13:11
to add a row of slip stitches along the
13:14
edge and this gives you a really really
13:16
professional finish to your border now
13:18
this is optional you don't have to do
13:20
this if you don't want to but it will
13:21
give you a more professional finish now
13:24
I I chose mustard for my border i chose
13:26
one of the colors I used for the stripes
13:28
but you can use any color you like you
13:30
can choose one of the colors from the
13:31
stripes or you can choose one of your
13:33
main colors it's entirely up to you um I
13:35
think I'm going to go with the pink
13:36
today seeing as I did the border in the
13:38
mustard last time let's see how it looks
13:40
with the pink so let's just pretend I've
13:42
got another stripe of surface cro
13:45
crochet there okay so what we're going
13:47
to do here is we're just going to
13:52
join here in the side of one of of this
13:55
top stitch
13:57
here
13:59
and pull our yarn through now what
14:02
you're aiming for is we've got 12
14:04
stitches across this way so I found that
14:06
working 12 slit slip stitches across the
14:09
side of each check of each square worked
14:12
perfectly for me so that's what I would
14:15
advise you to do but you do need to um
14:18
take into consideration consideration
14:19
your own tension so you you might need
14:21
more or less stitches but 12 works
14:23
perfectly for me and you do want to work
14:25
fairly loosely because you will need to
14:28
work into these when you're adding your
14:29
border
14:51
oops so there I've got 12 slip stitches
14:53
going across the side here and you're
14:55
going to continue doing that 12 inside
14:56
of each of your checks all the way down
14:59
this side then fasten off and then do
15:01
exactly the same on the other side when
15:05
you're ready to add your border I am
15:08
going to start with a slip knot on my
15:09
hook
15:11
and you can put a double crochet in any
15:14
stitch across the top i'm just going to
15:16
start up here near the corner so to do a
15:18
double crochet straight into a stitch
15:21
have a slip knot on your hook yarn over
15:23
and then just work that stitch as
15:25
normal like
15:29
so and then you're going to put a double
15:31
crochet into each
15:33
stitch across the top of the blanket and
15:35
once you get to the corner so I'm in
15:37
this corner stitch now going to
15:41
put double
15:43
crochet chain
15:46
two and another double
15:51
crochet for the corner and then we're
15:54
going to start putting a double crochet
15:55
into each of these slip stitches we've
15:57
worked across the sides
16:10
and you're going to keep
16:12
going all the way across the side of
16:14
your
16:15
blanket until you get to the next corner
16:18
i'm just coming up to the corner of of
16:20
my blanket now I'm just working that
16:23
last working into that last slip
16:28
stitch and then we're going to work our
16:30
corner so we're just working into the
16:33
corner stitch
16:35
here with double crochet chain
16:39
two and double
16:44
crochet and then we're now working along
16:46
the bottom side of our
16:48
blanket so we're going to be working
16:50
into the bottom of the foundation
16:52
foundation chain so we're just going to
16:54
put a double crochet
17:00
into each stitch all the way
17:03
across
17:07
oops very very simple this first round
17:09
of the border okay so you're going to go
17:11
ahead and you're going to work all the
17:14
way across the bottom of your blanket
17:17
you're going to work the corner in the
17:18
same way and then work into your slip
17:21
stitches along the side then work this
17:24
final corner in the same way and then
17:26
working a double crochet into each
17:29
stitch all the way across once you've
17:31
worked all the way around and get back
17:32
to the beginning you're just going to
17:33
join with a slip stitch to that first
17:35
double
17:36
crochet now as you can see it looks
17:39
really really nice and neat across the
17:42
sides now I deliberately didn't put the
17:45
slip stitches down the other side of the
17:47
blanket so you can see what it looks
17:49
like and it still looks good but I don't
17:52
think it looks as good as the side
17:55
that's had the slip stitches worked
17:57
through it first okay so we're now going
17:59
to start to work our ribbing so we're
18:01
going to chain two to start this counts
18:03
as a post double crochet but anyway
18:07
we're going to do a front post double
18:09
crochet so you're going to yarn over
18:10
your double crochet and you're going to
18:12
put your hook around the
18:15
back of the stitch like so and work your
18:18
double crochet stitch so that the double
18:20
crochet sits around the front around the
18:23
front post of your stitch and then we're
18:25
going to do a back post double crochet
18:27
in the next stitch so you go from the
18:29
back going around the front of the
18:31
post and working the stitch so that the
18:34
stitch sits at the back of the post like
18:36
so now in the corners your corners are
18:39
going to change depending on whether you
18:42
had a front post stitch or a back post
18:44
stitch so first of all we're just going
18:46
to put a double crochet
18:49
and chain two and a double crochet if
18:52
you find you need a chain three there
18:53
you can put a chain three there now the
18:56
the first stitch here at the corner this
18:58
was a back post stitch so we're going to
19:00
do the same one here just so that it
19:01
looks even so we're going to do back
19:04
post double
19:06
crochet
19:08
next and then front post double crochet
19:15
and we're just going to alternate
19:16
between a back
19:22
post and a front
19:25
post and just remember that in the
19:28
corner if you ended with a front post
19:31
double crochet you will put a double
19:33
crochet chain two or three double
19:35
crochet and then the next stitch the
19:37
first stitch you do will be another
19:38
front post double crochet so ju just
19:40
make sure you keep that correct at the
19:42
corners
19:45
so I'm just going to
19:47
continue across to the next
19:51
corner just alternating between a front
19:54
post and a back post double crochet just
19:56
coming up to the next corner here and
19:58
the last stitch I did was a back post
20:00
double crochet so the next stitch will
20:02
be a front post double
20:06
crochet and then in the corner double
20:10
crochet chain two double
20:14
crochet and then because we had a front
20:16
front post stitch here we're going to
20:18
start off with a front post double
20:20
crochet and then you're just going to
20:22
alternate between the two all the way
20:24
across and just repeat that all the way
20:26
around your blanket okay so at the end
20:28
I'm just going to join to the top of
20:30
that chain two and then we're going to
20:32
chain two to start our
20:35
next round this will be the last round
20:37
of the blanket and basically wherever
20:39
you see a front front post double
20:42
crochet you're going to put another
20:44
front post double
20:47
crochet like so and wherever you see a
20:50
back post double crochet you're going to
20:52
put a back post double
20:56
crochet now this time in the corners
20:59
it's going to be a bit different
21:04
so in the corner I'm going to put three
21:06
double crochet
21:09
one
21:10
[Music]
21:11
two three and at the same we're going to
21:15
make sure this is a front post double
21:18
crochet for the next one
21:21
and then just continue with the pattern
21:23
around putting a back post double
21:25
crochet into every back post double
21:28
crochet from the previous round and a
21:30
front post double crochet from every
21:32
front post double crochet from the
21:34
previous round
21:37
and simply just join with a slip stitch
21:39
to that first stitch at the beginning
21:40
and that's your blanket finished if you
21:43
enjoyed this tutorial don't forget to
21:44
check out my blanket playlist for even
21:46
more cozy makes and I'll see you in the
21:48
next one bye-bye now
#Hobbies & Leisure
#Crafts
#Fiber & Textile Arts