Up next in 10


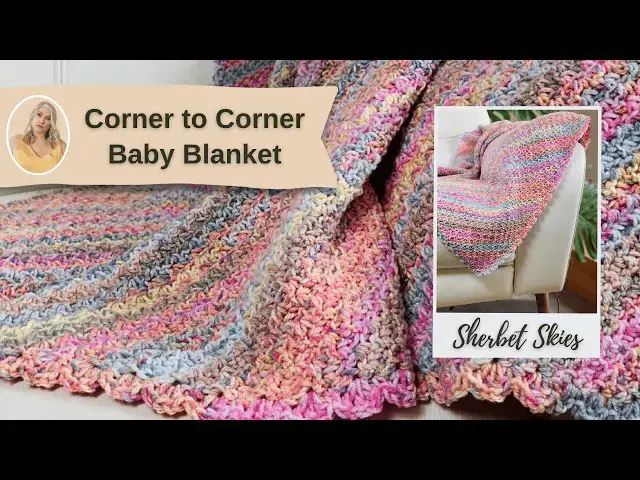
Learn how to crochet a C2C wattle stitch baby blanket with this step-by-step tutorial. Get the PDF https://lullabylodge.etsy.com/listing/4340148997 coupon YOUTUBE35. FREE blanket sizes guide https://tinyurl.com/blanketsizechart. Shop for yarn https://www.lovecrafts.com/en-gb/l/yarns/yarns-by-brand/stylecraft-yarn?utm_medium=affiliate&a_aid=7f83a24a
USA - https://www.amazon.com/shop/lullabylodge?ref_=cm_sw_r_cp_ud_aipsfshop_6NYZ15JWQW8AH4XC7WZZ
UK - https://www.amazon.co.uk/shop/lullabylodge?ref_=cm_sw_r_cp_ud_aipsfshop_6NYZ15JWQW8AH4XC7WZZ
Some of these are affiliate links, I may receive a small commission if you make a purchase through these links at no extra cost to you.
In this video, I’ll walk you through the full Sherbet Skies Baby Blanket pattern using the corner-to-corner (C2C) method and the beautiful textured wattle stitch — perfect for beginners and experienced crocheters alike.
If you’ve ever wanted to learn how to crochet a C2C wattle stitch baby blanket, this video is for you! I’ll show you how to start from one corner, increase, decrease, and add an optional shell border to finish it off.
Grab your hook and yarn, and follow along to see how to crochet a C2C wattle stitch baby blanket from start to finish.
00:09 Materials
00:23 Pattern Info
00:43 Increases
04:44 Decreases
09:29 Border
12:32 Free Size Guide
Show More Show Less View Video Transcript
0:00
Keep watching if you would like to learn
0:02
how to crochet this beautifully textured
0:04
corner to corner baby blanket. So to
0:07
make my blanket I use this style craft
0:10
colorburst doublenit but you can use any
0:13
double net weight yarn you like. I'm
0:15
using a 4.5 mm hook. You're also going
0:18
to need some scissors, a couple of
0:20
stitch markers and a darning needle to
0:21
sew in those ends. Now this tutorial is
0:25
made to accompany the written pattern.
0:27
And the written pattern comes with sizes
0:30
from security blanket up until throw. Um
0:33
so if you need to know all the details
0:36
from um how much yarn you'll need for
0:38
each size and all of the different
0:40
sizes, then please refer to the written
0:42
pattern. So I'm going to start by
0:45
putting a slip knot on my hook
0:50
and I'm going to chain four. That's one,
0:53
two, three,
0:56
four. Now, we're going to start by
0:58
working into this first chain.
1:00
So, I'm going to put a single crochet in
1:02
there,
1:11
chain one, and then a double crochet
1:14
into that same stitch.
1:21
And that's our far our first row. So,
1:24
we're now going to chain three and turn.
1:30
And we're now going to work into the
1:31
space between that double crochet and
1:34
the single crochet. So, you've got that
1:36
chain one space just here. And we're
1:38
going to go in with single crochet into
1:40
that space.
1:43
Chain one and a double crochet into that
1:46
same space.
1:50
And we're now going to work into that
1:52
chain three space. That's the chain
1:54
three from the last row. So, we're going
1:57
to put single crochet in there,
2:01
chain one, and a double crochet.
2:07
And that's our second row finished.
2:09
We're going to chain three
2:12
and turn. And again, we're looking for
2:15
that chain one space. We're going to put
2:17
a single crochet in there.
2:20
chain one and a double crochet.
2:28
We're going to look for the next chain
2:30
one space, which is here. You can see
2:33
between the double crochet and the
2:34
single crochet. So, we're going to put a
2:37
single crochet in there. Chain one
2:41
and a double crochet. This is such an
2:43
easy pattern repeat to remember. And now
2:46
we're looking for that chain space at
2:47
the end. So, we're going to put a single
2:50
crochet in there,
2:52
chain one, and a double crochet
2:57
and chain three
2:59
and turn. And then we're going to do
3:02
that all over again. We're just going to
3:03
keep repeating that. So, look for that
3:04
first chain space, put single crochet in
3:07
there, chain one,
3:11
double crochet,
3:14
look for the next chain space. So you're
3:16
always looking between the single
3:18
crochet and the double crochet for that
3:19
chain one space. And we're going to go
3:21
right in there with single crochet,
3:24
chain one, and a double crochet.
3:27
And then we look for the next chain one
3:29
space.
3:31
And we're going to do exactly the same.
3:32
Single crochet, chain one, double
3:35
crochet. And then when you get to the
3:37
end of the row, you're looking for that
3:38
chain space. So we're going to put a
3:40
single crochet in there. Chain one and a
3:44
double crochet.
3:48
And then you're going to chain three
3:51
and turn. And you're just going to
3:52
repeat that row. And you can see got the
3:55
triangle shape is starting to form
3:57
already.
4:00
So you're just going to keep going until
4:02
the measurement across here. This
4:03
measurement here or here along the right
4:05
angle of the triangle is the measurement
4:08
you're going to need. So you'll just
4:10
keep going until your blanket is as wide
4:12
as you want it to be or until it's the
4:15
size that is recommended in the pattern
4:17
for the size that you're making.
4:20
Now I've gone ahead and added a few more
4:23
rows just so you can see how the blanket
4:25
develops. Now if you want to have an
4:28
idea about what size to make your
4:29
blanket, I have a free resource that you
4:32
can get. It's a PDF download. It's
4:34
absolutely free and it gives you all the
4:36
different sizes for different blankets.
4:38
So, if you would like to get that, just
4:40
keep watching to the end and I'll let
4:41
you know how you can get that at the end
4:42
of the video.
4:44
Right. So, what we're going to do now,
4:45
I'm going to um assume that this is as
4:47
wide as I've got my blanket in this
4:49
small swatch. And we're going to start
4:51
working our decreases.
4:54
So, for our next row, we're going to
4:56
chain two.
4:59
And I'm actually going to pop a stitch
5:00
marker around the chain two
5:04
like so. And this just helps
5:07
to know where you need to put your last
5:09
stitches cuz it gets it gets a little
5:10
bit tricky to see from now on. And we're
5:13
going to turn.
5:16
And just as normal, we're going to look
5:18
for that first chain space.
5:21
And we're going to put a single crochet,
5:24
chain one, and a double crochet.
5:30
And then we're going to carry on across
5:32
as normal. So in each chain space, it's
5:34
a single crochet, chain one,
5:39
double crochet. So you just keep going
5:45
until you get to the end of the row.
5:48
Once you're at the end of the row, I'll
5:49
show you what we're going to do at the
5:52
end.
5:56
[Music]
6:09
So, I'm coming up to the end of the row.
6:11
I've got my last chain one space here
6:13
and then my chain three space. What
6:16
we're going to do is we're going to
6:17
single crochet two together across those
6:19
both spaces. But you want to make this
6:21
um single crochet two together quite
6:23
loose. So, I'm going to put my hook into
6:25
that chain one space, pull up that loop,
6:28
and then put my hook into the chain
6:30
three space and pull up a loop. And then
6:32
loosely, we're just going to finish off
6:35
that single crochet stitch. Then I'm
6:38
going to chain two
6:40
and turn. And I'm going to put stitch
6:43
marker around that chain two again.
6:47
Just like that.
6:49
And turn.
6:52
And now we're going to look for that
6:54
first chain one space, which is here.
6:57
And we're going to put our single
6:58
crochet,
7:00
chain one, double crochet.
7:05
And we're going to continue in each
7:07
chain one space across with our stitch
7:10
pattern
7:12
again until we get to that last chain
7:14
one space.
7:21
Okay. So, come up to this last chain one
7:23
space. And you can see I've got my
7:24
stitch marker here as well. So, this is
7:26
the space where you're going to crochet
7:28
your single two together over this chain
7:31
one space and this space where the
7:33
stitch marker is. So, again, we're just
7:35
going to put my hook in, pull up a loop,
7:38
put my hook into that chain space, pull
7:41
up a loop, and loosely going to yarn
7:43
over and pull through those loops. And
7:45
then chain two for our turning chain.
7:47
And then I'm just going to move that
7:50
stitch marker over to place it around
7:52
that chain two. And then we're going to
7:55
turn and continue with the next row. So
7:57
that last row is a row you're just going
7:58
to keep repeating that now. So I'll show
8:00
you one more time. So we look for that
8:02
first chain one space, single crochet,
8:06
chain one, double crochet.
8:10
And we're going to repeat this across
8:11
the row into every chain one space.
8:26
And here we are at our last chain one
8:28
space. So again, we're going to single
8:30
crochet two together over that chain one
8:32
space
8:34
and that space where we've got our
8:37
stitch marker.
8:39
And you want to do that quite loosely.
8:41
Chain two. Again, we're just going to
8:44
move our stitch marker over around that
8:47
chain two and turn. So, we're just going
8:49
to keep repeating that until you've got
8:50
one chain one space left. So, you go
8:53
ahead and do that and I'll meet you back
8:55
for the last row. I've continued
8:59
decreasing and we're at our last row
9:01
now. So, our first chain space that
9:03
we're going to work into is this one
9:05
here, but this is also the last chain
9:07
space. So, we're going to just do that
9:09
single crochet two together over that
9:11
last chain one space. Oops.
9:15
And that chain space at the end.
9:20
And that's it. So, if you wanted to go
9:22
for a more modern look for your blanket,
9:24
you can just fasten off and weave in
9:26
your ends and leave the blanket um
9:28
without a border. But if you would like
9:30
to, I'm going to show you how to add a
9:32
little shell border onto your blanket.
9:33
I'm just going to remove these stitch
9:34
markers. We don't need those now. So, if
9:37
you're adding a border, you don't need
9:38
to fasten off.
9:41
So, we're just going to chain one to
9:42
start. And then we're going to start
9:45
walking working working across this side
9:47
of our blanket. And we're going to be
9:48
looking for those kind of spaces you get
9:50
at the end of each row. Um, so some of
9:53
them are a little bit harder to see than
9:55
others, but we're going to work into the
9:56
end of each row. So, we're going to
9:58
start by putting a single crochet
10:02
in this first
10:04
space. And then in the next space, we're
10:07
going to put a shell. So, we're going to
10:09
put a double crochet,
10:13
chain one, double crochet,
10:18
chain one, and a double crochet all into
10:21
that same space
10:23
like so. And then in the next space, the
10:27
next row at the edge, we're going to put
10:28
a single crochet
10:31
and then a shell into the next space.
10:34
So that's double crochet,
10:38
chain one, double crochet,
10:42
chain one, and a double crochet.
10:47
And into the next space, a single
10:48
crochet. So you're just going to repeat
10:50
this all the way across the side of your
10:52
blanket.
10:54
[Music]
11:04
And as you come up to the corner, just
11:07
going to put single crochet.
11:09
And then we've got the next space. I'm
11:12
going to put the shell. I don't do
11:13
anything fancy for the corners. I just
11:15
carry on around in the stitch pattern.
11:23
And then as we go around the corner,
11:25
that next space we've got here, going to
11:26
put single crochet in there.
11:29
And then the next space, another shell.
11:42
So, you're just going to keep going
11:43
around all the way around your blanket
11:46
until you get back to the beginning.
11:50
So, I'm just coming up to this last
11:52
corner and I'm going to put a single
11:53
crochet in here. And in that last
11:58
space, we're just going to put our final
12:01
shell.
12:03
It's double crochet, chain one,
12:06
double crochet, chain one, double
12:08
crochet,
12:11
and then we can slip stitch into that
12:12
first single crochet. Now, if you happen
12:14
to have an extra space, don't worry too
12:16
much. just skip over that extra space
12:18
and just join to that first stitch. And
12:21
then you can fasten off and weave in
12:23
your ends. Now, I really do recommend
12:25
blocking your finished blanket. Corner
12:27
to corner projects are notorious for
12:30
sometimes being a little bit wonky. Um,
12:33
and as I said before, if you would like
12:35
to get your hands on my handy blanket
12:37
size guide, just type size guide in the
12:40
comments and I'll make sure you get one.
12:42
And for more blanket patterns, be sure
12:44
to check out my blanket playlist next.
12:46
Bye-bye now.
#Hobbies & Leisure
#Crafts
#Fiber & Textile Arts