Up next in 10

Learn the Running Stitch for Hand Embroidery - Slow Stitching for Beginners
May 16, 2026

The running stitch is the very first stitch every embroiderer should know —
it's simple, beautiful, and incredibly versatile. In this tutorial I'll show
you exactly how to do it, nice and slowly, step by step, and we'll be
practising it right inside our slow stitch book.
Whether you've never picked up a needle before or you're just building up
your stitch library, this one is a brilliant place to start.
And once you know it, you'll find yourself reaching for it again and again.
What we'll cover:
🧵 How to prepare your thread and needle
🧵 The running stitch technique, broken down nice and slowly
🧵 Tips for keeping your stitches even and neat
🧵 Beautiful variations to try in your slow stitch book
All you need is some fabric, a needle, and a little thread —
nothing fancy, nothing expensive. Just have a play and enjoy the process.
📖 MAKE YOUR SLOW STITCH BOOK FIRST: https://youtu.be/8zCLRJG1lIc
🧵 BLANKET STITCH TUTORIAL: https://www.youtube.com/watch?v=ofnBmni1k4o
Show More Show Less View Video Transcript
0:00
Have a look at these pages. The
0:02
beautiful dotted line. It's the simplest
0:04
stitch of embroidery. And that's the
0:06
running stitch. And by the end of this
0:08
video, we're going to be doing it in
0:10
your slow stitch book or indeed wherever
0:12
you want to use it. Once you can do this
0:15
stitch, you're off and running and you
0:16
can do them all. If you're brand new to
0:18
embroidery, you're in exactly the right
0:20
place and we're going to have a good
0:22
practice. So, I just want to share with
0:24
you my stitching book. So, if you've
0:26
never made one, there's a link below and
0:29
on the screen so that you can go and
0:31
make yours and you can see all the
0:33
places I've used the running stitch. So,
0:35
it's great on its own. It's great for
0:37
sewing fabric on. And all in all, a
0:40
great allrounder. But all you really
0:42
need is a piece of fabric. I'm going to
0:44
use this one, but you can use any piece
0:46
of fabric you've got. And a needle.
0:51
No pressure on the needle. any needle
0:52
you've got, but you do need an eye big
0:54
enough to get your thread through. And
0:56
then you need some thread. I'm using
0:58
embroidery thread, but please use any
1:00
thread you've got. And I don't tend to
1:03
use the embroidery thread as it is. You
1:06
can do, and that's something I really
1:08
recommend you experiment with different
1:10
threads later on, but I'm just going to
1:12
cut a length. And then I'm going to
1:15
divide it because I don't want the full
1:17
six strands. So, if you want separate
1:20
thread, you simply separate it out how
1:23
you want. As I say, I'm going for three
1:25
strands each half of it. You could be
1:28
working in two strands and then you get
1:30
three lengths, but just separate it. So,
1:32
you've got those three strands, one in
1:35
each hand. You can see I'm having a bit
1:36
of trouble, but once you've got those
1:39
three,
1:40
it's really easy to separate without
1:42
getting it all twiddled up. So just take
1:47
them separate like that in one hand and
1:49
then run your finger down and let the
1:53
end twizzle free. It needs to be free on
1:56
the end. It's a bit difficult for me to
1:57
show you, but if you just hang it
1:58
vertically, it'll work really well. And
2:01
there you've got two threads. Just run
2:03
your fingers along them so that they're
2:05
not too twisted
2:07
like that. And then it's time to thread
2:09
your needle. One way to do it is to wet
2:12
the end and then push it through or fold
2:15
it tight round the end and then push
2:17
that through. And that's what I've just
2:19
done there. And then make sure you've
2:22
got a short tail and a long tail. And
2:25
then you're going to put a little knot
2:27
in the end
2:30
just so that it doesn't pull through
2:31
your fabric. And then you're all set to
2:34
start and we're going to do our running
2:37
stitch. So once you're happy, you've got
2:39
your knot, we're going to just bring our
2:42
needle up from the back where we want to
2:45
start your running stitch. So just bring
2:48
it through where you want to start so
2:51
that that knot sits just at the back of
2:53
the fabric, just against it. And then go
2:56
along as far as you want your running
2:58
stitch to be. Now it can be as long or
3:00
short as you like. So I don't know, half
3:03
an inch is quite long, quarter of an
3:05
inch is quite short. And then you're
3:07
going to go in and then back out as wide
3:11
as you want the gap. And you're going to
3:13
go in
3:15
and then back out as wide as you want
3:16
the gap. Don't worry about the fact the
3:18
first one I did a little differently.
3:20
I'm going to show you that. I just want
3:22
to get a couple on the fabric so you can
3:25
see how it's working. So you go in and
3:29
then back out. Now if you do it like
3:32
that, it feels so nice. It's such a
3:35
rhythm and you really get into that and
3:38
really enjoy that dashed line forming.
3:40
So, it's simple in and out, a little
3:43
dotted path across the fabric. It's a
3:45
really satisfying stitch to do. Very
3:48
soothing.
3:50
So, you're trying to keep them the same
3:52
length and you're trying to keep the
3:54
gaps the same, but there really is no
3:56
stress about this. It doesn't matter if
3:58
they're perfect or not. It's going to
3:59
look beautiful. So, you're just going to
4:02
keep it nice and snug. You want your
4:06
fabric lying against the stitch. I think
4:09
I should have said that the other way
4:11
around. Um, but you don't want to pull
4:14
your fabric too tight. That we don't
4:17
want. If it happens, just pull your
4:19
fabric because it's a running stitch. It
4:21
will just go back through nicely. And
4:24
you're just taking this as far as you
4:26
want. There's no hurry here. You just
4:30
keep going until you get to the end.
4:34
So, we've tried loading a few stitches
4:36
on. We're doing a few at a time. And
4:38
just keep going. And then once you get
4:42
to the end, take your needle to the
4:44
back.
4:46
Make sure it's nice and flat.
4:49
And then the easiest way to finish off,
4:51
obviously, we don't want to just cut it.
4:53
It'll all come out. is to just push your
4:56
needle through some stitches.
4:59
Now, I don't find that secure enough.
5:02
So, I tend to for one of them go through
5:05
the stitch and then go through the loop.
5:08
So, it just forms a little knot and it
5:10
will not pull through. And then you can
5:13
cut your thread off.
5:16
And that's it. You've done a beautiful
5:18
running stitch. And you can use that on
5:21
any project you like. Now you can see
5:23
here I've done a spiral of running
5:25
stitches for a different design in my
5:27
book. And you really can experiment.
5:32
So look here, we've got a border. So
5:36
it's just put round a picture to form a
5:38
border. But I've done two rows and look
5:40
how different they are. And then now I'm
5:43
going to use the two rows at the bottom
5:45
to show you a new stitch.
5:48
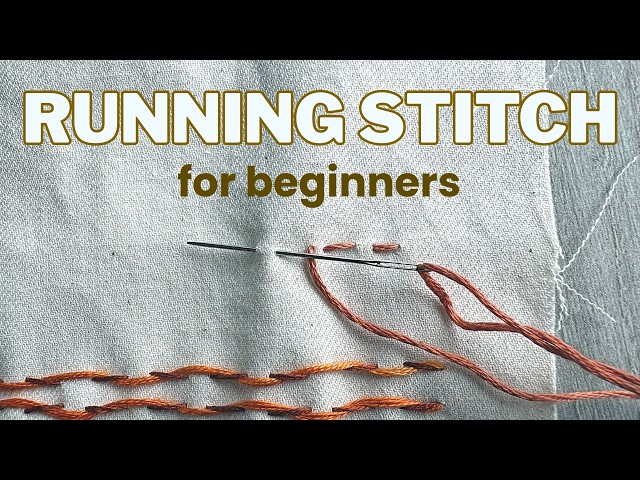
It's using the running stitch, but we're
5:50
adding another thread. And all you do is
5:54
come up at the end of your running
5:57
stitch. If I can get it through. And
6:01
then you put the needle through the
6:04
stitch. Not through the fabric at all.
6:06
Just through the stitch.
6:11
And then back through the next stitch.
6:15
And then back through the next stitch.
6:17
You're simply weaving
6:20
under and over and you never go through
6:22
the fabric.
6:26
What you're making here is a whipped
6:28
running stitch. And it looks almost like
6:31
a twisted rope effect. And it can look
6:34
amazing, especially if you use two
6:36
really contrasting colors. So you can
6:38
see I've got a nice rusticy brown and
6:41
orange here because that's the effect on
6:43
the page I'm doing. but it can look
6:46
amazing in two very different colors.
6:48
Perhaps a black and a bright pink. Now,
6:52
when you get to the end, it's just the
6:55
usual. Go back through
7:00
and then you could finish off. However,
7:03
I've got two rows of it. So, what I'll
7:05
do is come back up at the end of the
7:09
next row and work my way back along. I
7:13
mean, it's a beautiful thing to have in
7:15
your stitching journal, and it's a
7:18
beautiful thing to put on any sort of
7:20
embroidery.
7:22
It shows what's possible, doesn't it?
7:24
Just one simple stitch you've learned
7:25
here, and you're already doing really
7:28
something beautiful.
7:30
So, there we have it. That is the
7:32
running stitch in all its lovely
7:34
simplicity.
7:36
I hope you've enjoyed it because what
7:38
I'm doing is building a series of lots
7:41
of different embroidery stitches for
7:43
your slow stitching book. I do feel this
7:46
one deserves more credit than it gets.
7:48
And I'd love to know if you have a go at
7:51
using it, how you use it, how you get on
7:54
with it, and any tips you have or maybe
7:59
further stitches you'd like to see in
8:01
this series. I mean, I'm always welcome
8:04
to suggestions and including the ones
8:06
you want. So, if you are new here,
8:10
welcome. It's lovely to have you. And
8:12
this channel is all about crafting on a
8:14
budget, learning new skills, and just
8:16
enjoying the process of making things.
8:19
We don't like to rush. We don't like
8:20
lots of pressure. And we definitely
8:22
don't think there's a right or a wrong.
8:24
So, I'd love you to stay and join us for
8:26
the rest of the series and perhaps be
8:30
making your own stitching journal, even
8:32
if you'd never thought about doing it
8:33
before. You can see different pages I'm
8:36
building up here. And you can do all
8:39
your own pages. Look at some of these
8:42
with some buttons attached, different
8:44
stitches, some stem stitches, lots and
8:47
lots of running stitches. So, I hope
8:49
you're feeling inspired. And on the
8:52
screen you'll see links to this book,
8:55
blanket stitch tutorial. And all I'm
8:57
going to leave with is I'll see you in
8:59
the next one. Happy stitching.
#Hobbies & Leisure