Up next in 10


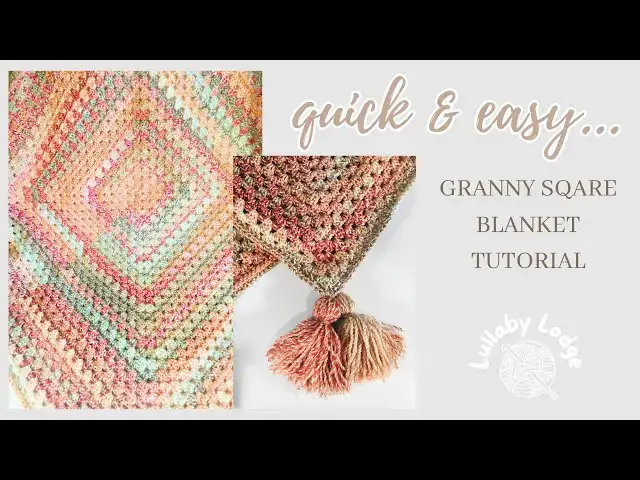
In this video I will be showing you how to make the Weekend Wonder blanket. This project has been designed especially with beginners in mind.
Get notified of new pattern releases & exclusive deals and discounts by signing up to our mailing list - https://tinyurl.com/3cae89k8
For more information and photo tutorial, please see accompanying blog post - .
https://www.lullabylodge.com/2021/01/the-weekend-wonder-giant-granny-square.html
Tassel tutorial
https://www.youtube.com/watch?v=Mvj4NkUGH08&t=394s&ab_channel=LullabyLodge-Crochet%26Crafts
A printable pdf version of the Weekend Wonder blanket is available in my online stores -
Etsy https://www.etsy.com/uk/listing/950822973/pdf-pattern-crochet-lap-blanket-weekend?ref=shop_home_active_1
Ravelry https://www.ravelry.com/patterns/library/weekend-wonder-blanket
Crochet supplies - https://amzn.to/4aRZ74b (affiliate link)
Video recording equipment - https://amzn.to/4e58U9N (affiliate link)
Shop for yarn - https://www.lovecrafts.com/en-gb?utm_medium=affiliate&a_aid=7f83a24a (affiliate link)
Show More Show Less View Video Transcript
0:00
So today I'm going to be using this pretty marble chunky yarn by James Seabrett
0:07
I believe this is called a bulky weight in the US if you're from there
0:12
And I'm going to be using a 6mm hook for my blanket
0:19
Now you can use any yarn that you like, as long as you use the hook size that's recommended on your yarn ball band
0:27
So for this blanket I'm using a nice thick chunky yarn which will work up really quickly
0:33
meaning that you can make a small app-sized blankets in as little as a weekend
0:39
So let's get started. Okay to start we need to first make a slip knot so you just make a loop with your yarn
0:49
like so then your long end you'll fold into the middle of that loop and then you'll fold into the middle of that loop and then
0:56
pull that loop through and put that onto your hook like so and then we're going to chain four
1:09
so we put the yarn over and then we pull that through our chain so that's one
1:17
yarn over pull through the chain it's two three and four now we want to join those chains
1:27
into a circle to make a ring. So we're going to put our hook into the first chain. We will
1:35
yarn over and pull that loop through and then we'll pull that loop through the chain on the hook
1:42
as well. That's called a slip stitch. If you give this little end a little bit of a target
1:51
it tightens that hole up a little bit for you. Okay, so now we want to change
1:56
three one two and three this counts as our first double crochet we're now going to start
2:07
putting our crochet stitches into the ring so we want to put two double crochet into that
2:13
ring so we yarn over hook goes into the ring and pull up a loop yarn over pull through two loops
2:23
yarn over pull through two loops that's one double crochet so we want one more double crochet
2:29
yarn over hook goes into the ring pull up a loop yarn over
2:36
pull through two yarn over and pull through two so this is our first group
2:41
of three double crochets into the ring so now we're going to chain two
2:46
one two and now we need to do another group of three double crochet into the ring
2:53
one two
3:03
and three and three and three so as you can see we've started to form our square here
3:12
so where we've did the chain two this is where we form our square so now we need to do our next corner so we chain two
3:19
and then another three double crochet into the ring. One, two
3:30
and three So now we want to do our next corner so we chain two And now we going to have our last group of three double crochet into the ring
3:45
One, two, and three. So then we chain two. And now we're going to join to the top of that chain three
3:59
So that chain three counts our first double crochet. So we put our hook into the top of the chain three
4:04
and then we make a slip stitch. So we yarn over, pull through both of those loops
4:11
And then we have the beginning of our granny square. So we're ready for round two
4:16
So first we're going to turn our work. And we're going to start working into this corner here
4:25
So first we want to slip stitch into that corner. like so and then we're going to chain three
4:34
One, two, and three. This counts as our first double crochet. We're going to put two more double crochet into that corner space
4:46
One and two. Then we're going to chain two
4:57
and now we're going to put three double crochets into that same space
5:05
One. Two. And three. And there we have our first corner made
5:18
Now you can see for this round we're going to work into each of these corner spaces. And we're going to do the same stitches into each corner
5:24
So it's going to be three double crochets. crochet chain two three double crochet into this space and we're going to do the same
5:33
into each of those spaces so I will meet you back at the end of the round so here we
5:39
are at the end of the round we're going to finish that round off by putting a slip stitch into the top of our chain three like so and now we're ready to start round
5:50
three so we turn our work and then we're going to slip stitch into that space
5:57
that we're currently at and then we're going to chain three. One, two, three. This counts
6:06
as our first double crochet. We're going to put two more double crochet into that same
6:10
space. One, and two. And now we're going to start working into the next space, which is a
6:20
corner. So in the corners we're always going to be working three double crochet, chain two, three
6:26
three double crochet. One, two, three
6:37
Chain two. And three more double crochet. Okay, so that's our corner made
6:49
So now we're working along the sides of the square. So now we have a space in the center of the square
6:55
we're going to put three double crochet into that space. One two and three And now we at our next corner So it going to be three double crochet chain two three double crochet into that next corner
7:17
So each time you get to a space in the middle of the square, you put three double crochet
7:22
Each time you get to a corner, three double crochet, chain two, three double crochet
7:28
I will finish off this round and I will meet you back at the end. Okay, so we're now at the end of the round and we're going to finish that off by putting a
7:36
slip stitch into the top of our chain through like so are ready to start the next round so from
7:49
now on we're just going to repeat round three until our blanket is as big as we would like it to be
7:56
so we will turn our work we'll slip stitch into that space chain three for our first double
8:06
crochet and then put two more double crochet into that space. Like so
8:16
Our next space is a corner, so we will have three double crochet, chain two, three double crochet
8:22
And then we will work. This time we have two spaces along the sides. So we'll put three double crochet into each space and then work the next corner
8:30
And we keep doing that until the blanket is as big as you would like it to be
8:34
Okay, so at some point, um, making your blanket, you're going to need to change your yarn, whether it's because you want to
8:41
change a different colour or if you've run out and you need to join in a new ball. So I'm going
8:47
to show you how to do both of those now. So here you can see I have run out of this particular
8:51
ball and we're ready to join in our next ball of yarn. So it doesn't matter where you are
8:58
in your blanket as long as you keep a good sized tail. So first of all we're going to start
9:06
to work our next double crochet. As you can see, we've just worked a corner here
9:10
And our next step is to put three double crochets into the next space. So we're going to start
9:15
to work our next double crochet. So yarn over. Hook goes in the space, pull up a loop
9:22
yarn over and pull through two loop. So we're going to stop there. This is where we're going to join
9:26
in our new ball of yarn. So we let go of that strand of yarn, and we pick up the next ball that
9:33
you're going to join and we'll finish off that double crochet stitch by yawning over and pulling
9:41
through those last two loops and there you have a finished double crochet stitch so I like to
9:48
then tie these two ends it's up to you whether you want to tie them or not I know some people
9:55
don't like having knots in the work I never tie knots in my knitting but I don't mind having
10:00
knots in the crochet because they always seem to go to the back of the work and they not anywhere near is noticeable
10:06
So these tails will need to be waving in at the end. So then you're just going to carry on
10:11
putting two more double crochets into that space. So there's one. And there you go
10:24
You've joined in a new ball of yarn. Okay, so say you want to change colour
10:28
you're making a blanket with different stripes in. You need to finish off a whole round and fasten off your yarn
10:37
And then with your new colour you can join it doesn really matter where I actually joined I like to join along the sides just for a corner So you will pull your new color through
10:55
And then you will chain three. One, two, three. This counts as your first double crochet
11:02
You then want to put two more double crochet into that space. Oops, one
11:12
and two and then you just carry on as normal. So the next space is a corner space
11:20
so you'll put three double crochet, chain two, three double crochet, and then continue working around your blanket
11:27
So there go, you can either change colour or add in a new ball of yarn
11:32
And I'll meet you back once we're ready to add on the border to our blanket. Okay, so once you've added as many rounds as you would like to
11:39
and your blanket is as big as you want it to be, We are now ready to add a very simple, single crochet board to our blanket
11:48
And so we will chain one. And then single crochet into the same stitch
11:56
So a hook goes into the stitch. We pull up a loop, yarn over and pull through both loops
12:07
And single crochet into the next stitch. So hook goes through the stitch, pull up a loop, line over, and pull through both loops
12:18
And so we're going to continue working single crochets all the way across the edge of our blanket
12:26
until we get to the corner space. Okay, so here we are at our first corner
12:35
So now we're going to be working into this corner space. So we're going to single crochet into that space and then two more single crochet into the same space
12:46
So that's three in total. Like so. And then we're going to continue to work single crochet stitches all across the next side of the blanket
12:59
Like so. So your single crochet in every stitch of class until you get to the next corner
13:07
In the corner space you will add three single crochets. So you'll do this in each corner
13:13
So single crochet into every stitch along each side and three single crochet into each corner
13:20
And once you get to the end, you will join with a slip stitch into the first single crochet
13:25
Okay, so here we are at the end of the route. We have joined with a slip stitch into our first single crochet
13:30
And all that's left now is to last knot. Make sure you fasten off securely
13:41
I don't want any unwravening to happen. And then all you need to do now is just sewing your tail
13:53
and then attach your lovely big poofy tassels to the corners of your bike kit
13:59
The tassel tutorial is linked in the description books below. books below and that will show you exactly how to do that. I hope you enjoyed this video
14:09
and if you did please like and subscribe it really helps my channel to grow and I will see you all
14:15
again very soon with more videos like this. Take care now. Bye bye
#Hobbies & Leisure
#Hobbies & Leisure
#Crafts
#Fiber & Textile Arts