Up next in 10

Hey everyone, welcome back to FilterGrade. Today we’re going to be talking about creating and exporting your own transitions in After Effects. Some transitions can’t really be exported because you need to use the footage itself to create an effect, but today we’ll be showing you the kind of transitions that can be exported, and how to make them, then we’ll cover the sorts of transitions for which you’ll need to exclusively use After Effects.
View the full article: https://filtergrade.com/how-to-make-transitions-in-after-effects/
Get After Effects Templates here: https://filtergrade.com/product-category/after-effects-templates/
Get video transitions and effects here: https://filtergrade.com/product-category/video/
- - - - - - - - - - - - - - - - - - - -
Follow FilterGrade!
Facebook - https://www.facebook.com/filtergrade
Twitter - https://twitter.com/filtergrade
Pinterest - https://www.pinterest.com/filtergrade/
Instagram - https://www.instagram.com/filtergrade/
Newsletter - https://filtergrade.com/filtergrade-newsletter/
- - - - - - - - - - - - - - - - - - - -
Show More Show Less View Video Transcript
0:02
hey everyone
0:03
welcome back to filtergrade today we're
0:05
going to be talking about creating
0:07
and exporting your own transitions in
0:08
after effects
0:10
some transitions can't really be
0:11
exported because you need to use the
0:13
footage itself
0:14
to create an effect but today we'll be
0:16
showing you the kind of transitions that
0:18
can be exported
0:19
and how to make them then we'll cover
0:21
the sorts of transitions for which
0:22
you'll need to exclusively use after
0:24
effects
0:26
the kind of transitions you can create
0:27
in after effects and then export as a
0:29
template
0:30
to use later are mostly things like
0:31
stingers these sorts of transitions work
0:34
by completely covering the first video
0:36
then going off screen to reveal the
0:37
second clip when the screen is fully
0:39
covered by the transition the first clip
0:41
ends and the second clip starts this
0:44
switch is masked by the fact that the
0:45
transition is completely covering the
0:47
screen
0:47
and by the time the video is edited it
0:49
looks perfectly smooth
0:51
we actually already have a video on the
0:52
channel going in depth about how to
0:54
create transitions like this in after
0:56
effects
0:56
to see the full guide you can go watch
0:58
that video but we'll include the basics
1:00
here
1:01
right-click then click add new then
1:03
click shape layer
1:04
click on the add button next to contents
1:06
and select group this will give us
1:08
access to the controls we need to make
1:09
this animation work properly click on
1:12
add again
1:13
and add a rectangle then add a fill
1:15
layer to give it a color
1:17
to set the size of the rectangle open up
1:18
the rectangle path object
1:20
uncheck the chain symbol and then size
1:22
it up we'll want it to cover the screen
1:24
top to bottom
1:25
and take up most of the horizontal width
1:27
as well
1:28
next we're going to do a simple
1:29
animation move a couple seconds into
1:32
your timeline and using the transform
1:33
properties under the group
1:35
move the shape off screen to the right
1:37
click on the keyframe button
1:39
we'll want to use easy ease on this so
1:41
that the animation is smooth
1:43
you can do this by right clicking on the
1:45
keyframe and selecting easy ease
1:47
but the shortcut is shift plus f9
1:50
now we can make our starting keyframe
1:52
when we use easy ease on a keyframe any
1:54
new keyframes that occur before it will
1:56
have the effect automatically applied
1:58
which is why we start with the end of
2:00
the animation
2:01
move the playhead to the start of the
2:03
timeline and move the shape offscreen to
2:05
the left
2:06
now when you play it back you should
2:07
have a smooth animation of the shape
2:09
going left to right across the screen
2:11
now let's open the graph editor by
2:13
clicking on the graph editor button
2:15
this will let us change the curve of the
2:16
animation play around with this to get
2:18
the exact animation that you want
2:20
for example if we drag the first node up
2:22
and to the left we will get a really
2:24
fast start to the animation with a slow
2:25
ending
2:27
so that's a basic shape transition with
2:28
just one shape but most transitions of
2:30
this type feature multiple shapes
2:32
working in tandem select your first
2:35
group
2:36
and hit ctrl d to duplicate it change
2:38
the color to something different than
2:40
your first group
2:41
you can now press the u key on your
2:42
keyboard to show only the position
2:44
properties within this layer
2:46
so press that and we'll see both
2:48
precision properties for both layers
2:51
click on the upper one which should be
2:53
your new one
2:54
this will select both keyframes for that
2:56
shape then you can just offset them from
2:58
the first shape
2:59
so they happen shortly after the other
3:01
layer now we have a cool two shape
3:03
transition and it looks dynamic and
3:05
interesting since the animations for
3:06
both are not linear
3:08
now let's add a third shape using the
3:09
exact same process make sure to change
3:11
the color
3:12
the new shapes should be on top so just
3:15
make sure the animations for the top
3:16
ones happen
3:17
after the original ones and this
3:18
animation will look great
3:20
[Music]
3:24
to save this as a preset animation to
3:26
use later select the three groups
3:29
click on animation then click on save
3:31
preset
3:32
you can leave it in this default folder
3:33
or create a new folder to better sort
3:35
your animations
3:36
name this animation and save it now open
3:39
an empty composition and create a new
3:41
shape layer
3:42
then under effects and presets go into
3:44
animation presets user presets and
3:46
select your newly made transition
3:50
now you can verify that it works
3:52
properly and you can make changes to the
3:53
transition and save it as a new
3:55
animation
3:56
just by editing this preset and resaving
3:58
it
3:59
for example you can rotate it to change
4:00
the direction that the transition moves
4:04
[Music]
4:10
to use this transition elsewhere like in
4:12
premiere pro we'll need to export this
4:14
on an alpha channel
4:15
go to file export add to render queue
4:18
in your render queue click on the output
4:20
module where it says lossless
4:22
we need to export it in a format that
4:23
supports transparency so click on
4:25
quicktime for the format
4:27
as this is a common format that supports
4:28
it
4:29
[Music]
4:30
then under channels select rgb plus
4:33
alpha this will render both color and
4:35
transparency
4:36
now you can drag this finished file into
4:38
a premiere pro project and you won't
4:39
need to make any changes
4:41
the transparency will just work
4:42
automatically
4:44
this transparency tip is great for
4:45
anything whether it be titles
4:47
transitions lower thirds or anything
4:48
like that
4:49
you can't just save a transition as a
4:51
file to use in premiere pro or another
4:53
software
4:54
you'll need to export it as a video file
4:56
that can be used in additional
4:57
productions
4:58
if you try to export a transition only
5:00
to find that your transparency
5:02
didn't render properly then you're
5:03
probably exporting in a format that
5:05
doesn't support it
5:06
for example np4 files don't support it
5:09
in after effects when you've added a
5:11
file to the render queue
5:12
click on the output module there are
5:14
several formats that support
5:15
transparency but the most common and
5:17
versatile will be quicktime
5:19
this will render an mov file and all of
5:21
the transparency you worked on will
5:22
remain when you drop this
5:24
file into another video editor now that
5:27
you have this file you can import it
5:28
into other editors and it will have the
5:30
transparency you need
5:32
while this method is convenient for
5:33
flexibility if you need to work with
5:35
other editors or on other computers
5:37
you can also just import the after
5:38
effects project directly into premiere
5:40
pro
5:41
using dynamic link and you won't have to
5:43
worry about any loss of quality from
5:44
exporting the file multiple times
5:52
after effects is incredibly powerful for
5:54
creating complex transitions however you
5:56
will be limited if you plan on exporting
5:58
them for later use
5:59
even something like a basic cross
6:01
dissolve can't really be templated
6:03
in after effects for use in other
6:04
programs the transparency transitions we
6:07
covered work well
6:07
because they're essentially just another
6:09
video overlay that has transparency
6:11
if you want a more complex transition
6:13
then you'll need to do it in after
6:14
effects
6:15
and either export the rendered clip or
6:17
use dynamic link if you're editing in
6:18
premiere pro
6:20
here's an example of a transition that
6:22
you might want to do in after effects
6:23
that you have to do entirely in after
6:25
effects
6:26
create a new composition and drop in
6:28
your first clip select the shape tool
6:30
and create a new shape
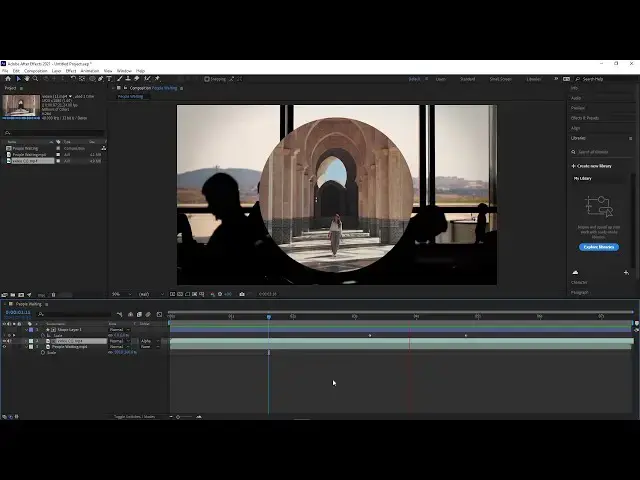
6:32
in this case i'm going to create a
6:33
circle it doesn't matter what color the
6:35
shape is as long as it's one single
6:37
color
6:38
next we're going to animate this shape
6:40
i'm going to have it scale from zero
6:42
all the way until it's just covering the
6:43
entire screen this shape is going to
6:46
hold the second clip that we're
6:47
transitioning to
6:48
[Music]
6:59
drop the second clip into your timeline
7:01
below the shape
7:02
now click on toggle switches modes until
7:05
you see the track matte option
7:07
change the track matte setting of the
7:09
upper video layer to alpha matte
7:11
if the shape layer is directly above it
7:13
this second clip will take the place of
7:15
this solid color
7:16
layer this unlocks a ton of great
7:19
opportunities for very creative
7:21
transitions
7:22
however it just doesn't work if you
7:23
export this as some kind of template
7:25
you'll need to do this in after effects
7:27
every time and export the final clip or
7:29
use dynamic link
7:31
you can use this shape layer as an after
7:33
effects template in the future however
7:35
for working in after effects all you
7:37
need to do is drop in different clips
7:38
and adjust the timing if you need
7:41
hopefully this helps you understand when
7:43
you can use after effects to create a
7:44
templated transition
7:46
and when you need to use it for custom
7:47
transitions let us know your favorite
7:49
tricks for making awesome transitions in
7:51
it
7:51
and how you template them out if you
7:54
enjoyed this video
7:55
be sure to like and subscribe and leave
7:57
a comment down below
7:58
and if you're looking for professional
7:59
lutz lightroom desktop and mobile
8:01
presets premiere pro templates and more
8:03
photo and video education
8:05
visit filtergrade.com today