Up next in 10

Learn how to create and use layer masks in Adobe Photoshop. In this tutorial and walkthrough Leighton Milne covers masking in Adobe Photoshop CC 2017. Get a better understanding of selecting your images, using brushes to erase or paint parts of your image back on, and more to help you save time with your projects.
View PS Actions on FilterGrade: https://filtergrade.com/product-category/photoshop-actions/
Learn more about the basics of layer masks here: https://www.youtube.com/watch?v=sQCy4QiIqqE
In this Photoshop tutorial Leighton covers:
* Using Layer Masks for Photo and Design Projects
* Using the Magic Wand Tool
* Shortcuts for Selecting Parts of Your Image
* Inverting Layer Masks
* Using Brushes to Paint Masks
* Fixing the Edges of Selections
Soft Vintage Look Photoshop Tutorial! https://www.youtube.com/watch?v=l3itiClXiZI
Learn how to use the dodge and burn tools in Photoshop here: https://www.youtube.com/watch?v=EKN0d9ADMVQ
Show More Show Less View Video Transcript
0:00
[Music]
0:01
hello and welcome to another filter
0:03
grade tutorial my name is Leighton and
0:05
in this quick video I'll be showing you
0:06
how to use layer masks in Adobe
0:07
Photoshop masking is a non-destructive
0:09
way to eliminate certain aspects or
0:11
section of a layer to be able to easily
0:13
undo or fix your actions layer masks
0:16
work great if you want to remove
0:17
backgrounds or add an adjustment or
0:18
effect to a select area of the layer so
0:20
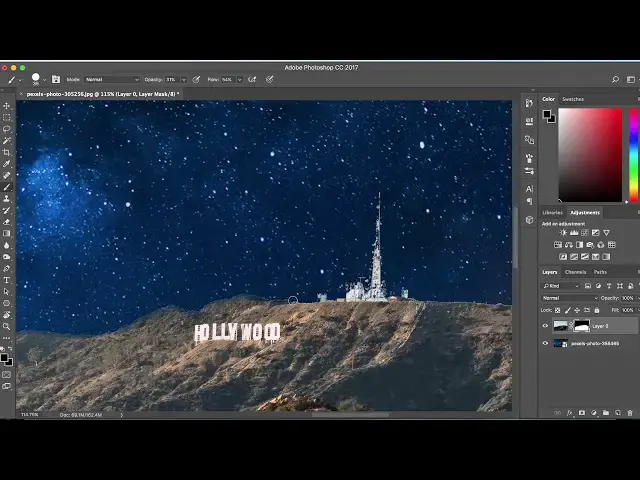
here I am in Photoshop I've got a nice
0:23
photo of the Hollywood Hills in
0:24
Hollywood sign and what I want to do is
0:26
actually place the sky in this photo
0:28
with this sky of a night scene so we can
0:31
do this fairly easily with layer masks
0:33
there's a couple ways you can go about
0:35
doing this the easiest and quickest way
0:37
to eliminate your background or sky is
0:40
when you go over here to the toolbar on
0:41
the left hand side and click the magic
0:43
wand tool you can actually just click on
0:45
the sky hold shift and just keep adding
0:47
points until your entire background is
0:50
highlighted as you can see there's a
0:51
little dotted line here going across the
0:53
sky so once this is highlighted all you
0:55
have to do is go down to the bottom of
0:56
screen and click this layer mask button
0:58
here just a circle inside the rectangle
1:00
click that and automatically has gotten
1:02
rid of the foreground and left the sky
1:04
which is the opposite of what we want
1:05
but in order to switch that around all
1:07
you have to do is double click on this
1:08
mask that you've created and that's
1:10
gonna bring up your options and right at
1:12
the bottom this button invert that's
1:14
just gonna invert the layer mask so
1:16
right away you see you've replaced the
1:17
background
1:18
now--how layer masks work is whatever is
1:20
white is gonna be showing and whenever
1:23
it's black is gonna be eliminated so as
1:26
you can see here on this mask the sky is
1:27
black meaning that we've gotten rid of
1:29
it completely in the foreground is white
1:31
if you're still kind of struggling with
1:32
this concept think about putting a white
1:34
sheet of paper up to a light source like
1:36
a light bulb you're still gonna be able
1:37
to see light coming through that sheet
1:39
of paper however if you hold a solid
1:41
black piece of paper up to the light
1:43
that solid paper is gonna block any
1:45
light coming through so it's the same
1:47
concept with layer masks you can
1:49
actually paint a layer mask by clicking
1:50
the brush tool and making sure the color
1:53
selected is black you can actually
1:55
remove the layer just by painting on it
1:58
we undo that and change the color to
2:00
white it's gonna bring back your
2:02
original photo as you can see if I paint
2:04
this we're back here now if you don't
2:06
want to have as harsh of a brush you can
2:08
actually select a shade of grey so I'm
2:11
gonna select that one right there
2:12
this is useful if you want to have a
2:14
nice fade or gradients transition from
2:16
the foreground to the background it
2:18
doesn't look as good I would recommend
2:20
sticking with white or black and then
2:22
changing your actual brush settings
2:23
maybe bring the opacity down as well as
2:25
a flow so you can just fix the edge here
2:27
because you still see a little bit of
2:28
the blue from this guy before and you
2:30
can just kind of go along brushing over
2:32
the edge just to make it less obvious
2:34
that you've cut this out somes gonna
2:36
quickly go over the edge just to make
2:37
sure it looks a little bit more natural
2:40
you spend as long as you want doing edge
2:42
maintenance on this mask you might even
2:44
go to the blur tool here and just do a
2:46
quick run-through of this edge just to
2:50
kind of blur it into the background a
2:51
bit more make it look more natural I'm
2:52
gonna leave that and move on to a bigger
2:54
issue which is the fact that this
2:55
foreground is looking very bright and
2:58
well lit and does not really blend well
2:59
with this background so I'm actually
3:01
gonna create a curves layer and I'm
3:03
gonna right click so that can turn it
3:05
into a clipping mask so what that does
3:08
it just only affects this layer here and
3:10
it will not affect the bottom background
3:12
layer which is this guy it's only gonna
3:14
adjust the foreground so using the
3:15
curves adjustment I'm gonna just the
3:17
exposure so it looks much more real
3:19
because the Hollywood Hills are not this
3:21
bright at nighttime
3:23
I surround the highlights alright so it
3:25
looks good it's got a bit of a red kind
3:26
of hue to this foreground and you can
3:28
really see this on the white of the
3:30
Hollywood sign so I'm gonna use this
3:32
layer mask which is already here I'm
3:33
gonna paint black gonna change my pass
3:36
it all the way up flow all the way up
3:38
and I might add a bit of a feather to
3:39
the edge of my brush okay so now I'm
3:41
just gonna paint black over the
3:43
Hollywood letters and as you can see if
3:44
I paint on this foreground it's gonna
3:46
return back to its original state before
3:48
I made the curves adjustment it's meant
3:50
undo that basically just exaggerate the
3:53
letters a little bit more and correct
3:55
that red hue that the curves layer made
3:57
so again just a subtle adjustment but
3:59
that's really gonna make a difference we
4:00
zoom out mind adjust that even more so
4:02
there you go I've used two different
4:03
masks here using the magic wand tool I
4:05
got rid of the sky and created a mask
4:08
then I created a curves adjustment layer
4:09
to make the scene more realistic and
4:11
darken the overall look then create
4:13
another mask to accentuate and
4:15
exaggerate the Hollywood sign making it
4:17
more bright so it sticks out a lot so
4:18
there you go that's a quick and easy way
4:20
of how to create masks in Photoshop I
4:22
would highly recommend using masks over
4:23
actually erasing use the eraser tool
4:26
then continue making adjustments
4:27
you won't be able to hit undo if you go
4:29
too deep and adjustments there's no way
4:31
of really getting it back however if you
4:33
use the layer mask and just paint on the
4:35
scene in a pinch you can always just
4:37
switch the foreground and background
4:38
color paint with white and you can bring
4:41
back your foreground now if you like to
4:43
speed up your workflow in Photoshop and
4:45
create effects that would take you a
4:46
long time or things you just don't know
4:47
how to do check out filter grade comm
4:49
for all the best Photoshop actions such
4:51
as light leaks some lens flares color
4:53
wash film effects and many more in
4:56
addition to the Photoshop actions
4:57
check out filter grid for all the best
4:58
Lightroom presets capture one styles and
5:01
video let's
5:01
[Music]