Up next in 10

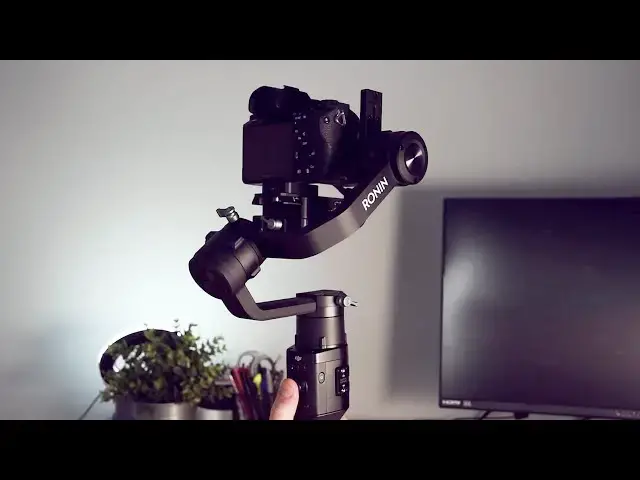
Our full setup guide for the DJI Ronin S Gimbal! Follow along as Matt puts together the gimbal and shows you how he balances the Sony a7ii.
Get the DJI Ronin S Gimbal here: https://adorama.rfvk.net/qnDyKb (affiliate link)
Related articles: https://filtergrade.com/?s=gimbal&sentence=1&post_type=post&submit=Search
Covered in this tutorial:
- Unboxing and overview of DJI Ronin S Gimbal
- Setup of Gimbal and Tri-Pod Stand
- Balancing a Camera on the Gimbal
- Other helpful tips and advice for using the Ronin S
Discover amazing video LUTs and editing assets on FilterGrade: https://filtergrade.com/product-category/video/
Follow Matt Moloney on Instagram: https://www.instagram.com/matt_moloney/
-------
Shop!
Show More Show Less View Video Transcript
0:00
when i first got my gimbal i was really
0:02
excited to start using it get super
0:04
cinematic shots
0:06
make my own little movies and do all
0:08
this fun creative stuff with it
0:10
and really once i got it i had to figure
0:14
out how to set it up how to use it how
0:15
to do
0:16
you know x y and z with it and i was
0:18
super excited about it although
0:20
it was a bigger beast than i had
0:22
realized and i was a little bit
0:24
um just taken back by that and so
0:27
because of that
0:27
when i first got my gimbal i wasn't even
0:29
really using it that much
0:31
um at least as much as i had hoped to i
0:33
was actually still shooting some stuff
0:35
handheld
0:36
getting the footage back or seeing the
0:37
footage afterwards and then just being
0:39
like wow
0:40
i just you know wasted my money on this
0:42
gimbal i'm not even using it and this
0:44
footage still looks shitty i need to
0:45
figure out a way to actually make this
0:47
work
0:48
and so i went on youtube i found a few
0:50
tutorials and
0:52
just figured out a little bit more on
0:53
how to get the setup process for the
0:55
gimbal
0:56
the dji ronin s a little bit faster so
0:59
that i could set it up you know in five
1:00
to ten minutes
1:02
rather than figuring it out and hassling
1:04
over it for like 10 to 20 minutes every
1:06
time i do it
1:07
and really yeah just took a little bit
1:09
of practice a little bit of trial and
1:10
error
1:11
and after i i figured out how to get the
1:13
setup done perfectly
1:15
then i really just started using it a
1:17
lot more and
1:18
yeah it's just benefited me a lot so in
1:20
today's video we're going to be going
1:22
over how to set
1:23
up the dji ronin-s and we're going to be
1:26
using the sony a7 ii
1:27
but really this process and setup guide
1:30
works with any camera that's
1:31
you know um compatible with the dji
1:35
ronin acid
1:36
and in the weight the weight limits for
1:38
this gimbal so
1:39
let's just go ahead and get into it when
1:41
you get started with your dji ronin-s
1:43
you're going to want to open up the box
1:45
and just get familiar with everything
1:46
that's in it
1:49
first when i looked at it i was a little
1:50
bit confused because there were so many
1:51
different little parts and pieces
1:53
little screws this that and the other
1:55
but really once it's once it's all
1:56
broken down you should be fine
1:58
it's not not too much to worry about so
2:00
first things first
2:02
is the the the tripod base mount
2:06
this is one of my favorite pieces of the
2:09
the gimbal
2:10
this will help you know put it flat so
2:12
you can even use it as a tripod
2:14
but it's also super helpful just for
2:16
setting the tripod or
2:17
setting the gimbal up and yeah
2:19
stabilizing it getting it
2:21
balanced and everything like that so
2:23
this is the
2:24
the tripod mount and also i guess it's
2:27
just an extra
2:28
hand um hand grip because it does
2:32
combine down at the bottom and you can
2:34
use it as
2:35
you know your little extra arm so the
2:38
next piece
2:39
is the actual battery and the hit the
2:41
main hand grip
2:42
and this is you know the main power
2:45
source for the whole entire gimbal
2:47
and it's also where you're going to be
2:48
holding your gimbal from most of the
2:49
time
2:50
because that's right above it is where
2:52
the whole
2:53
menu i guess you can call it and the
2:55
joystick is this is perfect
2:58
just a really good setup and design for
3:00
usability and
3:02
yeah it's just just super user friendly
3:04
um
3:06
and on the right side of that menu kind
3:09
of aspect
3:10
sort of console you can see also the
3:12
power button and then there's also
3:14
um a focus wheel adapter and and things
3:16
like that for other
3:18
attachments and add-ons and the next
3:20
main piece is the actual
3:22
gimbal with all the the different axes
3:24
you can see it's a little bit of a
3:27
just a little bit of a hassle to carry
3:28
it around before it's all set up and
3:30
everything
3:31
so just set that off to the side and
3:33
then we'll get into that in just a
3:35
second
3:35
another piece that these three other
3:38
these three last pieces are all small
3:41
but they're all notable and you're
3:42
definitely going to need them and need
3:44
to know about them
3:45
the first is the mounting plate which is
3:47
going to go on your
3:48
the bottom of your camera similar to it
3:51
to how it would with um
3:52
a tripod or something like that so
3:55
you're going to put the mounting plate
3:56
onto the bottom of your camera with one
3:58
of the screws that they have given you
4:00
i just use um a key usually you can use
4:03
like a flathead screwdriver
4:04
or anything flat to tighten it all the
4:06
way
4:07
this is just going to secure the
4:10
mounting plate to your camera
4:11
the next is the actual mounting
4:15
i guess slash sliding plate um
4:18
this is the slider that goes that
4:20
connects your camera's mounting plate
4:23
to the gimbal itself which is just going
4:25
to make it easier for when you want to
4:27
slide your your gimbal
4:29
or your camera on and off the gimbal so
4:32
this is super convenient it's annoying
4:33
to put on but it is really convenient
4:35
for when
4:35
you need to just take the camera off the
4:37
gimbal grab it on
4:39
use it as handheld and then slide it
4:40
back on real quick so i do
4:42
you know appreciate that that design
4:45
aspect and then the third piece that i
4:47
had mentioned
4:48
is just this little lens stabilizer
4:51
that they included it attaches to that
4:54
sliding plate that i just mentioned
4:56
and really you only really need to use
4:59
it for bigger lenses that might have a
5:01
little bit of
5:02
you know jitter to them but i like to
5:05
use it on all of the the lenses just
5:06
because it makes for a more
5:08
stable secure setup and really it's not
5:10
that
5:11
you know sturdy or anything like that
5:13
but it does get the job done
5:14
so now that we have all the pieces and
5:18
we know
5:19
what everything is we really just it's
5:21
just
5:22
a little beast that we need to tackle
5:23
and we need to put it all together get
5:25
it set up so that
5:26
you can be using your camera how you
5:28
normally would but now with
5:29
smooth stabilized footage like you you
5:32
intended to use it for
5:33
so when you first open the box you'll
5:35
probably notice your quick start guide
5:37
and
5:38
the you know just your setup
5:40
instructions and everything like that
5:41
and that is helpful
5:43
although i will say i i breezed through
5:45
it and i still wanted to go to youtube
5:47
find a video on how to do it perfectly
5:49
this side or the other
5:50
the next thing you'll probably see in
5:52
the the box when you first start out
5:55
is the power cable it's just a simple
5:59
um just a simple power cable i don't
6:01
even know what it is
6:02
but it just connects to your dji ronin
6:04
and you can use one of your
6:05
you know iphone blocks or something like
6:07
that it's just a us
6:08
usb plug just plug it in charge it up
6:12
takes about 8 to 12 hours to charge
6:14
fully but it will last you
6:16
i don't even know maybe 12 to 16 hours
6:18
pretty long so you can really use it for
6:21
for a while so that's that's another big
6:23
benefit out of this
6:24
so now that you've seen all the
6:25
different pieces of the actual gimbal
6:27
let's get into how to set it up to make
6:28
it look like a full setup
6:30
where you can go and shoot with it right
6:32
so how i like to start
6:34
really is with the the tripod mount just
6:38
to make it a lot easier then you can set
6:40
this down
6:41
um you can prop it up so this is
6:44
basically i like to look at it as an
6:45
extra grip for when you're actually
6:47
shooting with it
6:48
but yeah in terms of for setup this is
6:51
the easiest to set it up like this
6:53
with you know a wide a little bit of a
6:55
wider setup
6:56
that way you can get everything else on
6:57
it so the tripod base mount attaches to
7:00
the battery
7:01
hand grip and you're just gonna screw it
7:03
in like you would with any
7:05
um you're just gonna screw it in like
7:07
you would with any tripod
7:11
let's see if i can get it
7:16
and once you screw it in it's just going
7:18
to make everything a lot easier
7:20
then you can easily attach everything
7:24
from
7:24
on top of here rather than trying to do
7:26
it all on the ground
7:28
so now that the bottom tripod mount is
7:31
attached to the actual hand grip battery
7:33
let's go ahead and put the actual gimbal
7:36
onto the battery and mount it up
7:38
so you can do this just by sliding it in
7:42
to you know the the battery mount and
7:45
then locking the side lever
7:49
and then obviously you're going to have
7:51
a little bit of a trouble
7:52
a little bit of trouble with the arms
7:54
just because they're all over the place
7:56
right now
7:56
just try and contain them as best you
7:58
can in the meantime we're going to put
8:00
the mounting plate onto the camera
8:02
like i said before you can use a flat
8:04
head screwdriver or a pair of keys
8:06
to just tighten this screw all the way
8:08
it doesn't really matter which way this
8:10
plate goes
8:10
but the next plate will matter so now
8:13
that the first plate's on
8:14
go ahead and grab the sliding plate and
8:16
attach that
8:18
to the base plate on the camera and
8:20
tighten those screws as well
8:22
you're going to want to use both screws
8:24
for that part just to make sure
8:25
everything's in
8:26
securely if you're using a large lens
8:28
make sure to use the lens stabilizer
8:32
attachment that will really help you out
8:34
it's adjustable too so it can go you
8:36
know up or down depending on how big
8:38
or small the lenses and now that you
8:40
have that all set up
8:42
the next step is to actually slide the
8:45
camera sliding
8:46
you know slider mounting plate onto the
8:48
dji ronin
8:50
you're going to make sure that the lever
8:51
is unlocked on
8:53
the axis where you're going to put your
8:54
camera so once you can get that
8:56
in just go ahead and lock it kind of in
8:59
a center point
9:00
just based off of how it looks just so
9:02
it stays kind of stable and then
9:04
we'll get into how to stabilizing it
9:06
after that
9:07
now that you have your camera attached
9:08
to your gimbal we're gonna go ahead and
9:10
stabilize it and
9:11
this is one of the hardest parts about
9:13
setting up the whole gimbal
9:15
obviously putting pieces together is one
9:17
thing but really
9:19
getting the actual gimbal stabilized and
9:21
balanced perfectly so that you can use
9:23
it
9:23
is at least at first one of the hardest
9:26
parts
9:27
once you get in a groove with it and you
9:28
get comfortable with the gimbal
9:30
and how it works then it's definitely a
9:31
lot easier but when you're first
9:33
starting out it's just daunting
9:35
it's super annoying and it feels like
9:36
just a real tedious step when you get
9:38
get to a set or get on shoot and you
9:41
have to deal with that aspect of it so
9:44
let's get into how to setting it up
9:45
super simple
9:47
and you know make it an easy process so
9:50
for me
9:51
how i like to go about it usually is i
9:54
like to get the camera
9:57
attached on with the mounting plate and
9:59
then slide it all the way to the right
10:01
where the mounting plate is slide that
10:03
all the way as far to the right as i can
10:05
because the closer it is to that right
10:07
bar the more stable it's going to be
10:09
once it's locked over there just go
10:12
ahead and tighten that screw in the back
10:14
on the sliding plate for the for the
10:16
camera itself the next step
10:19
is the roll access which is on
10:22
the right side of your camera basically
10:25
and you're going to want to point your
10:27
camera straight up towards the sky
10:30
and basically if your camera is
10:34
you know leaning back towards you if
10:36
you're standing behind your camera if
10:37
it's leaning back towards you
10:39
then it's a little bit top heavy or if
10:41
it's a little bit back heavy
10:42
rather but if it's leaning towards the
10:45
front if it keeps falling down
10:47
face forward then it's top heavy so
10:50
really you're just gonna have to balance
10:51
that
10:52
find the right spot for it once it's in
10:54
the middle it will just point straight
10:56
forward
10:56
or straight up rather just straight
10:58
towards the sky straight towards
11:00
the ceiling and
11:03
yeah so once you have that one the roll
11:05
axis set up
11:06
then you should be good to do the actual
11:08
camera itself
11:10
on you know the the main mounting plate
11:14
and really this one's kind of tricky but
11:16
it all comes with
11:18
the it all comes with how you know it
11:21
all comes with the lens and how big it
11:22
is
11:23
how much it weighs and really you're
11:25
going to want to just hold the lock
11:27
lever on the left side of the camera
11:30
and kind of play with it back and forth
11:33
i will say
11:34
there's a lock to take the the actual
11:37
base plate
11:37
out of the camera so if you do
11:39
accidentally drop it forward it's not
11:41
just going to fall off of your gimbal
11:43
it will stay there but just be wary of
11:46
this just in case because you don't want
11:47
to break your gear
11:49
once you have your camera balanced to a
11:50
good middle weight for
11:52
the base plates the base plate itself
11:55
then you're going to want to go to your
11:56
tilt axis which is on the back
11:58
and for the tilt axis it's actually this
12:01
one's
12:02
relatively easy you can really just tell
12:05
if it's leaning too far to the left or
12:07
if it's tilting too far to the right
12:09
then you gotta balance it so that you
12:11
know the bottom of your camera
12:13
is parallel with the ground so that your
12:14
image is flat and and how it should look
12:18
the last one is gonna be your
12:21
pan axis which is the basically the
12:24
bottom one
12:25
which in my opinion is another tricky
12:27
one and i still don't really fully
12:29
understand it
12:30
but most most times for me it
12:33
stabilizes or it balances perfectly if
12:36
you have kind of the middle weight of
12:37
your camera
12:39
based directly over that that pan
12:42
um kind of screw sometimes i'll print
12:45
i'll bring it
12:46
too far forward or too far backward and
12:49
it doesn't really look like the camera's
12:51
off
12:51
off balance but in terms of usability
12:54
and
12:54
maneuverability it will help to have
12:57
that
12:59
based under the middle weight of your
13:00
camera
13:02
so now that you have it set up and it
13:05
feels like
13:06
it's it's kind of in a good spot one way
13:09
to test it before you actually turn the
13:10
gimbal on and test
13:12
the stabilizer and do a balance test
13:14
with the dji ronin app
13:16
you're going to want to just play around
13:17
with the camera and
13:20
so yeah you're going to want to just
13:23
play around with the camera and see
13:25
kind of how um it reacts and
13:28
if it's you know all over the place then
13:31
you're definitely not
13:32
stable or really even close yet but
13:36
really the true test is to just see if
13:37
you can point it somewhere and if it
13:39
stays and
13:40
if you can point your camera just
13:42
anywhere
13:43
and it just stays there then it's then
13:45
it's basically set up
13:47
and you can go ahead and do your balance
13:48
test to make sure that it's perfect
13:51
so yeah just even just looking at this i
13:54
can just point it somewhere
13:56
change it up point it somewhere change
13:58
it up point it somewhere
13:59
and it stays where it is that one last
14:01
one but that last one didn't but
14:03
you can really change it up point it
14:05
shoot it
14:06
and do whatever so once you have once
14:08
you have the gimbal actually
14:10
set up and it looks like it's pretty
14:11
stable just you know
14:13
by looking at it with your eyes um
14:15
you're going to want to download the dji
14:17
ronin app on your phone
14:19
just so that you can do a quick balance
14:21
test get everything connected
14:23
and then you're good to start shooting
14:25
once you set up the modes and everything
14:26
like that so
14:28
go ahead and get the dji ronin app on
14:29
your phone and
14:31
really for me it was super simple um
14:34
you're going to want to turn it on
14:35
you're just going to need to turn the
14:36
base
14:37
the battery plate on first and then
14:39
you're going to turn it on
14:41
next to the the joystick there's another
14:43
power button
14:44
you're going to want to do that one
14:45
second and
14:47
to connect it you go into the dji ronin
14:49
app and you just hit connect
14:51
it's a big you know big square button at
14:53
the top it's not too hard to miss
14:55
and for me i i thought i was gonna have
14:58
to look up
14:59
how to how to do it this side or the
15:00
other but really it just it just
15:02
connects pretty automatically like a
15:03
bluetooth device or something like that
15:06
in the area and ever since mine has just
15:09
kind of been paired together and so
15:11
after you get it connected
15:12
you're going to want to do a balance
15:14
test go ahead and get onto the app
15:17
and just do a quick balance test
15:22
so once you get to once you get to the
15:25
balance test
15:26
on the ronin app you're going to go
15:27
ahead and see that it makes you point it
15:30
at a 15 degree angle just so that they
15:33
can do the test with it
15:35
um through the app and once you have it
15:37
at about a 15 degree angle go ahead and
15:39
hit begin test
15:42
and the dji will just perform a ronin or
15:45
a quick balance test
15:46
on its own through the ronin app i think
15:49
this is a really good
15:50
benefit and perk that they add to it
15:52
because it just helps to get set up and
15:54
and make sure you're you're going to be
15:57
good it's not like
15:58
just a thing to question is is it set up
16:00
right is it going to look right
16:01
in in post and everything like that so
16:04
it takes about
16:05
10 to 15 seconds sometimes a little
16:07
longer but
16:08
you'll get a quick result analysis and
16:11
for me it says tilt excellent roll
16:13
excellent pan
16:14
excellent i'm just going to hit ok now
16:16
i'm good to go
16:18
just looking throughout the rest of the
16:19
ronin-s app you can see your battery
16:21
percentage
16:22
you can if you go into the top left
16:25
corner on the far right there's a little
16:27
one button
16:28
this will show what mode you're in you
16:30
can change all these up
16:32
change the speeds change so that way you
16:34
can do three different mode
16:35
settings and change the motor speeds
16:37
change the different types of
16:39
preferences you have for each mode we
16:41
can go into this in a different video
16:43
i think this is a little um that's a
16:45
little bit down the road once you figure
16:47
out how to actually use the ronin-s a
16:49
little bit more so another thing you can
16:50
do that i think is actually pretty cool
16:53
is you use the virtual joystick on the
16:55
ronin app which
16:56
it always gets people going because it's
16:58
just like a little remote controlled um
17:02
camera type thing you can just just use
17:05
your joystick
17:06
just like you would be on the camera but
17:07
it's just on your phone so i think
17:09
that's super cool
17:10
you can even turn the motors up change
17:12
the smoothness and the speed
17:14
so it's super fun i just think once you
17:18
get it set up once you figure out how to
17:20
balance it and everything
17:21
it's really all about learning movements
17:23
learning how to use the different
17:25
modes and settings to their best
17:28
abilities that they can because when you
17:30
first get it
17:31
it really you might think that it's all
17:33
about oh
17:34
now i have a gimbal now i can shoot all
17:36
this smooth footage
17:38
and make all my videos look that much
17:39
better but at the end of the day
17:42
it's about what you're creating and what
17:44
your ideas are if you don't have ideas
17:46
to use this tool to create with then
17:48
it's just going to be an expensive
17:50
you know fun piece of equipment so make
17:52
sure that you're always being wary about
17:55
how you're going to use the equipment
17:56
and not just why you're going to get it
17:58
if you if you don't have any real reason
18:01
on how you're gonna use it
18:03
maybe just think twice about getting it
18:05
so for me the ronin-s
18:07
really has helped me in my work just
18:09
make my footage look
18:10
a lot more high production value a lot
18:13
more professional and official i guess
18:15
you could say
18:16
um it helped me up my creativity also
18:19
at the same time really before when i
18:21
was shooting handheld
18:22
there were lots of times when i couldn't
18:24
get the angles that i wanted to
18:26
i couldn't get even the specific shots
18:28
that i wanted to
18:29
for a perfect example um
18:32
when i was shooting handheld before i
18:34
would always have the goal to get
18:36
you know a nice intro scene of somebody
18:38
walking in somewhere
18:39
and have it get their feet and just
18:42
super close to the ground
18:43
super simple shot if you have the right
18:44
equipment but
18:46
i i always struggled because it would
18:48
always be super shaky out of focus this
18:50
that or the other
18:51
because i was doing it handheld and this
18:53
is actually the first
18:55
that was the real first benefit that i
18:57
saw from it was just being able to get
18:58
those angles that
19:00
they seem so easy in
19:03
all the content that we're watching on
19:04
tv and youtube and instagram
19:06
all over the web it seems so easy to get
19:09
shots like those
19:10
but if you don't have the equipment it
19:12
was just for me it was really difficult
19:14
to get those simple shots and now that i
19:15
have
19:16
the ronin i'm able to get you know shots
19:19
that are close to the ground
19:20
shots that are above me shots that are
19:23
just
19:24
out of my hand-held reach and i think
19:27
that's
19:28
just a super a super big benefit on top
19:30
of the whole
19:31
stabilized footage that you'll get out
19:33
of the ronin-s so yeah the dji ronin-s
19:35
has really helped me out a lot in my my
19:38
short filmmaking career so far
19:39
and i'm excited to see where it can take
19:42
me in the future and
19:43
and what what else i can make with it so
19:45
if you enjoyed this video make sure to
19:47
leave a like and comment
19:48
we're going to be making some more
19:50
tutorials about the dji ronin-s
19:52
some more advanced things on you know
19:54
the menu settings some gimbal movement
19:56
tutorials and things like that so make
19:58
sure you leave a comment if you have any
19:59
other specific
20:01
ideas but other than that thank you for
20:03
watching and have a good day
20:04
peace out
20:17
[Music]
20:31
you