Up next in 10

Hey everyone, this is Mason with FilterGrade and today we’re going to be talking about editing audio with Adobe Premiere Pro. That’s right, Premiere Pro, not Audition, the dedicated audio editor in the Adobe Creative Cloud suite. Premiere Pro has plenty of great audio enhancements that can improve your video’s sound without ever jumping into another program.
In this video you'll learn about:
* Bring bass back into your audio
* Audio compression
* Noise removal
* Presets and useful settings
* Reverb removal
* Working with audio in larger projects
View sound effects on FilterGrade! https://filtergrade.com/product-category/video/sound-effects/
View all Video products: https://filtergrade.com/product-category/video/
Watch these next....
** Download the FREE Cinematic LUTs: https://www.youtube.com/watch?v=ScvZ1kud9kE
** Learn Adobe Premiere Pro CC in 15 minutes - BEGINNER TUTORIAL: https://www.youtube.com/watch?v=8ppP3Lmom84
** Premiere Pro Masking Techniques: https://www.youtube.com/watch?v=0EL5LhyEWys
** Top Shortcuts in Premiere: https://www.youtube.com/watch?v=9lYxaiDW0Ns
Show More Show Less View Video Transcript
0:03
hey everyone this is Mason with filter
0:05
grade and today we're going to be
0:07
talking about editing audio with Adobe
0:09
Premiere Pro that's right Premiere Pro
0:10
not audition the dedicated audio editor
0:13
in the Creative Cloud suite Premiere Pro
0:15
has plenty of great audio enhancements
0:17
that can improve your video sound
0:18
without ever jumping into another
0:20
program bring bass back into your audio
0:23
a lot of audio recorded on cameras or
0:26
cheap microphones can be pretty tinny
0:28
and flat you may think it's beyond
0:29
saving but there is a lot that we can do
0:31
go to the effects panel and search for
0:33
parametric equaliser then drag it onto
0:35
your clip an equaliser lets you play
0:38
around with the different audio
0:39
frequencies in your clip if you ever
0:41
messed around with the bass and treble
0:42
controls on a car stereo then you're
0:44
already familiar with a basic equalizer
0:45
tool once you've applied the effect go
0:48
into the effects control panel and
0:50
scroll down to custom setup click the
0:52
edit button this will pop up with a full
0:54
equalizer control panel the left side
0:56
has your low end the bass and the right
0:58
side has the high end the treble here's
1:01
what our clip sounds like right now
1:02
don't forget to Like and subscribe the
1:06
first thing you can do especially on
1:07
tinny audio is adjusting the bass curve
1:09
higher you can mess around with the
1:11
exact amount until it sounds good to you
1:13
but likely around 120 Hertz should be a
1:15
good starting point don't forget to Like
1:18
and subscribe don't forget to Like and
1:22
subscribe
1:24
don't forget to Like and subscribe
1:27
that's not a fixed tinny audio the rest
1:30
of these tips are more for audio
1:31
recorded in standard microphones and
1:33
more ideal environments rather than
1:34
trying to save audio format in your
1:36
recording compression compression is so
1:39
named because it literally compresses an
1:41
audio waveform lowering the volume of
1:42
loud parts and raising the volume of
1:44
quiet parts until the audio is fairly
1:46
consistent this helps make your audio
1:48
sound so much better especially voices
1:50
when talking we tend to trail off or
1:52
speak with any consistent volume
1:53
compression helps mitigate the
1:55
unfortunate side effects of this natural
1:57
way of speaking while also giving your
1:58
audio more of a crisp sound go to the
2:02
effects control panel and search for
2:03
multiband compression here's what our
2:07
clip sounds like right now don't forget
2:09
to Like and subscribe go to the effects
2:13
control panel and click on edit and here
2:16
we see our multiband compressor
2:17
interface it comes with a lot of great
2:19
presets that might work well for you so
2:21
start with one of those if you're not
2:22
comfortable with advanced audio editing
2:24
and here's what happens when we use the
2:26
broadcast preset don't forget to Like
2:29
and subscribe already a massive
2:31
difference this should bring up the
2:32
overall volume and balance of your audio
2:34
but it will also bring up the volume of
2:36
annoying bass and treble sounds so we'll
2:38
need to cut some of those off to deal
2:40
with the bass take the bass section on
2:41
the far left and lower the gain until
2:43
those rough booming bass sounds start to
2:44
disappear don't forget to Like and
2:49
subscribe don't forget to Like and
2:54
subscribe don't forget to Like and
2:57
subscribe if your treble is too high or
3:00
you're getting a lot of annoying s
3:01
sounds you can do the same with the
3:03
highest frequency is found on the right
3:04
side don't forget to Like and subscribe
3:10
don't forget to Like and subscribe you
3:15
may also want to experiment with the low
3:17
mids this is where most of the human
3:20
voice falls boosting this range can give
3:21
your voices a brighter and more
3:23
professional tone don't forget to Like
3:26
and subscribe don't forget to Like and
3:30
subscribe
3:33
don't forget to Like and subscribe don't
3:37
forget to Like and subscribe while
3:40
you're in the compressor make sure your
3:42
audio levels are all right you can
3:44
adjust the output gain to boost the
3:45
volume of your audio clip you can also
3:47
utilize margin in the limiter tool to
3:51
prevent yourself from peaking too much
3:52
make sure that brickwall limiter box is
3:55
checked and then try setting the margin
3:58
to about minus three this will make sure
4:02
your audio won't peak past minus three
4:03
decibels don't forget to Like and
4:06
subscribe
4:07
noise removal the unfortunate part about
4:10
compression is that it will introduce a
4:12
digital noise in the portions that were
4:14
boosted this is a side effect of
4:15
applying additional gain
4:17
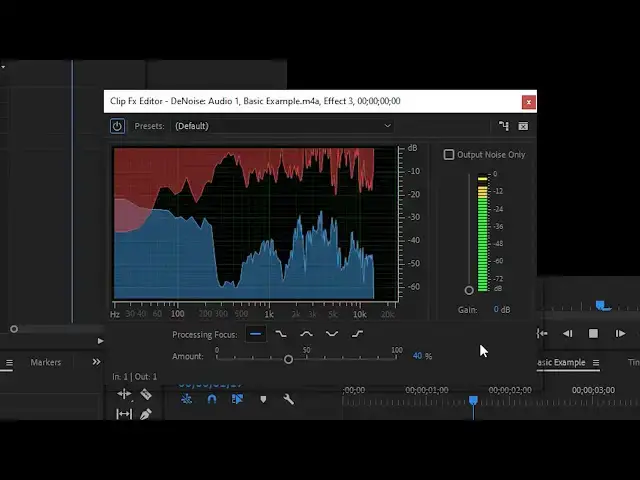
let's denoise this clip that we just
4:19
added compression on go into the effects
4:21
panel and search for D noise go into the
4:24
effects control panel and click on edit
4:26
the default settings should be a good
4:27
starting point and will probably fix a
4:29
lot of your noise problems don't forget
4:31
to Like and subscribe in this case we'll
4:34
probably want to adjust that down a
4:35
little bit because it's taking out too
4:36
much don't forget to Like and subscribe
4:38
that's pretty good
4:41
now let's use an unedited clip that has
4:43
a lot of noise here's what it sounds
4:46
like right now
4:49
don't forget to Like and subscribe the
4:53
kind of noise the denoiser gets rid of
4:55
in cases like this is consistent
4:56
background noises like microphone hiss
4:59
or fairly consistent noise like computer
5:01
fans this won't magically erase
5:03
background noises like people talking or
5:05
cars honking now let's go and add the D
5:07
noise to this clip and click on the edit
5:10
button with the default selected let's
5:13
see what that did as you can see almost
5:17
none of the noise that we heard before
5:19
is in the clip now don't forget to Like
5:26
and subscribe you can move the slider
5:29
around to adjust the amount of denoising
5:31
again you can also tell Premiere Pro
5:33
which frequencies the noise occupies by
5:36
default Premiere is checking all
5:37
frequencies which can be effective in
5:38
many cases but has a higher chance of
5:40
degrading your overall audio quality a
5:42
hissing sound might occupy only the
5:44
higher frequencies so you can tell
5:46
Premiere to only look there and then
5:48
adjust the amount to see if you're able
5:49
to scrub away the noise that way don't
5:56
forget to Like and subscribe if you're
6:00
not sure if the tool is removing too
6:02
much of your original audio you can
6:03
click on the output noise only box and
6:05
hear if much of your original audio is
6:07
being cut out
6:13
in this case we hear most of the noises
6:15
being removed and only a little bit of
6:17
my actual voice reverb removal removing
6:23
reverb works much the same search for
6:25
and apply the effect D reverb here's
6:27
what our clip sounds like right now
6:29
don't forget to like it subscribe now
6:35
let's click on the edit button in the D
6:36
reverb tool adjust the slider until
6:38
you're happy with the result
6:40
here's what default sounds like don't
6:43
forget to Like and subscribe in addition
6:45
to adjusting the amount you can also
6:47
adjust the frequency if you're
6:48
comfortable just like in the denoise
6:50
tool don't forget to Like and subscribe
6:55
to my kit subscribe don't forget to Like
7:00
and subscribe
7:03
the autogain toggle will try to restore
7:05
the overall volume of the clip as
7:07
reducing reverb will result in a lower
7:09
volume audio track working with audio in
7:12
larger projects so far we've covered how
7:14
to apply these effects to individual
7:16
Clips but if you're working on something
7:17
along with many Clips like a podcast you
7:19
probably don't want to have to apply the
7:21
effect to every clip one by one there is
7:23
an easier way which lets you apply an
7:25
audio effect to the entire audio track
7:27
in your entire project to access this
7:29
click on window and make sure that audio
7:32
track mixer is selected for whichever
7:35
track you want to apply the effect to
7:36
click on the drop down menu and you will
7:38
see a list of effects these are the same
7:41
audio effects you have access to
7:42
normally you can add the denoiser the
7:44
compressor or any other effect double
7:46
click on the effect and you'll see the
7:49
same control panel that we saw before
7:50
and of course you can add multiple
7:52
effects on top of each other so you
7:56
could use a denoiser and a compressor in
7:57
conjunction these were some simple tips
7:59
for making your audio sound better in
8:01
Adobe Premiere Pro without ever leaving
8:03
the program Premiere has all the tools
8:05
and presets that its counterpart
8:06
audition has and using them in your
8:08
video edits can greatly increase the
8:10
quality of your production especially in
8:12
things like vlogs podcasts or audio that
8:13
was recorded in an unidentified or
8:19
anything we may have skipped over in
8:21
this tutorial that we should cover in
8:22
the future
8:24
if you enjoyed this video be sure to
8:26
like and subscribe and leave a comment
8:28
down below and if you're looking for
8:30
professional Luntz lightroom desktop and
8:32
mobile presets Premiere Pro templates
8:34
and more photo and video education visit
8:36
filter grade comm today