Up next in 10

This tutorial was contributed by creator Softoni! Subscribe to their channel: https://www.youtube.com/@softonimotion
Here's more from the creator: 'Welcome to my tutorial on creating cool shapes background in After Effects! In this step-by-step tutorial, I'll show you how to create a visually appealing and dynamic background that will elevate your motion graphics projects to the next level.
Whether you're a beginner or an experienced After Effects user, this tutorial is for you. I'll guide you through the process of creating a stunning visual from scratch, using various techniques and effects in After Effects.
Subscribe now and let's get started!'
View Softoni's store here: https://filtergrade.com/vendor/softoni/
View all After Effects Templates on FilterGrade: https://filtergrade.com/product-category/after-effects-templates/
- - - - - - - - - - - - - - - - - - - -
Follow FilterGrade!
Instagram - https://www.instagram.com/filtergrade/
TikTok - https://www.tiktok.com/@filtergrade_
Facebook - https://www.facebook.com/filtergrade
Twitter - https://twitter.com/filtergrade
Show More Show Less View Video Transcript
0:00
hello guys soft Tony here welcome back
0:02
to this brand new After Effects tutorial
0:05
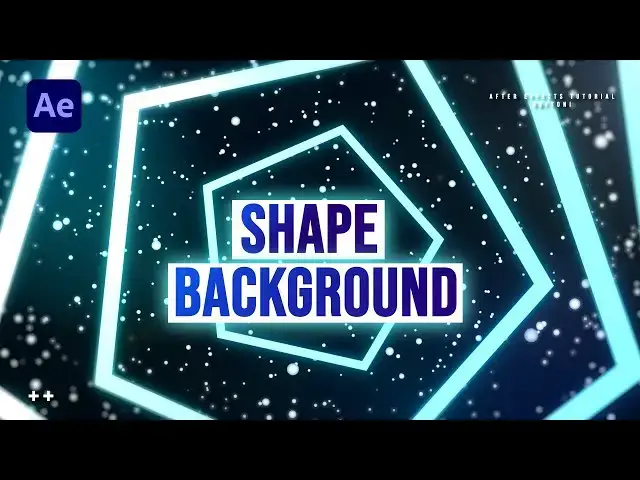
and in this one we will be creating this
0:07
creative shape background here in After
0:09
Effects this technique is really easy to
0:11
create just follow my steps so without
0:14
wasting any more time let's jump into
0:16
after effects and get
0:20
[Music]
0:28
started
0:30
all right we're here in After Effects
0:32
and first like always let's create a new
0:33
composition controll or command plus and
0:36
this is going to be final 9020 by 1080
0:39
60 frames per seconds and duration 10
0:41
seconds long now hit okay and it's time
0:43
to create background right click to
0:45
create a new solid layer this is going
0:47
to be Background 90/20 by 1080 also hit
0:51
okay and then go here in the fact and
0:53
pres it and if you can find them just go
0:55
window and you will find the effects and
0:57
preset here now type fil effect drag and
1:00
drop onto the background or double click
1:03
and let's change color to pure black
1:05
color hit okay now let's create another
1:08
solid layer go right click to create new
1:10
solid layer this is going to be
1:12
particles like so hit okay and then go
1:15
in the effects and PR it find again F
1:17
effect drag and drop onto the particles
1:20
change color to pure white color hit
1:22
okay then go here again find star burst
1:26
effect drag and drop also here on the
1:29
particles and here for the scatter let's
1:31
type 350 for the speed I will type
1:36
0.70 something like this of course you
1:38
can play around with your options and
1:41
third effect is going to be glow effect
1:43
Dr and drop onto the particles and here
1:46
for the glow threshold let's try maybe
1:48
30% glow radius maybe around 280 or 300
1:53
it's up to you and for the glow
1:55
intensity maybe lower down to
1:58
0.8 something like this
2:00
and now when we hit zero we have cool
2:03
particles in our final composition okay
2:07
now let's also draw shape here in the
2:09
composition go here on this little icon
2:11
or hit Q for a few times on your
2:13
keyboard or go left Mouse click to find
2:15
the polygon tool but first I will turn
2:17
on the titles and action save and from
2:20
the center you can hold control and
2:22
shift on your keyboard to draw a perfect
2:24
shape like so you can also hold space
2:28
while you're holding control and shift
2:29
to move it up or down here in the scene
2:32
Now open up this poar option poar pad
2:35
and in every moment you can change here
2:37
maybe 4.3 and you can get here triangle
2:41
I will leave it now to five like so and
2:44
now let's animate our shape layer hit
2:46
here again and then go double click on
2:49
this Pan behind tool to Center The
2:51
Anchor Point hit s for scaling and also
2:54
hold shift and R for rotation go here to
2:57
maybe zero frames and then hit zero for
3:00
scale set up the first key frame also
3:02
for the rotation and scale and then go
3:04
to around 4 seconds or so for the scale
3:07
let's type here 500 and for the rotation
3:11
let's do around 75 and now when we hit
3:14
zero we have this uh basic animation of
3:17
our shape okay now it's time to
3:20
precompose the shape layer go right
3:22
click precompose this is going to be
3:25
shape make sure to move all attributes
3:27
into the new composition and then hit
3:29
okay and now it's time to make a few
3:32
further adjustments let's add more
3:34
effects but before that let's add
3:36
another effect here in the shape
3:38
composition here on the shape layer 01
3:40
hit F3 and then go here in effects and
3:43
pres it find Echo effect and then just
3:46
drag and drop onto the shape player one
3:49
and here let's also make a few
3:50
adjustments for the echo time type here
3:53
minus
3:54
0.600 okay for the number of echo type
3:58
here 100 and and for the Decay type here
4:01
instead of 1 Two And now when we hit
4:03
zero we have this cool shape movement of
4:06
our polygons okay now let's go here
4:09
again in the final composition go in the
4:11
effects and pres it find here ramp
4:13
effect okay Dragon drop onto the shape
4:16
and here for the start of the ramp let's
4:18
go upper left corner end of the ramp go
4:20
lower right corner and for the first
4:23
color let's change this to pure white
4:25
color for the second color let's go and
4:27
find this bright bright blue color
4:30
something like this and then hit okay
4:33
now let's also add glow effect again hit
4:36
glow here and then drag and drop onto
4:38
the shape composition for the glow
4:40
threshold instead of 60 type here 90 for
4:43
the glow radius instead of 10 type here
4:45
40 and for the glow intensity instead of
4:48
one type here
4:49
0.5 okay now let's duplicate this shape
4:53
composition hit control+ D or go edit
4:56
and then duplicate and for the second
4:59
one I will rename this one shape Shadow
5:02
something like this okay now let's
5:04
delete this gradient ramp here in the
5:06
shape Shadow composition Okay add fill
5:10
effect okay drag and drop here above
5:13
glow effect let's find here maybe also
5:16
bright blue color and then hit okay now
5:20
let's add another effect find here CC
5:23
radial fast blur drag and drop above our
5:26
glow effect and also for the amount
5:29
let's type here 80 and for the center go
5:32
somewhere like here okay this is looking
5:36
cool and then here in the final
5:37
composition hit t for shape Shadow
5:40
instead of 100% type maybe
5:44
7% okay and for the next step let's add
5:47
here adjustment layer go right click
5:49
here in the final composition find
5:51
adjustment layer this is going to be
5:54
lights okay go in facts and preset again
5:57
find light bra SP drag and drop onto the
6:01
adjustment layer and here let's also
6:03
make a few adjustments for the first
6:05
step let's uncheck this color from
6:07
source for the intensity you can play
6:10
around here with the options I will do
6:12
55 and for the radius type 170 and varp
6:16
softness to around 200 now let's uh
6:19
change color maybe to this type of blue
6:22
color you can also play around here with
6:24
the colors hit okay and for the center
6:27
go somewhere like here now hit control+
6:31
D here on our light race to create
6:34
second effect and then for the center
6:37
let's go somewhere around here you can
6:39
play around of course with the options
6:42
and you can reposition those points here
6:44
in the scene Also let's add our third
6:47
effect this is going to be lens flare
6:50
Dragon drop also on the lights
6:52
adjustment layer and for the flare
6:54
Center go upper right corner somewhere
6:57
like here and L type instead of First
7:00
Option change 105 mm Prime and blend
7:05
with original type around 70% you can
7:08
also here play around to maybe 50
7:10
whatever fits to you for the final step
7:13
let's add another adjustment layer go
7:15
right click to create a new adjustment
7:17
layer this is going to be BL I will add
7:21
here camera lens BL but I recommend you
7:23
to use goshan blur if you don't have
7:25
enough strong PC to support the effect I
7:28
will add camera lens blue okay drag and
7:32
drop onto the adjustment layer and for
7:34
the blue radius let's type here 10
7:36
instead of five now go here again to
7:39
find the ellipse tool here in the tools
7:43
options and then just double click while
7:46
this adjustment layer here is selected
7:48
just make sure to select this adjustment
7:50
layer double click and then hit M for
7:53
mask you can see it over here and then
7:56
just hit here inverted option you can
7:59
also play around here with the mask
8:01
double click move it on the left or on
8:03
the right side according your needs and
8:05
then also what you can do for the mask
8:07
feather instead of zero let's type here
8:10
maybe
8:11
250 and now in our finals we have this
8:14
Edge blue and this is looking awesome
8:17
hit zero and our scene is looking really
8:21
cool and awesome for the final step
8:24
let's precompose everything hit control+
8:26
a or select everything go right click
8:28
pre post this is going to be seen of
8:31
course you can type here your own name
8:34
hit okay hit s for scaling just to
8:36
prevent those Edge bendings and then hit
8:39
here
8:41
101% hit zero on your keyboard and our
8:45
background is looking really cool and
8:47
really awesome as I mentioned earlier in
8:50
every moment you can go here in the
8:52
shape option open up this content option
8:55
poly star poly star pad and if you want
8:57
to see I don't know um triangles hit
9:00
three and then go here in the finals and
9:03
as you can see now you can see the
9:06
triangles background here in the finals
9:08
I will do control+ set and then hit zero
9:12
again and this is looking awesome all
9:14
right guys that was everything for
9:16
today's tutorial like always I hope you
9:18
learn something new if you haven't
9:20
subscribed to my Channel please hit that
9:22
subscribe button also leave me a comment
9:24
Down Below in the comment section hit
9:26
that like button take a look on my
9:28
channel for more great tutorials and
9:31
until next time stay creative and
9:37
[Music]
9:45
bye-bye