Up next in 10


Transform your Dollar Tree Christmas village into a stunning holiday display—without spending a fortune! 🎄✨
In this video, I’ll show you step-by-step how to embellish Dollar Tree village houses using simple, inexpensive craft supplies.
Then, I’ll walk you through how to style and compose a beautiful Christmas village display that feels magical and cohesive. Whether you love cozy cottage vibes, classic Christmas charm, or a winter wonderland look, these tips will help you elevate your décor instantly.
| CHAPTERS |
00:00 Intro
00:23 Supplies Needed
00:50 Cut Base
02:30 Paint Roofs
05:40 Embellish Roofs
07:53 Assemble Base
11:08 Add Snow
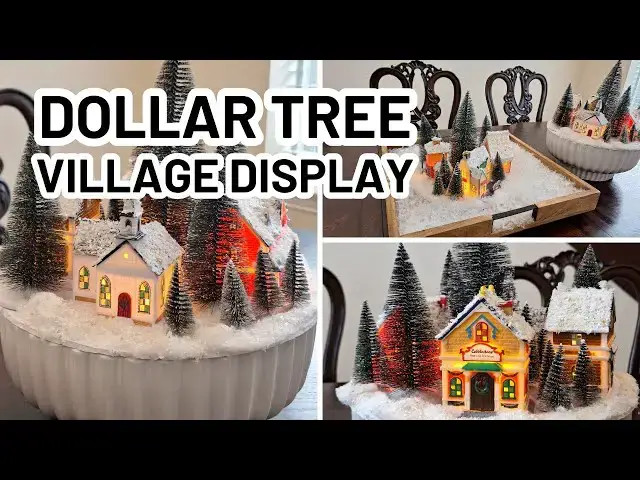
14:00 Final Results
15:37 Outro
| LINKS |*
Show More Show Less View Video Transcript
0:03
Hi, it's Lindsay Diane from
0:05
dianecor.com. In this video, I'm going
0:07
to show you how to make this gorgeous
0:10
DIY Dollar Tree village display. This is
0:14
very simple to do. It's inexpensive and
0:17
it will really upgrade the look of your
0:19
Dollar Tree Village. Let's get started
0:22
with the supplies that you'll need. So,
0:24
for this project, here's what you'll
0:25
need. You'll need a foam board for your
0:27
base. You'll need some bottle brush
0:29
trees of assorted sizes. You'll also
0:32
need your Dollar Tree village houses.
0:35
Then for the snow embellishments, we're
0:37
going to need some cotton balls, some of
0:39
the faux snow from Dollar Tree, and some
0:43
Elmer's glue, and some white paint. And
0:46
that is all. Let me show you how we
0:49
start cutting out the base. For this
0:52
project, I am using some planters that I
0:55
use as vases. These are the Better Homes
0:58
and Garden Fisher planters. I will leave
1:00
a link to these in the description box
1:02
below. I use these for all four seasons
1:05
and I just switch out the arrangement
1:07
from season to season and I leave them
1:09
on my dining table. Now, if you want to
1:12
have an elevated stand, you're going to
1:14
want to trace around your base. So,
1:17
whatever it whether it's a pedestal vase
1:19
like this or some other stand, you're
1:22
going to want to trace around it so that
1:23
you can top your foam board perfectly on
1:27
top of your base. Now, you do not need
1:30
to use a raised base for this. If you
1:33
just want to cut out a circle, let it be
1:37
about 14 in in diameter. That should be
1:39
good enough to fit in your houses and
1:41
the trees. And you can just go ahead and
1:44
trace yourself a large circle and cut it
1:46
out. You don't have to have the raised
1:48
base at all. I will show you in the end
1:50
what it looks like if you just want to
1:51
set this down on your table as is. So,
1:55
getting started, I traced around that
1:57
planter so that I could get the right
2:00
outline. And then I started using my box
2:02
cutter to cut out the circle.
2:07
[Music]
2:15
[Laughter]
2:18
[Music]
2:26
When that's all done, I'm just going to
2:28
set those two circular base plates
2:32
aside, and then I'm going to move on to
2:34
embellishing the houses. Now, with the
2:38
Dollar Tree Village houses, the thing
2:39
that really turns a lot of people away
2:42
is just how colorful they are. Um, and
2:45
by doing this village display with lots
2:48
of embellished snow on it, it really
2:51
tones down the color. You still get that
2:54
peak of color from the fronts and the
2:56
sides of the houses, but it does tone it
2:59
down quite a bit when you cover the
3:01
roofs with snow. So, you're going to see
3:05
that I have set up here white paint, the
3:09
uh baking soda, and the glue. Because I
3:12
was using a recipe to create like a
3:14
foamy snow base, you do not need to do
3:17
this step at all. You can just use the
3:20
paint as is. Just do one single color of
3:23
paint. Again, we're just trying to dull
3:25
down the color of the roof because we're
3:27
going to go in later and use the faux
3:29
snow as the texture. If you did not want
3:32
to use the faux snow, then I would use
3:34
this method. So, the ratio is supposed
3:36
to be uh one to one to three. So, one
3:40
part paint, one part glue, three parts
3:43
baking soda. I found this to be way too
3:46
chunky. I ended up having to water it
3:50
down a little bit after I used that
3:52
those measurements. So, I would say one
3:54
to one to two if you wanted to use this
3:57
method. But you truly do not need to do
4:00
this step if you're going to do it the
4:02
way that I do it, which is to add the
4:04
faux snow as a topper. That's going to
4:07
give you all of the texture that you
4:09
need. And this step is just it's really
4:12
not necessary. I would just go in with a
4:15
single coat of white paint on the roofs
4:17
and go from there. But here's how I
4:20
started to paint out the roofs. I just
4:23
go one by one. I paint all of the roof
4:26
surfaces. double check to make sure you
4:28
don't have any tiered roofs on your on
4:31
your village houses and just work your
4:33
way through them. So, like I mentioned
4:35
before, I am putting my bases on top of
4:39
these Fisher planters from Better Homes
4:41
and Gardens. These are the large
4:44
planters and they're 12 in. So, you're
4:47
going to want to make sure that you
4:48
trace something that's around 12 in. I
4:51
was able to fit four houses comfortably
4:54
on each of the base plates and then add
4:57
in the trees and the snow. If you wanted
4:59
to say trace something like this paper
5:01
plate that I have here, that's something
5:03
that's easily accessible. Most people
5:05
have them. Those are just the standard
5:07
10in sort of dinner paper plates. You
5:10
could definitely do that. I would say go
5:12
with three houses if you wanted to use
5:14
one of the 10-in plates so that you have
5:16
enough room to add in your trees. Um,
5:19
but that would could be an easy way to
5:20
go about this. If you don't want to put
5:22
it on an elevated stand or you don't
5:24
want to fit it to the exact proportions
5:26
of something that you already have, just
5:28
go ahead and use a paper plate as the
5:31
thing that you trace on your foam board
5:33
and then cut that out as your base.
5:40
Now, for the next step, we're going to
5:42
start to embellish the houses and the
5:44
base plate with the faux snow. For this
5:46
step, you're going to need that faux
5:49
snow from Dollar Tree. Now, look out.
5:51
You want the finely ground one like I
5:54
have in this package here. They do have
5:56
two different sizes at Dollar Tree. One
5:58
is a larger chunky snow. This one is the
6:02
finer snow. This is the one that you're
6:03
going to want to use to embellish your
6:05
houses. And then I also have a bag of
6:08
cotton balls. You can get these at the
6:09
Dollar Tree. I think I got mine at
6:11
Dollar General. In all, I think I maybe
6:13
used 10 or 12 cotton balls. So, you
6:15
don't really need a super large bag to
6:17
do this. Um, it's just to fill in on the
6:20
base plate. So, I'm going to start with
6:24
squeezing out some of my glue. Later on,
6:26
you'll see that I just started squeezing
6:28
the glue directly onto the roofs and
6:30
kind of using the paintbrush to spread
6:32
it around. And then what I'm going to do
6:34
is just go ahead and sprinkle that faux
6:37
snow on top of the glue layer. And it's
6:41
going to stick. I kind of pat it in a
6:43
little bit here and there and it really
6:45
creates a nice beautiful textural finish
6:49
to the top of these houses. And again,
6:52
because this is all sort of whitewashed
6:54
a bit, it really tones down the coloring
6:57
on these Dollar Tree houses really,
6:59
really beautifully.
7:01
[Music]
7:04
[Applause]
7:05
[Music]
7:32
[Applause]
7:35
[Music]
7:47
Once all of the houses are finished, I
7:51
move on to the base. So, the first thing
7:54
I'm going to do is set two of the houses
7:56
down opposite each other. All of the
7:59
houses should be facing out. And then
8:02
the other two I just do on sort of like
8:04
a caddy corner a little bit, a little
8:06
bit of a diagonal so that it just gives
8:08
it a little bit more interest and it
8:10
doesn't look so uniform all around. So
8:13
that's what I'm doing here. Once the
8:15
houses are set in, then I'm going to
8:17
start to add my trees. Now these bottle
8:19
brush trees I reuse year to year to
8:21
year. I just create different displays
8:23
with them. I still had a little bit of
8:25
the tacky putty on the bottom of them,
8:27
which is why I'm able to just go in and
8:29
and just plop them down there. You can
8:32
get a tacky putty, you can get a sticky
8:34
adhesive dot, you can do double-sided
8:36
tape, whatever you need to just lightly
8:38
adhere it to the surface. It's all they
8:40
need. You're not going to be moving this
8:42
around a ton. Um, so I would just go
8:45
ahead and tack down the trees. Now, the
8:48
reason why I'm tacking the trees and not
8:50
the houses is because these are battery
8:52
operated with an on andoff switch. Now,
8:55
if you had houses with timers, so let's
8:57
say you don't want to do this with the
8:58
Dollar Tree houses. Maybe you found
9:00
houses at Dollar General or Five Below
9:02
or something like that that have timers
9:04
on them, you won't have to worry about
9:07
picking up the houses and flipping them
9:08
over and turning them on and off every
9:10
night. But for this project with the
9:14
Dollar Tree houses, at the time that I'm
9:16
filming this, they do not have the ones
9:17
with the timers out yet. I'm hoping that
9:20
will come soon. Maybe next year we'll
9:22
get those. But right now, I needed for
9:24
them not to be adhered to the base
9:26
because I want to be able to turn them
9:28
on and off when I want. The trees,
9:30
however, I do want to stay in place
9:33
because they're going to help sort of
9:35
carve out your space so that you can put
9:38
your village houses back down in the
9:40
right place each time.
9:43
Now, I'm going to go in and what I'm
9:45
going to do is add a little bit of glue
9:47
to the base in these open areas. And
9:50
then I'm going to pull off little pieces
9:52
of the cotton balls and add those in
9:56
there as the nice base. It's going to
9:58
create a nice fluffy elevated base for
10:01
the faux snow. So, this is sort of the
10:03
first layer of the snow that I'm adding
10:05
in here. And I'm just going to do this
10:07
all throughout the base wherever I see
10:10
bare patches. So, around the houses,
10:12
around the rim, and then you'll see
10:14
later on that I'm going to tuck a few of
10:16
them in in between the houses in the
10:19
middle. And at times I need to use the
10:21
back end of the paintbrush to kind of
10:23
tuck it down there cuz I couldn't get my
10:24
hands in there. Um, but that's all
10:27
you're going to do is go all the way
10:28
around and fill in all of the gaps with
10:31
the cotton balls.
10:35
[Music]
10:51
[Applause]
10:54
[Music]
11:07
Once you've completed that step, you're
11:09
on to the final step, which is to just
11:12
drizzle a small layer of glue on top of
11:15
those cotton ball areas. And then you're
11:17
going to sprinkle on that little uh
11:20
crushed up iridescent faux snow from the
11:23
Dollar Tree. This is what's going to
11:25
give it a nice sort of melded together
11:28
look. It's going to match the snow on
11:30
the roofs of the houses, but it's also
11:32
going to give that sort of ground uh the
11:36
the ground a little bit more of a nice
11:39
elevated look. It has the puffy fluffy
11:42
snow underneath and then it has the
11:44
shimmery kind of glittery iridescent
11:46
topper. I think that this is what makes
11:49
it look really really special and really
11:50
elevated.
11:52
It's a simple way to upgrade the look of
11:55
your Dollar Tree village. Just go ahead
11:58
and sprinkle on that second layer of
12:00
snow and you are done.
12:04
[Music]
12:11
[Music]
12:17
I'm going to repeat the same process for
12:19
my second base, filling in with my
12:23
remaining four houses and my trees. So,
12:27
quick note on the trees. These trees
12:30
that I'm using, you can get similar ones
12:32
from the Dollar Tree, but these ones are
12:34
the Lax trees from Michaels. It's a much
12:38
better bang for my buck to buy the
12:41
package of trees. I'm getting 21 trees
12:43
for around like 13 or $14. They sell
12:46
these every single year. I've had these
12:48
trees for I think going on 3 years now,
12:51
and they are a great quality. Again, you
12:54
can buy them from Dollar Tree, but if
12:56
you think that you're going to need a
12:57
lot of them, I definitely had a lot left
12:59
over from this project, but when you
13:01
start to add up, you might get one big
13:03
tree for $1.50 or maybe two medium-sized
13:06
trees for $1.50, it can start to add up
13:09
on you if you think you're going to need
13:11
a lot of trees for your display. So, if
13:14
that's the case, I would definitely
13:15
recommend just going to Michaels and
13:17
getting the pack of the Lax trees. They
13:20
do sometimes sell out. As far as I know
13:23
when I'm filming this, they are still
13:25
available. And I think they were like
13:26
$13 or so for the 21 trees. I will leave
13:29
a link in the description box below for
13:31
those. But other than that, if you can't
13:33
find them, you can get them at Dollar
13:35
Tree. You can get them at Five Below.
13:36
You can get them at Target and Walmart.
13:39
Lots of places sell bottle brush trees.
13:44
[Music]
13:56
[Laughter]
14:00
And then here's a final look at this
14:03
project. I think it came out so well. It
14:06
was very inexpensive. It just really
14:09
elevates the look of the Dollar Tree
14:11
Village. I love the way it toned down
14:13
the colors. I love the texture and the
14:15
sparkle that it gives it. And then when
14:17
you light up the houses, it looks even
14:19
better. Don't forget, you do not have to
14:21
use these little arised pedestals if you
14:24
want. You can definitely place them as
14:26
is on your coffee table, on a side
14:29
table, on your dining table. I would say
14:32
if you do that, just make sure you take
14:33
care to sort of cover up the um the edge
14:37
so that you have a nice sort of fuzzy
14:39
edge there instead of the cutout of the
14:43
uh foam board exposed too much. But
14:46
overall, I think that this is a
14:48
fantastic display option for your Dollar
14:51
Tree village.
14:53
[Music]
15:10
[Applause]
15:11
[Music]
15:37
That's it for this video. I hope you
15:39
found it helpful. Don't forget to visit
15:41
me at dandor.com. I post all about home
15:44
decorating ideas and DIY projects over
15:47
there. If you like this video, please
15:49
give it a like and consider subscribing
15:50
to my channel. And I'll see you in the
15:52
next one. Bye.
15:54
[Music]
#Hobbies & Leisure
#Crafts
#Home & Interior Decor
#Home & Interior Decor
#Home Improvement