Up next in 10

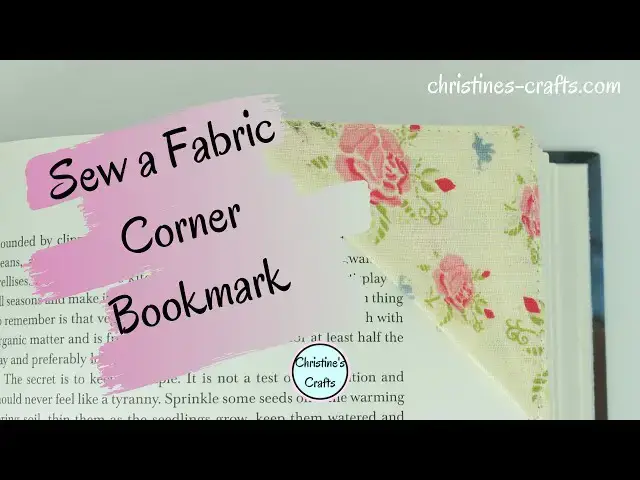
HOW TO SEW A FABRIC CORNER BOOKMARK - Quick and Easy to Make for Beginners and Use up Fabric Scraps
Jan 15, 2025

Sew your own fabric corner bookmarks even if you are a beginner! These bookmarks are so pretty and practical yet easy to make. Use up those fabric scraps and make bookmarks for you and your friends and family.
They make a great gift when given with a book or voucher. They fit nicely in the post if you are sending a gift.
If you want any more details about making these then check out my blog at https://christines-crafts.com/how-to-make-a-fabric-corner-bookmark/
If you enjoy crafting my blog is full of great ideas and tutorials. Plus if you subscribe you gain access to my free resource library and get to hear about my latest projects first. Take a look at https://christines-crafts.com/
Enjoy watching and sewing your own fabric corner bookmarks. Please leave me a 'thumbs up' if you enjoyed this video and subscribe so that you get to see all my videos as they are posted.
You can also find me across social media. To see all my information and ideas find me at https://linktr.ee/Christines_Crafts.
Show More Show Less View Video Transcript
0:01
hi today in this video i'm going to show
0:02
you how to sew your own fabric corner
0:04
bookmark
0:05
they're really easy to make use up all
0:07
those fabric scraps
0:09
and they're great for yourself or as a
0:11
gift for any book lover you know
0:13
they're really nice to put in the
0:14
envelope with a voucher if you've got to
0:16
post your gift this time
0:17
so stick with me and you'll see exactly
0:19
how to make one
0:21
i'm christine of christinescrafts.com
0:23
and this channel is dedicated to
0:24
crafting on a budget
0:26
please subscribe if you like what you
0:28
see so you'll see all my videos as they
0:30
come up and please give me a thumbs up
0:32
below
0:33
so what are you gonna need you're going
0:35
to need some squares of fabric
0:37
and interfacing okay so we've got two of
0:41
this pattern
0:43
one of that and two of the other so
0:46
you're going to choose your main fabric
0:47
and you're going to cut
0:48
two squares out should be four inches
0:51
by four inches and you need two squares
0:54
of that one
0:56
you're then going to follow that up with
0:58
whatever fabric you want to make the
1:00
triangle out of for a front of the
1:01
bookmark
1:02
and you're going to cut one square of
1:04
that also
1:06
four inches by four inches
1:10
you're then going to need some iron on
1:11
interfacing
1:13
and you're going to cut two squares of
1:15
that and you'll not be surprised to
1:16
learn
1:17
four inches by four inches and that's
1:20
everything you need
1:21
just make sure you know which sides the
1:23
gluey side and which side is not
1:26
because when you're using it that's
1:27
going to be very important
1:30
so now we've got everything let's start
1:33
assembling
1:34
you should have two squares of your main
1:37
fabric one square of your triangle
1:38
fabric and two squares
1:40
of interfacing take one of your squares
1:42
of interfacing
1:44
and fold it in half doesn't matter which
1:46
way at the moment all you're doing is
1:47
marking to cut it
1:49
so once you've cut it once you've marked
1:51
it you're going to cut it
1:53
into two triangles so you've basically
1:56
cut it in half
1:57
to form two triangles and you're going
2:00
to use one of them
2:02
and you're going to put the other one
2:03
aside for the next bookmark you make
2:06
a piece of interfacing is going to be
2:08
used on your front fabric
2:10
so make sure you've got the wrong side
2:14
of that front fabric
2:16
and you're going to place your
2:17
interfacing on it
2:20
two things to be sure make sure your
2:22
fabric is right side down
2:24
and make sure your interfacing is gluey
2:26
side down
2:27
onto the fabric place it carefully
2:32
and then press it in place you're gluing
2:36
it
2:36
to the fabric and then it can't move
2:39
about while you're sewing and cause you
2:41
any difficulties
2:43
just make sure it's smooth make sure
2:45
it's down make sure it's glued in place
2:51
once you're happy with it you're going
2:53
to fold
2:54
your fabric in half so that it covers
2:58
the other side of the interfacing you're
3:00
basically making your interfacing into a
3:02
sandwich in the middle
3:04
and then press along that line and you
3:07
can see you've formed the triangle for
3:08
the front of your bookmark already
3:11
so now we need to think about assembly
3:14
okay
3:15
we've got that what about the other
3:18
piece of interfacing we had
3:20
we're going to take one of our main
3:21
pieces of fabric
3:23
place it right side down check your
3:26
interfacing
3:27
make sure you put it glue side down
3:30
and you're going to stick that down
3:34
to your piece of main fabric again
3:37
just use your iron it doesn't need to be
3:39
too hot just hot enough to melt the glue
3:42
press it in place until your interfacing
3:44
is stuck
3:45
firmly to your fabric
3:48
just check at the edges you'll see if
3:50
it's lifting and a little bit more heat
3:57
and just check it's firmly down
4:00
and then you're ready to build so i'm
4:03
going to go back to my board
4:05
you're going to place that piece of
4:06
fabric that's got the interfacing on it
4:08
face up so we've got the right side
4:10
facing up
4:11
take the triangle you made the both
4:14
sides of the right side
4:17
place that down across there like that
4:21
and then you have your other piece of
4:22
fabric and you're going to place that
4:24
right side down
4:28
over the other two and you can check
4:31
you've done it right
4:33
you can just peel them back and you
4:34
should have
4:36
right side triangle right side
4:40
and now we're just going to pin that in
4:42
place you'll notice i'm just using some
4:44
large pins
4:45
because i just want to put one on each
4:47
side if you like using clips that's
4:49
perfectly fine
4:50
all you've got to do is make sure you
4:52
secure it and that you're not twisting
4:54
it as you go
4:57
so the first pin i put in incorporated
4:59
the triangle
5:00
to make sure it held it in place
5:04
and then you can see i've twisted it
5:06
slightly so i'm just going to go and put
5:08
the pin in the opposite
5:10
corner and then
5:13
complete by putting the other two
5:15
corners in
5:17
so you pin in the whole thing even
5:19
though you're not going to sew
5:20
absolutely all the way around
5:23
pin all the way around and then it's
5:25
time
5:26
to sew it in place
5:30
so after your sewing machine or you can
5:32
hand sew it but you got to remember to
5:34
leave a gap
5:35
so that you can turn it out so i
5:38
recommend
5:40
a couple of inches maybe an inch and a
5:43
half
5:44
so what you're going to do is start part
5:46
way along one side
5:48
a little bit of reverse to keep it tight
5:50
so it doesn't unravel
5:52
get to your corner needle down
5:57
lift that foot turn
6:00
and go all the way along the other side
6:06
take the pin out so that i don't sew
6:07
over it
6:10
get myself to the next corner
6:13
needle in foot up turn and this way you
6:17
get some nice
6:17
crisp corners which is what you want on
6:19
your bookmark
6:21
and just keep working all the way around
6:25
so you can see i want to go all the way
6:27
along this side
6:31
get to the corner
6:34
needle in lift the foot turn
6:38
i'm going all the way along this side
6:41
again
6:42
all the way to the corner and then on
6:44
the final side i need to be careful to
6:46
make sure i leave a gap
6:47
large enough to turn it out so i'll get
6:50
to this corner
6:54
and now i have to look where i sewed to
6:58
and make sure i don't go too far and
7:01
when i feel
7:02
i've gone far enough i'll just reverse
7:05
it
7:06
and make sure nothing comes unraveled
7:12
then lift your foot take your sewing out
7:14
and just clip those threads however you
7:16
choose
7:21
and clip off the two threads from where
7:25
you started
7:27
and you've sewn around your bookmark but
7:31
just left a gap on one side
7:35
so before we think about turning it out
7:37
and tidy up those corners
7:40
if you clip the corners which means
7:43
cutting off a triangle of fabric
7:45
as close to stitching as you dare but do
7:47
not cut your stitching or everything
7:49
will go wrong
7:50
it just gets rid of some of the bulk and
7:52
it helps you to get nice corners when
7:54
you turn it out
7:56
so just clip round them all carefully
7:58
like that
8:01
get rid of those and now it's time to
8:04
turn it out
8:06
so i'm sure you've got your own
8:07
techniques but just poke
8:09
all the fabric in and through that hole
8:14
you can feel a little bit bulky because
8:16
remember you've quite a bit of
8:17
interfacing in there
8:19
don't worry just keep going keep
8:21
pressing it through
8:23
and you should start to see your
8:25
bookmark appearing
8:27
so i just push it all through
8:30
get into those corners start to see the
8:33
shape
8:35
and look you can see a bookmark
8:38
now i tend to find the best tool for
8:40
getting your corners out
8:42
it's a chopstick it's entirely up to you
8:44
what you use some people use the back of
8:45
the scissors
8:47
but i always think that's a little bit
8:48
risky because your scissors have a point
8:50
but i find a chopstick's quite nice it's
8:52
sharp enough while still having a blunt
8:53
enough end not to poke through any seams
8:56
or cut any fabric
8:58
and just keep working those corners
9:00
until you're happy with them
9:02
that's always what matters in your
9:04
sewing but you're happy
9:07
so you can see i'm showing you here that
9:09
some people will use the back of the
9:11
scissors
9:12
it's entirely up to you
9:18
once you're happy with it it's going to
9:21
be time
9:22
to press it again so make sure we get a
9:25
nice crisp
9:26
bookmark so back to your ironing board
9:29
or your ironing pad
9:31
and we're going to press it now remember
9:33
one side of this
9:35
is not completely sewn just make sure
9:38
those edges are folded in
9:39
in line with the seam so that you get a
9:42
nice straight edge
9:43
and then you're simply going to press it
9:45
all
9:46
to get a nice finish
9:50
it's all pressed
9:53
it should look like a finished bookmark
9:56
but obviously we haven't sewn up that
9:58
side section yet
10:02
so we're just going to top stitch all
10:04
the way around
10:05
and that's going to tidy it up make it
10:09
look very nice
10:10
and it's also going to close up the seam
10:14
that you left the hole in so just work
10:17
your way around
10:18
in exactly the same way as you did
10:19
before make sure you stay the same
10:22
distance from the edge
10:24
your markings on your sewing machine are
10:26
great for that
10:28
just decide where you're going it
10:30
doesn't matter it's entirely up to you
10:32
you can be as close to the edge as you
10:34
like
10:36
so long as you're consistent so work
10:39
your way around
10:40
turn at the corners in exactly the same
10:42
way
10:43
make sure you get the needle down
10:46
lift the foot turn 90 degrees
10:50
and off you go again with the foot back
10:53
down
10:54
if you have trouble at the corners
10:55
because of all the bulk just take your
10:57
time
10:58
i'm not on a race here it's about
11:00
getting a nice finish
11:03
you may also choose to lengthen your
11:04
stitch length to do top stitching it can
11:06
sometimes look nicer with a longer top
11:08
stitch and experiment with that on some
11:10
fabric beforehand
11:12
now you'll notice i'm cutting the
11:13
threads off from where i started before
11:15
i get back to them
11:17
to make sure they don't get caught in
11:19
and look a mess
11:21
so now i'm just going to make sure i sew
11:23
right up to
11:25
where i started and slightly over the
11:28
stitching
11:28
to hold it in place and then i'll do a
11:31
little reverse
11:33
and that's it that'll just hold it to
11:36
stop it unraveling
11:37
no need to go mad you don't need to back
11:39
over loads of it
11:42
snip those ends off nice and tidy
11:45
and you've got a bookmark now you'll
11:47
notice my bookmarks quite large because
11:49
i've made it bigger
11:50
just so you can see what i'm doing um
11:53
and you can see you've got the little
11:55
bit there where your pages fit in
11:57
what i have done in the past is made
11:59
many of these but make them the actual
12:01
size
12:02
and there's some of them to show you a
12:04
nice little bookmark
12:07
you see little different designs
12:09
different patterns
12:11
you can make them to suit anybody or any
12:13
occasion as you can see one of mine is a
12:15
christmas bookmark
12:17
so then once you've got your bookmark
12:19
you can open up your book
12:20
and you can slide it on pick one page
12:23
pick a few pages it's entirely up to you
12:25
slide it on where you're up to close
12:28
your book
12:29
and it'll just sit there and hold your
12:31
page
12:32
so thank you for watching i hope you've
12:34
enjoyed it and i hope your fabric corner
12:36
bookmarks work out well
12:38
please subscribe below give me a thumbs
12:40
up and leave me some comments and i look
12:42
forward to seeing you again
12:43
bye
#Crafts
#Fiber & Textile Arts
#Fiber & Textile Arts
#Clothing Accessories
#Art & Craft Supplies