Up next in 10



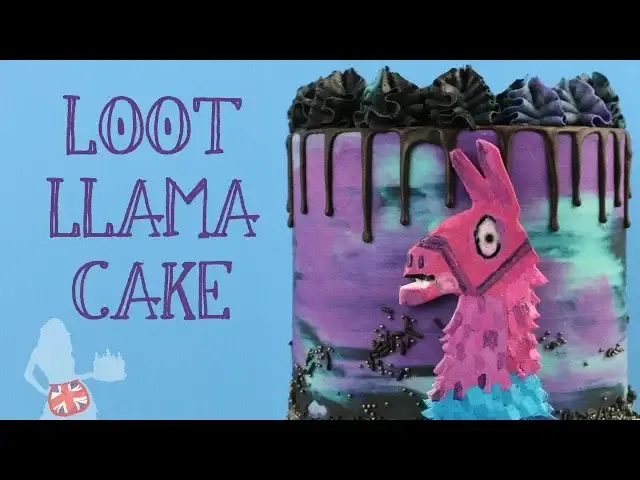
Step by step cake decorating tutorial for how to make a Fortnite Loot Llama Cake! This is a buttercream cake with watercolour frosting, a black drip and a 2D fondant loot llama cake transfer.
SUBSCRIBE to my channel for new cake tutorials every week!
For a more detailed tutorial on how to make DRIP CAKES, click here: https://youtu.be/aY3a5kcrQuQ
I used my 4 Minute Buttercream Frosting for this cake: https://youtu.be/MFKfXbnU1Lw
For How To Build A Cake, click here: https://youtu.be/xtZCSM-dleM
For a more detailed tutorial on the watercolor frosting technique, click here: https://youtu.be/hDPMoJHeiII
Instagram: www.instagram.com/britishgirlbakes
Facebook: www.facebook.com/britishgirlbakes
Pinterest: www.pinterest.com/britishgirlbakes
Website: www.britishgirlbakes.com
Show More Show Less View Video Transcript
0:00
Hi, welcome to British Girl Bakes! I'm Emily and I'm going to show you how to make this fun Lute Lama cake with watercolour buttercream frosting and a hand-painted fondant luchelama
0:12
I'm starting with my crumb-coated cake. If you're new to cake decorating, check out my tutorial on how to build a cake
0:20
I'm using my four-minute buttercream frosting and I've divided it into three bowls, adding gel food colours to make it purple, turquoise and navy blue
0:29
I have one empty bowl, and I'll show you why later. Starting with my purple frosting, I'm using an offset spatula to wipe dollops of frosting onto my cake
0:39
I've chilled my cake for 30 minutes, so the crumb coat has set, and the coloured frosting will sit on top instead of blending into it
0:46
Now I'm adding my turquoise randomly around the cake. It's not necessary to cover the whole cake, because I'll smooth the frosting around the cake in a minute, covering up the visible crumb coat
0:56
So now with my frosting scraper, I'm going around the whole cake, because I'll smooth the frosting scraper, I'm going around the whole cake, because I'll smooth the fronel comb coat
0:58
I'm going around the cake twice to spread the frosting around. Any frosting I pull off the cake I'm putting in this extra bowl to use next
1:06
I'm adding more frosting to the gaps where you can still see the crumb coat
1:10
and I'm using the frosting that I just scraped off the cake
1:14
so it's already a bit blended together to enhance the water color effect
1:18
I'm covering the top two, holding my offset spatula at a slight angle on top of the frosting
1:23
and then spinning my turntable. Now that the sides of the cake are covered with blue and purple frost
1:27
I adding a few dabs of navy frosting I didn do this at the beginning because I didn want to overpower my bright colors I smoothing the frosting around the sides of the cake with my frosting scraper again putting any frosting I pull off the cake into my extra bowl
1:44
If you're enjoying this tutorial, please click the thumbs up button. I'm adding some more frosting in a few places where the frosting isn't as thick as it is around the rest of the cake, using frosting from my extra bowl
1:56
smoothing out, touching up, smoothing out, touching up, smoothing out. And now to clean up the top, I'm using my frosting scraper to pull any frosting that's sticking up over the top of the cake into the middle
2:16
I'm smoothing the top one more time with my offset spatula, and this pushes some of the frosting from the top of the cake over the sides
2:23
So I'm going around the sides again with my frosting scraper, and then using my offset spatula for a few touch-ups on the top edge
2:30
Using a wet paper towel I'm wiping any smudges of frosting off my cakeboard
2:36
I've made a black drip using two ounces of black candy melts and one
2:40
tablespoon of heavy whipping cream. You can also use chocolate canash and add a few drops
2:45
of black gel food colour. Both are really simple to make. I have a full tutorial on
2:50
drip cakes and to watch it you can click the link in the top of the screen or I've put it in the
2:54
description below. I'm putting more of the drip onto the top of the cake and
2:59
spreading it up to the edges with my offset spatula Next I going to use the rest of the extra frosting I scraped off the cake I putting it into a piping bag fitted with a 1M star tip and the colours are all swelled together
3:12
which matches the watercolour frosting on my cake perfectly. I'm piping rosettes around the top of the cake, holding the piping bag above the cake
3:20
and squeezing out the frosting, wiggling my hand back and forth to ruffle the rosette
3:26
To space the rosettes out evenly, I'm piping at opposites, so 12 o'clock and then 6 o'clock
3:31
9 o'clock and then 3 o'clock, and then 2 rosettes in each gap. I'm using a variety of black
3:38
sprinkles around the base of the cake, pressing them into the first inch or so of the sides
3:42
and then flicking a few around the sides randomly to add some texture to the sides. I'm filling in
3:49
the top of the cake with the same combination of sprinkles, sprinkling them all the way up to the
3:54
edges of the rosettes so the whole of the black drip on top of the cake is covered. Since the
3:58
drip hasn't set yet, the sprinkles stick to it nicely. I'm putting my cake in the fridge until I'm ready to finish decorating it
4:05
Now for the Lute Lama! I've printed off a picture of the part of the llama I want to make for my cake
4:11
I'm cutting out the llama, cutting off the body because I only want the neck and head
4:15
Oh, that sounds a bit morbid. I'm rolling out fondant as thin as I can so that it dries quickly
4:21
If you roll it out thickly, the weight of the fondant will make it slump, and it might make the cake lean towards it
4:27
Now I'm just placing the picture onto the fondant and using a really sharp knife
4:31
to cut around it getting into all of the fiddly bits on the side You can use an exacto knife blade if you prefer Now I mixing my colours Dark blue turquoise a few shades of purple
4:45
I'm using gel colors, and I'm adding Wilton white white icing to the purple
4:49
and it's a lot bluer than I want, so I'm adding pink to it as well until I get the shades that I want
4:57
Now that I have my colours, using the printed picture as my guide
5:01
I'm painting big areas on the llama, and then adding deep, details, paying attention to the shading on the drawline and the ears, which areas of the neck have lighter or darker pinata flaps, and where the shadow lies on the mouthpiece
5:15
I promise this really is as easy as it looks. I'm terrible at drawing and painting, and even I can do this
5:21
Now I'm leaving my figure to dry for a bit, about a day, so that the colour is set and the figure can hold its shape
5:28
When my llama is dry, I'm pulling my cake out of the fridge and choosing where to place the final decoration
5:33
I'm dabbing on a bit of buttercream onto my cake and pressing gently to attach the llama
5:39
You could also use simple syrup instead of frosting. I love it
5:44
The colours are bright and cheerful and they match the Lut Lama perfectly. Now comes my favourite bit
5:50
I looked far and wide to find the biggest Fortnite fan I could, and here he is
5:55
What? It's a Lama cake! It's a Lama cake! Thank you! You're welcome
6:03
Happy birthday. It's awesome! Yay! If you've enjoyed this tutorial, please click the thumbs up button and subscribe to my channel for new cake decorating tutorials every week
TV & Video
Hobbies & Leisure