Up next in 10

React.js FFMPEG WASM Project to Build Audio Recorder From Microphone Using vmsg Library in JS
Dec 22, 2025
Buy the full source code of application here:
https://procodestore.com/index.php/product/react-js-ffmpeg-wasm-project-to-build-audio-recorder-from-microphone-using-vmsg-library-in-js/
Show More Show Less View Video Transcript
0:06
Uh hello friends, today in this tutorial
0:08
I will be uh telling you that how to use
0:11
web assembly inside your ReactJS
0:14
application and basically we will be
0:16
using the concept of FFmppg library
0:19
which is a open-source audio and video
0:21
processing library and we will be
0:24
building a very simple audio recorder
0:26
kind of application which will record
0:28
audio from your microphone. phone. So
0:30
basically this application is built uh
0:33
purely in react. We are not using any
0:35
sort of third party library. So
0:37
basically you can see this is a demo of
0:38
the application. Simply there is a
0:40
record button and in background we are
0:42
using web assembly ffmppg inside react.
0:47
So if I click the record button it will
0:49
ask for the permissions. I have already
0:51
granted the microphone permissions. You
0:53
will see this page is accessing your
0:55
microphone. So simply and now I am just
0:59
speaking right now. You will just see
1:01
here if I click the stop button my voice
1:04
will be recorded. And now you can see
1:06
for 17 seconds my voice has been
1:08
recorded. If I play this recording your
1:11
voice will be played here. Let me just
1:13
uh turn off the volume of uh let of the
1:17
desktop audio so that you can hear it.
1:20
Let me play it. So if I click the record
1:22
button it will ask for the permissions.
1:25
I have already granted the microphone
1:26
permissions. You will see. So you can
1:29
see that guys, it has recorded that
1:31
audio and now it is playing that. So it
1:33
is that simple to make a very simple
1:36
audio recorder. So basically this
1:38
recording will be saved and anytime you
1:40
hit the record for the record button for
1:42
the second time. This will again record
1:45
your audio and this will store this
1:47
audio in a separate file and there this
1:50
will take a list form. If I click again
1:53
stop, you will see that again. Click
1:55
record, again stop, again record. You
1:57
can see that. So basically, you can
2:00
record multiple recordings of yours in
2:02
different files. And now basically you
2:04
can download this as well inside your
2:06
computer. So it's simple. Click on
2:09
download button and your audio will be
2:11
recorded as MP3 file. You will see this.
2:14
You can anytime click the download or
2:16
you can also change the playback speed
2:18
as well. So if I open this MP3 if I
2:21
click the record button my voice will be
2:24
so you can open the recorded audio
2:26
inside your MP3 player. So just click
2:28
the download button right here. So we
2:31
will be building this application from
2:32
scratch guys. So let's start building
2:34
this application. I have given all the
2:36
source code in the video description. So
2:38
this is a blog post I have written
2:40
ReactJS FFMPG web assembly project. So
2:44
the link will be there inside video
2:46
description. So if you want to get all
2:48
the source code, you can just uh
2:50
download all the source code by going to
2:52
the video description link to build this
2:54
awesome little audio recorder which will
2:56
record your audio through microphone
2:59
using web assembly in FFMPG. So let's
3:02
start building this application from
3:04
scratch guys. So let me delete all this
3:06
code and start from scratch. So just
3:09
create the basic ReactJS project.
3:12
Nothing fancy. So the command is pretty
3:15
simple. You just need to go to the
3:18
command line and just write npx create
3:20
react app and then you need to put the
3:24
project name audio recorder. So just
3:26
execute this command and this will
3:28
create the newly created uh reacts
3:31
project and after that guys you need to
3:33
install this dependency which is uh w uh
3:38
which is controlling this application
3:40
which is called as voice message. It's a
3:43
reactjs library. So if you just go to
3:46
npmjs.com and search for this library
3:49
VMSG,
3:50
this is the library. You can see library
3:52
for creating voice messages. So simply
3:55
the first library comes in. Just click
3:58
it. And now you will see it has got 8,59
4:02
weekly downloads. Simply install this
4:04
library by executing this command which
4:06
is simple npm vmsg.
4:10
And uh there is also a demo given for
4:12
this library. So if you want to see so
4:15
basically if you write any sort your
4:17
comment click on record it will ask for
4:20
microphone.
4:22
So
4:27
hello hello you can see that.
4:35
So [snorts] you can see that you can
4:37
also send it right here and hello play
4:39
it.
4:42
If you play it. So basically this is the
4:45
hello hello. You can see that it record
4:48
the voice messages. This library is
4:51
mainly built for this purpose. So that's
4:53
why I'm using this library. It's awesome
4:55
little library. 8,000 weekly downloads
4:57
are there. So the command is pretty
5:00
simple. Just go to command line. Just
5:02
type npmi
5:03
uh vmsg.
5:05
Just install this. I have already
5:07
installed this library. So you don't
5:09
need to install it once again. So right
5:12
here guys uh in order to build this
5:14
application inside your app.js file we
5:17
just need to write code inside this
5:18
file. So first of all we will import the
5:21
react library which is coming from the
5:23
react library and then we need to import
5:26
this library which is vs vmsg voice
5:30
message from voice message like this. So
5:34
import this library and after this guys
5:38
what we need to do is that we need to
5:40
create a recorder. We need to initialize
5:42
a new recorder like this.
5:45
Recorder
5:48
like this and this takes some arguments
5:52
guys which is very much easy.
5:55
Vasma URL. So this stands for web
5:58
assembly URL. So here you need to
6:00
provide the full address of the web
6:02
assembly ffmppg library which is hosted
6:06
on the CDN. This is a CDN. So you can go
6:09
to the video description link. I have
6:10
written all the source code. This is a
6:12
CDN which is hosted on unpackage.com.
6:16
So we are providing the address. That's
6:18
it. And now we will write the function
6:20
uh class level component which is class
6:23
app contains extends react dot
6:26
component.
6:28
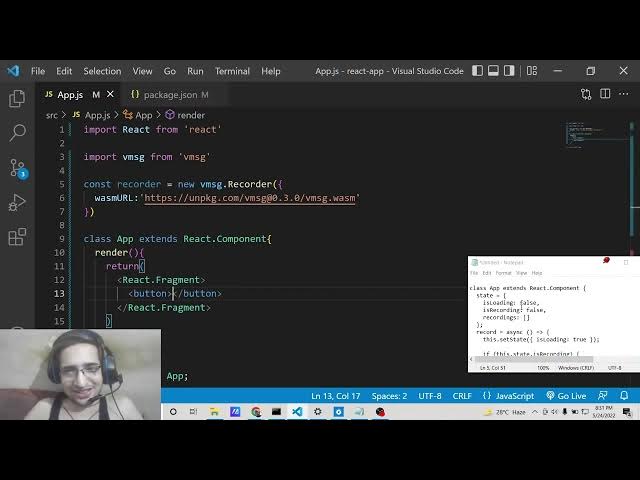
So here we will simply
6:33
make a render method and inside this we
6:37
will return simple
6:41
uh make we will make use of react
6:43
fragments which is very much useful
6:46
react fragment we will use it and if you
6:49
just put anything here hello world so if
6:52
you now start your ReactJS application
6:55
if you see npm start you will see this
6:59
uh it will start this ReactJS
7:01
application at
7:03
uh localhost 3000. So just wait it is
7:06
starting this.
7:13
So it is saying uh app doesn't contain
7:15
it export. So we need to export this
7:18
component. So we need to say export
7:21
default app. So just write this line and
7:24
this error will gone. You will see hello
7:26
world is printed out. So instead of
7:28
hello world we want a simple record
7:30
button which will record the audio from
7:32
the microphone. So inside this we will
7:35
have a simple button.
7:38
So this button will be saying
7:42
so
7:44
basically for having this we need to
7:46
declare some uh uh state variables. So
7:49
we need to have some spa state for our
7:51
reactjs application the data. So the
7:55
state will be an object and it will
7:57
contain three variables. First will be
7:59
is loading and this value will be false.
8:03
When the application load for the very
8:04
first time is recording will be again
8:07
false and the set of recordings which
8:10
will be saved it will be a simply array.
8:13
So we are not saving to a actual
8:15
database. So we are just storing it
8:16
inside our local memory. So we are
8:19
storing it inside and this array which
8:21
will be empty by default. So now guys we
8:25
need to have this inside our render
8:28
method. We need to get the state
8:30
variables which is is loading.
8:35
We will use of curly brackets is loading
8:38
is recording
8:40
is recording and [snorts] recordings.
8:44
This is uh you can see that we will uh
8:47
make use of uh we'll get it from this
8:51
dot state
8:53
if you see this dot state
8:57
this dot state so we will get all these
9:00
variables from the state and now
9:02
basically we will compare it basically
9:04
we will say that uh the disabled
9:07
attribute of the button will be equal to
9:11
is loading basically it is saying that
9:13
if the value of this is true then the
9:16
button will be disabled. If the value is
9:18
false then the button will not be
9:20
disabled. So now basically guys uh
9:23
inside this
9:26
here we need to put a on click as well.
9:29
So when we click this button what
9:30
happens? So on click listener. So here
9:33
we will attach a condition here which
9:35
will be this dotre record.
9:38
So basically this will be the function
9:39
name. We are attaching it by this
9:41
do.record. So now we need to create this
9:44
function guys which will actually record
9:46
the audio for us when we click this
9:48
button. So right here at the very top if
9:51
you see whenever we in uh just declare
9:55
our state so we need to declare this
9:58
function which will be actually record.
10:00
So record and this will be a async
10:04
function guys async function.
10:07
So this arrow function syntax. So first
10:10
of all inside this function guys we will
10:13
manipulate the state and we will change
10:15
the value of is loading to true. So
10:18
whenever we click this uh record button
10:21
this dis the button will be disabled
10:24
because this value will become true. You
10:26
can see we are manipulating this value
10:28
here. So this button will be disabled.
10:32
And also for the label of the button
10:34
guys we also need to check for the
10:36
condition. So if you see for this label
10:40
of this button we will again check if
10:44
the value of is recording is recording
10:50
if is recording
10:52
is true then this value will be stop
10:56
and if the value is false then obviously
10:58
we know that the button is not clicked
11:00
so the value will be record. So uh we
11:03
are putting dynamic conditions here
11:05
guys. I hope that you understand. So
11:07
basically in this condition we are just
11:09
checking that if this is a boolean
11:11
variable so if the value is true then
11:14
this label will change to stop and if
11:17
the button is not pressed then this
11:18
value will stay at as record. So now
11:22
basically if I load this application
11:24
what you will see is that so it is
11:26
saying that uh record is not defined. So
11:29
it is saying let me see
11:32
uh
11:34
uh on click this dotre record
11:37
this dot record
11:41
uh this dot record
11:44
uh let me see guys why it is saying that
11:47
put a semicolon here uh
11:53
oh sorry here this function needs to be
11:56
declared outside here so this is a meth
11:59
method. So that's why you can't declare
12:00
here. So here outside you need to
12:03
declare here this is will be a async
12:05
function and uh here basically we will
12:09
say that we will manipulate the value of
12:12
uh is loading to true is loading
12:16
to true. That's it. So now guys if you
12:20
see here if I load this application now
12:23
you will see the button will be record.
12:25
If I click the record button the button
12:27
will be disabled. because I have changed
12:29
this uh if I I made this value as true.
12:33
So that's why the button is disabled
12:35
here. You will see that.
12:37
So now the second step is that we need
12:39
to grant permission to use our
12:41
microphone. So basically here we will
12:43
check that if the state variable of is
12:47
recording is true. In that case we are
12:50
recording the uh audio. So in that case
12:54
we will use the await keyword and
12:57
basically we will say that recorder dot
12:59
stop recording
13:02
we will execute this method. So recorder
13:05
is you can see that recorder. So this is
13:08
the web assembly ffmpg library which is
13:10
initialized inside this variable. So
13:12
this contains a method which actually
13:14
stops the recording. So we are calling
13:16
this method to actually stop the
13:18
recording whenever you click click this
13:21
button. whenever the uh recording is
13:24
being done.
13:26
So after the button is clicked now we
13:28
need to uh manipulate the state guys. So
13:30
again we will use this dot set state and
13:33
inside this what we will do is that
13:36
first of all we will make is loading to
13:38
false. So now the button will not be
13:41
disabled and also we will say is
13:43
recording to also false. So this will
13:47
make sure that uh the button text
13:50
changes to record again and also
13:55
the recordings will be saved inside this
13:57
array which will be this dot state dot
14:00
recordings dot concat. We will use the
14:04
concat method. This is specifically for
14:06
arrays. So in order to
14:10
store it we will use the URL dot create
14:13
object URL method. And here we will pass
14:16
the blob object which is actually
14:18
recorded from the microphone. So
14:20
basically this will be a actual URL
14:22
which is recorded and we are storing it
14:25
inside our array. That's it. So this is
14:28
a if condition here guys you will see
14:30
that basically we are assuming that this
14:32
uh recording method uh recording
14:35
variable is true. So this means that
14:38
recording is being done by the user. So
14:40
in the else scenario we need to write
14:43
the code. If the recording is not done
14:45
in that case if the button is pressed we
14:48
need to start the recording. So in that
14:51
case we need to start the recording. So
14:53
here we need to make use write this code
14:55
inside try catch block. So first of all
14:57
we will say recorder dot initiate audio.
15:02
This is a method by which we start the
15:03
audio recording. And also the second
15:06
step will be to initiate the worker.
15:09
initiate the worker like this and then
15:12
we need to call the start recording
15:14
method of this uh web assembly ffmpg
15:18
library. So these three steps are very
15:21
much necessary guys. First of all to
15:22
initialize the audio, initi initialize
15:25
the worker. And first and thirdly, we
15:28
need to start the recording. And lastly
15:30
guys, we also need to initiate the
15:33
manipulate the state by using this dot
15:36
state. And here we will say this dot is
15:38
loading to false
15:42
and is recording to true.
15:48
So here we just need to uh just do the
15:50
opposite of what which we have done
15:52
inside this. So is loading was false
15:55
here. Is loading is again false. Is
15:58
recording to false. Here we are saying
16:00
is recording to true because we are
16:02
actually recording the audio. That's all
16:05
guys we need to do. And also in uh try
16:08
catch also has a catch block also for
16:10
catching the error. So if any sort of
16:13
error take place you can console in the
16:16
error department and uh just show the
16:19
error to the user. This dot set state
16:21
once again we will call the is loading
16:24
to false
16:28
like this.
16:31
Uh that's all guys I need to see and uh
16:34
basically if you see here if I refresh
16:36
the application click the record button
16:39
you will see that it changes to stop.
16:40
And now basically you will see this is
16:43
using my microphone and uh you can see
16:46
this page is access accessing your
16:48
microphone. So if I click the stop
16:50
button it doesn't display the recording
16:53
because uh we haven't manipulated that
16:56
front up till now. So here we need to
17:00
display our recordings inside the uh
17:03
unordered list which is ul tag. So
17:07
inside this guys we will give it a style
17:09
attribute to it of lay style
17:13
to none. And here also we will remove
17:17
the padding
17:21
to zero. And inside this guys we will
17:24
say that recordings is array. So we will
17:27
use the map method and inside this we
17:29
will pass the URL. And uh here we will
17:32
simply display the actual recordings.
17:39
So all tag. So here we need to give it a
17:43
key attribute. So for if you're
17:45
displaying array you need to give it a
17:47
key attribute. So key will be actual URL
17:50
and uh it will contain the audio tag and
17:54
here we will give it a source to that uh
17:57
equal to the actual URL and this will be
18:00
having the controls as well to control
18:03
the audio. So that's all that you need
18:05
to do guys. This application is
18:07
complete. Let me refresh the
18:08
application. So if I now click record
18:10
button now it will record the audio of
18:13
my voice from my microphone. So if
18:16
anytime I click the stop button, you
18:18
will now see it has recorded the audio
18:20
and now it is displaying it inside the
18:22
audio tag. If I now record the audio of
18:25
my voice from my microphone. So if all
18:29
these controls are there, you can
18:30
decrease the volume, up the volume and
18:32
also you can download the audio, change
18:34
the playback speed to any speed of your
18:37
choice. So in this way guys you can make
18:39
your audio recorder like this a bulk
18:41
audio recorder using web assembly in
18:43
ffmppg in react application. All the
18:46
source code will be there inside video
18:48
description. I have given all the source
18:50
code. So if you want to download all the
18:52
source code you can go to the video
18:53
description link to download all the
18:55
source code and I will be seeing you in
18:58
the next video. Until then thank you
19:00
very much.