Up next in 10

How to Integrate Github Copilot as Your Coding Assistant in Visual Studio Code Full Setup
Jan 9, 2025
How to Integrate Github Copilot as Your Coding Assistant in Visual Studio Code Full Setup
Show More Show Less View Video Transcript
0:00
uh Hello friends uh in this video I will
0:02
show you the GitHub co-pilot which is uh
0:07
essentially a alternative to chat GPD
0:10
and it's a paid alternative uh it's not
0:12
free uh so I just want to tell you at
0:15
the starting so it's not free but it
0:18
comes with a lot of features and uh this
0:21
is their official website github.com
0:23
features Co pilot
0:26
so the you will see the pl plans right
0:30
here individual $10 uh business plan $19
0:34
so the basic plan starts for $10 and I
0:37
have this plan so I can just show you so
0:39
it basically have a start a free trial
0:41
which gives you 28 days to actually try
0:44
this so I have taken the trial so I will
0:47
show you in this video all the features
0:49
of GitHub copilot so for installing this
0:52
you must have a GitHub account
0:55
so so after you in uh create a GitHub
1:00
account and there is this go to
1:02
extensions right here in vs code and
1:05
just search for this uh extension which
1:08
is GitHub
1:11
co-pilot so the very first link
1:15
extension which comes this is actually
1:17
developed by GitHub it's a GitHub Pro
1:20
product and it's a AI pair programmer
1:23
which helps you while developing your
1:25
applications so it is similar to chat
1:27
GPT but chat GPT is general for all
1:30
questions but GitHub co-pilot is only
1:32
specific to programming questions so
1:34
that's why it differs from chart GPT and
1:37
it gives you more detailed specific
1:39
answers in a less in a less time so you
1:44
can just see uh I already installed it
1:48
so basically after you get the trial you
1:52
you need to install this extension just
1:54
after installing it it will be enabled
1:57
globally and then you need to sign in
1:59
with your GitHub account so I have just
2:01
integrated it so I will not show you the
2:03
setup process but in this tutorial I
2:06
will show you the features of it let's
2:08
suppose I create a index. HTML file so I
2:11
just want to create some kind of web
2:13
application using GitHub copilot so how
2:16
we can create
2:18
that so right here in the left hand side
2:21
you will see these three dots so you
2:23
simply click these three dots and you
2:25
will actually see this option of uh chat
2:30
if you see I already integrated this so
2:33
now you are seeing this option of chat
2:36
simply you need to toggle this and here
2:39
either you can ask questions right in
2:40
the left panel or you can directly write
2:43
here inside your file index word HTML
2:46
there is a shortcut right here control I
2:49
so if you press control I this little
2:52
prompt will open right here and here you
2:54
will enter your question so which
2:57
application you want to create so you
2:59
will simply simply convey the message to
3:01
GitHub copilot so let's suppose I give a
3:03
message very descriptive message that I
3:06
make a simple random password
3:09
generator web
3:11
app using Tailwind CSS UI and JavaScript
3:16
with the copy to
3:19
clipboard
3:20
functionality and uh the UI should have
3:24
a card
3:26
like structure in the center
3:32
so so one thing about uh chatting with
3:35
AI Bots is that you need to be
3:36
descriptive you need to tell exactly
3:38
what you want because if you don't then
3:41
you will not get specific answers so
3:43
inside your prompts you need to get
3:45
practice in order to be descriptive
3:47
inside your asking your questions so I
3:50
just asked a simple question that I need
3:52
a simple random password generator web
3:54
app which uses Tailwind CSS UI and it
3:58
uses JavaScript and should have copy to
4:00
clipboard functionality and uh it should
4:03
have a card-like structure in the center
4:05
position so if you press enter and now
4:08
it will actually do the heavy lifting it
4:11
will actually write this code
4:12
automatically for you you will see that
4:15
it is writing the
4:17
code so in a short period of time you
4:20
can
4:21
see you can click on accept and uh if I
4:25
now simply run this application right in
4:28
the browser
4:30
now you can see that how beautifully it
4:32
has created a brand new random password
4:36
generator app so the UI looks pretty
4:39
awesome whatever we ask it it has given
4:42
me the perfect UI right in the center
4:45
position it uses card-like structure and
4:48
it uses Tailwind classes so we have a
4:50
simple button of generate password we
4:53
have the text area where the password
4:54
will show and we have the copy to
4:56
clipboard button so if I click the
4:57
button right here generate
5:01
password uh I think we need to bind this
5:04
button
5:07
uh if I simply inspect element you will
5:12
see that generate password is not
5:14
defined
5:16
so generate
5:24
password I think this is actually the
5:27
function that we are calling here
5:28
generate password
5:42
so if you again do this I think now this
5:47
time this should work generated
5:50
password oh sorry we are actually using
5:53
generated password right
5:58
here let's let me find out the error
6:09
generated so if you basically get this
6:12
error you can actually ask questions to
6:15
GitHub copilot so I get this error right
6:18
here this is a really good example to
6:20
show you the power of GitHub copilot so
6:22
I can simply copy this error and WR we
6:25
can need to select this code by contr a
6:28
and write in the
6:30
uh chat window we can simply say there
6:32
are various commands out there one such
6:35
command is uh this uh fix we need to fix
6:39
this code and we need to paste this
6:41
error message so please fix this code
6:45
and provide the correct code so it will
6:48
Analyze This code and it will using this
6:51
error message that you provided based
6:54
upon that it will actually show you the
6:56
correct
6:57
code so you will see it is actually
7:01
giving you the correct JavaScript code
7:04
which is
7:05
required so what I will do please
7:08
provide the full
7:13
code so you can see it is now providing
7:16
the full code alongside with the
7:23
HTML you can just increase the size of
7:26
this window accordingly
7:30
you can also see the speed of generation
7:33
is also pretty awesome in GitHub copilot
7:36
and I personally used it and I found it
7:39
better as compared to chat GPD because
7:42
it's specific to answering programming
7:44
questions that's why the speed is
7:46
awesome so if I again run
7:50
this now you can see the application is
7:52
working perfectly fine and uh you can
7:55
just see as I press press the button a
7:58
random password is gener ated so if you
8:01
want to develop more features inside
8:03
this random password generator let's
8:05
suppose I want to introduce a field
8:08
where I will let the user submit how
8:09
many correctors long The password should
8:11
be so I can actually copy this and again
8:16
ask a question so I can additionally add
8:19
features on top of this application I
8:21
can again write this prompt of fix and
8:25
here I can say please
8:28
add a
8:30
a text field where the user
8:33
can enter the length of the
8:37
password default length would be uh six
8:43
characters so just add that
8:46
feature to this code and provide the
8:50
full
8:51
code so as already told you need to be
8:54
descriptive when asking questions so now
8:56
based upon that it will add this text
8:58
field and it will will give you that
9:01
full code you will see that so in this
9:04
way you can add more functionality if
9:07
you have the base application you can
9:09
add more additional functionalities to
9:10
actually make this application a more
9:12
complex app so this is actually the
9:15
power of GitHub
9:18
co-pilot
9:20
and you need to
9:23
have experience in asking questions uh
9:26
descriptive so if I paste it now
9:30
this will save you a lot of time I
9:32
personally used it you can see that Now
9:34
default value of length is six
9:36
characters so six letters password are
9:38
generated if I change it to Let's
9:40
suppose 10 now 10 letters will be
9:43
generated 10 letter password if I change
9:46
to 35 now 35 characters you will see
9:50
that so based upon that you can add more
9:53
functionality to it you can add uh
9:55
numeric numbers special characters to
9:58
make this comp Lex random password
10:00
generator so the I showed you the way
10:03
you will again select it again ask the
10:05
question it will give you the response
10:07
back so in this way you can do that one
10:10
other feature of GitHub copilot is again
10:12
just press the chat window if you want
10:16
the code is not understandable by you if
10:19
you are finding some line of code to be
10:22
complex you can basically select this
10:25
function and you can
10:27
actually select this function function
10:29
and you can ask a question to GitHub
10:32
copilot that there is a prompt out there
10:34
which is called as explain so it will
10:38
you can ask a question that please
10:39
explain this code what this code is
10:41
doing so please explain this code what
10:44
it is
10:45
doing now it will analyze the generate
10:48
password function so it will break it
10:50
down line by line and it will show you
10:54
let's break down this JavaScript
10:55
function generate password and it will
10:58
give you a short little the summary of
11:00
it that it actually first of all uh get
11:03
reference to the length variable this
11:06
line is getting the value of the HTML
11:07
element with the ID length this is
11:09
expected to be number input where the
11:11
user can specify length of the password
11:13
they want to generate and then we have
11:15
this set of correctors that the password
11:17
can
11:18
include you can just see how basically
11:21
it is explaining each line in detail so
11:24
if you actually find any kind of code to
11:27
be complex you can ask question
11:29
using this explain keyword just need to
11:33
write slash after that explain and then
11:36
you can ask your question please explain
11:38
that if you want to fix any code you
11:41
just write slash fix these are different
11:43
prompts which are built inside GitHub
11:45
copilot which actually does various
11:49
things so that's the thing about it if
11:53
you want to clear it clear everything
11:56
start a new chat you will simply say
11:58
slash clear so it will clear out the
12:02
previous responses and it will start a
12:04
new window new chat window so this is
12:07
the thing and uh that's all and uh if
12:11
you want to basically test out a section
12:15
of
12:16
code
12:18
so if you see uh what I do I create a
12:22
new new file right here index 2. HTML
12:27
and here I basically write a program
12:29
which adds two numbers in the JavaScript
12:32
let me write this
12:34
uh Su a comma B and basically Returns
12:39
the sum of it and uh if you want to
12:42
basically I'm just show showing you very
12:44
basic example you select this code and
12:46
you need to Simply ask the question that
12:49
please uh test this
12:51
code so how this code
12:54
works please uh make a test so it will
12:58
actually
12:59
show you how this code will actually run
13:02
in real real life
13:07
situation so it will actually gives you
13:10
various test you can test out this
13:13
section of code it has given you this
13:19
uh so you can just you can this is
13:22
specially useful for testing so if
13:25
you're not a developer if you are on
13:27
into testing you can use the/ test
13:30
prompt if you want to test out a
13:32
specific
13:35
code so this is all about GitHub
13:38
co-pilot guys the main things is that
13:41
explain fix these are the two main
13:43
things or you can also generate The Code
13:46
by pressing control I it will ask this
13:50
here you can any write anything I showed
13:53
you previously how to Rand randomly
13:55
create password generator you can simply
13:58
this is not limited to index HTML or
14:00
JavaScript you can write python code PHP
14:03
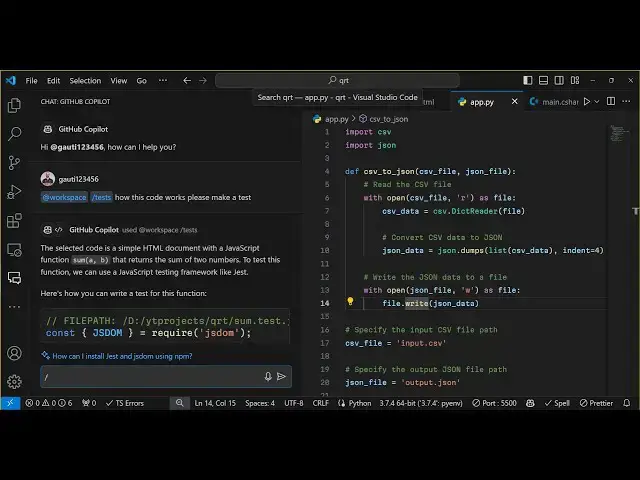
any language C now this is a python code
14:07
so we can say make a simple python
14:09
script
14:12
to to Let's suppose convert CSV to Json
14:18
this python script will convert a CSV
14:20
file to Json you will see
14:27
that so we should have an input CSV file
14:32
the process here will convert the CSV
14:35
file to Json file so we can create a
14:37
input. CSV
14:40
file I just want to show you it is
14:42
working name AG I will say this
14:52
one this is my CSV file so if I just run
14:55
this now run this python script so py
14:59
python
15:00
app.py so now it converts this into Json
15:03
file you will see that so it is not
15:06
limited to any specific language you can
15:09
write programs in various
15:11
languages uh c as
15:21
well so you can see that so we can
15:23
simply say make
15:26
a c program
15:30
to add two
15:32
numbers I'm just say just uh giving you
15:36
very simple examples you can generate
15:39
very complex programs you can make
15:42
clones of various Instagram Facebook but
15:45
for that you need to be descriptive in
15:47
asking the questions based upon your
15:49
questions it will generate the answers
15:51
so if you are a good
15:53
question asker then you can give then
15:57
you can receive a lot of descriptive
15:59
answers and you can actually make a lot
16:02
of good applications in less amount of
16:04
time so you just need to use GitHub
16:07
co-pilot in a nice way that's the thing
16:10
I want to tell you the power is
16:12
Limitless so it is your own imagination
16:17
it can create anything so but you need
16:19
to be descriptive in asking your
16:21
questions so this was a short little
16:24
tutorial guys you if you want to try
16:26
GitHub co-pilot you can try it they have
16:29
their free trial available after that it
16:31
will charge you $10 you need to have a
16:33
GitHub account for doing this so in my
16:37
opinion this is a good return on
16:40
investment and uh you will find a lot of
16:42
value if you try GI up co-pilot it will
16:45
save you a lot of time while developing
16:47
your applications so please hit that
16:50
like button subscribe the channel as
16:52
well and I will be seeing you in the
16:54
next video
#Programming
#Intelligent Personal Assistants
#Other