Up next in 10

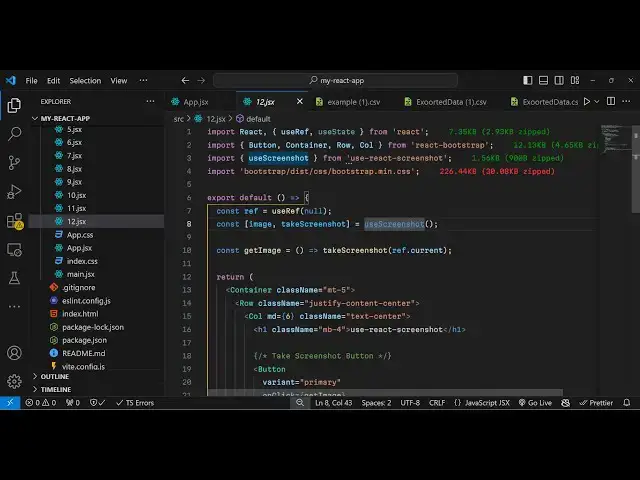
Build a React.js Project to Take Screenshot of Webpage as PNG Image Using use-react-screenshot
Jan 9, 2025
Buy the full source code of application here:
Show More Show Less View Video Transcript
0:00
uh hello guys welcome to this video so
0:02
in this video we will look at how to
0:04
take
0:06
screenshot of a specific uh element in
0:09
the web
0:10
page so inside react chairs so you'll be
0:13
using this uh package which is use react
0:16
screenshot so you can see the demo of
0:19
this application on your screen so
0:21
you'll be building this so we have a
0:23
button right here take screenshot so
0:26
we'll be taking the screenshot here of
0:28
this HTML section right here as I click
0:31
the button you will see it will take the
0:34
screenshot and this image you will see
0:36
this is actually this image it is
0:38
captured and now you can save this image
0:41
inside your PC as a PNG image and if you
0:45
try to open this you'll see it has taken
0:47
the screenshot and save it as a PNG
0:50
image so I will show you this is the
0:53
actual module so if you go to npmjs.com
0:56
it is actually a react hook which is
1:00
able to take the screenshot of a
1:03
specific HTML element it has 21,000
1:06
weekly downloads so the command is very
1:08
simple you just need to install this
1:16
react the module name is re use react
1:20
screenshot and also we will be using
1:23
bootstrap as well so just install these
1:26
packages as well
1:27
so bootstrap and react boot
1:30
I've already installed all these
1:32
packages so I will just show you the
1:36
demo so first of all you need to create
1:39
a functional component and right here we
1:44
will
1:47
import the actual module here so we will
1:51
import U screenshot it is say this hook
1:54
we'll be using this from use react
1:57
screenshot and then we will be importing
2:00
the
2:10
bootstrap and then there are lots of
2:14
components from react toot stra we will
2:16
use this button container
2:19
row we have uh imported all the modules
2:23
now we need to create some State
2:25
variables so we will be creating a
2:27
reference using the use ref hook of
2:32
reactjs and then to keep track of the
2:37
image so we will actually have a
2:39
variable here image and take screenshot
2:42
and you will be using this hook U
2:45
screenshot which is coming from use
2:47
react screenshot and right here in the
2:50
jsx we will actually
2:55
be having the container tag or bootstrap
3:01
you're giving a class name to it margin
3:04
top
3:08
five so inside this we will
3:11
[Music]
3:12
have the row here and we will align it
3:15
in the center position by giving the
3:17
class here justify
3:19
content Center and inside this we will
3:22
actually
3:25
have a column and
3:31
we will give a medium of six and we will
3:34
align it in the center position so Tex
3:37
Center and inside this we will have
3:42
a heading here which will simply
3:52
say so if you just refresh now go to
3:58
the so then we'll be having a simple
4:03
button so this button will actually say
4:06
uh take
4:11
screenshot so it will be
4:14
a primary button and we'll be attaching
4:17
a on click listener so when we click
4:19
this
4:20
button we will take the screenshot and
4:23
we'll be writing this custom function
4:25
get
4:26
image and we be giving a bootstrap class
4:30
of margin bottom three so we need to now
4:34
Define this get image function so inside
4:39
this function we just need
4:42
to invoke this take screenshot method
4:46
and here we just need to pass the
4:49
reference so what reference. current we
4:52
have this variable so we need to give
4:54
this reference to whatever HTML element
4:57
we need to take screenshots so what we
5:00
will do so right after this we will
5:04
declare a section A diff section and
5:07
will be attaching this reference to
5:11
it reference is like ID that we do in
5:14
plain HTML and JavaScript reference is
5:17
kind of giving an unique ID to the HTML
5:20
element in react CH and then inside this
5:24
div it can have any
5:27
HTML it can have text images for now we
5:31
will actually have H2 heading and a
5:33
simple
5:34
paragraph for just illustration purpose
5:37
so if you refresh now see a section
5:40
right here we have a button if you click
5:42
it now the screenshot will be taken but
5:45
now to display that screenshot we also
5:48
need to
5:49
display the actual
5:52
image variable so you can see we take
5:55
the
5:56
screenshot and we have this image so we
5:59
now need to display
6:03
this image so now to display this we can
6:10
simply display it in the image tag and
6:13
we'll be attaching the width of the
6:15
image to be 500 pixel and the source
6:19
will be the image that's all that's all
6:22
that we need to do so we are attaching
6:24
this image so if you try to now click
6:26
the button you will now see the image
6:28
will be displayed and this this is
6:29
actually your uh you can save image as
6:32
as PNG
6:34
image so it has taken the screenshot and
6:37
save it as a PNG image so in this way
6:40
you can use this react uh library of uh
6:44
use react screenshot to take any
6:46
specific screenshot of any HTML element
6:49
in the web page so thank you very much
6:52
for watching this video and do check out
6:54
my website as well free mediat tools.com
6:56
which contains thousands of free tools
6:58
regarding audio video and image and I
7:01
will be seeing you in the next video
#Programming
#Software
#Other