Up next in 10

Build a React.js Google Drive File Picker API to Upload,View & Download Files in Browser Using JS
Jan 9, 2025
Get the full source code of application here:
https://gist.github.com/gauti123456/b2c77f5ab4473ed887be199e988f158f
Show More Show Less View Video Transcript
0:00
uh hello guys welcome to this video so
0:02
in this video I will show you how to
0:05
integrate the Google drive file picker
0:08
inside your react CHS application where
0:10
you can actually select your Google
0:14
drive files from the Google drive file
0:17
picker and also you can able to upload
0:19
files as well so there is a button out
0:20
there if you see open picker this is
0:23
actually the button inside of a reactj
0:25
application so as I hit this button it
0:27
will do the authentication part you need
0:29
to select your Google account wherever
0:31
your Google Drive account is connected
0:33
so once you grant the permission you
0:35
will see the files appearing inside your
0:37
Google Drive you can select the or you
0:40
can we have two options right here
0:41
either you can select these files or you
0:44
can directly upload that to your Google
0:47
drive as well so there are two options
0:49
right here so once you select the files
0:53
you'll see I can select multiple files
0:55
so as I select the files you will see
0:57
the files will get displayed this is
1:00
actually the name of the file the
1:01
extension and this is a direct link of
1:03
the file so we are displaying the
1:05
selected files in a table structure so I
1:09
can individually click the file and it
1:11
will open it inside the new window so
1:14
it's a direct link to the Google drive
1:16
file if you see so in this way you can
1:19
open any specific file which is there
1:22
inside your Google Drive using this
1:24
Google drive file picker and there is a
1:26
second option also available to you if
1:29
you want want to upload a file to your
1:31
Google drive there is a second option in
1:33
this Google drive file picker so now you
1:36
can drag and drop any file that you want
1:39
to upload you can see we have selected
1:41
this file you can even add more files
1:44
multiple files so now I have selected
1:47
these two image files and there is a
1:49
button out there upload you can directly
1:52
upload this so This progress bar will
1:54
come and you will get a notifications
1:57
once the file is uploaded so in this way
2:01
so now if you open your Google
2:04
Drive inside your recent if you go to
2:10
recent you will
2:12
see these two files have been
2:15
successfully uploaded so in this way you
2:18
can do this guys uh and the actual name
2:22
of the package let me show you uh it's
2:25
specifically made for reactjs
2:27
applications if you just search for
2:29
react Google
2:31
Drive picker and if you just go to
2:34
npmjs.com and just search for this
2:38
package so this is actually the name of
2:41
the package react Google
2:44
Drive picker so it actually uses the
2:48
file picker API of Google in the
2:50
background and it does the
2:51
authentication part and 23,000 weekly
2:54
download so this is actually the command
2:56
to install this I've already installed
2:59
it so just just pause the video and just
3:02
install it I will just show you a very
3:04
basic example so just make a simple
3:07
functional component of react Chase and
3:10
we will use the import statement to
3:12
actually import the module so there is a
3:15
hook available which is used
3:18
Drive picker and from this we need to
3:22
import this react Google Drive picker
3:26
this is actually the module and from
3:28
this we are importing this use Drive
3:30
picker and now what we need to do we
3:33
need to declare some State variables
3:35
first of all for opening the file picker
3:38
we have to have this hook function I'll
3:42
be using the use Drive
3:46
picker and then we basically need to
3:49
actually create a variable for storing
3:52
the selected files so for this we'll be
3:56
using the UST State hook which is a
3:58
built-in hook inside react initial value
4:01
will be mty array so these two variables
4:03
we have declared one for the file picker
4:06
and secondly for the selected files it
4:08
will be empty array and now what I will
4:11
do I will inside my jsx I will
4:15
simply give it a custom CSS just give it
4:19
a style padding of 20 pixel and I will
4:23
align everything in the center positions
4:25
so what I will do text align Center and
4:29
here I will have have a simple button
4:30
which will say open
4:33
picker and I will just bind an onclick
4:36
listener to this button so when you
4:38
click the button you will execute this
4:40
custom function which will execute
4:42
handle open
4:44
picker and I will just give it a style
4:48
margin bottom of 20
4:56
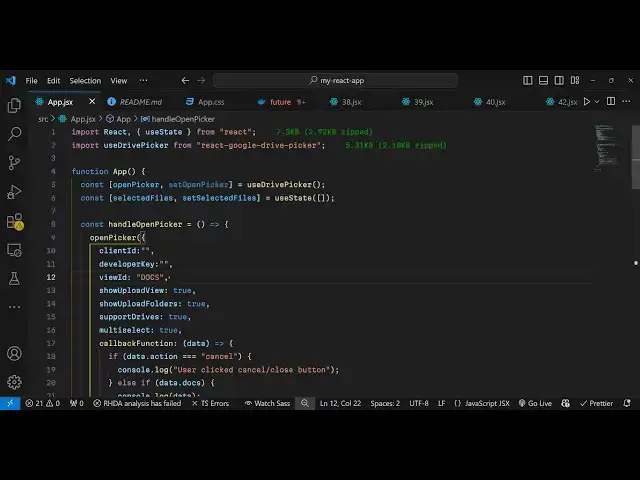
pixel so I just need to now Define this
4:59
function which is handle open picker so
5:02
this function will be responsible
5:04
whenever you click the button this
5:06
function will
5:08
execute so inside this function what we
5:11
need to do we need to show the window
5:14
the Google file picker window Google
5:18
Drive picker API window so for doing
5:22
this inside this
5:25
function we will use this function which
5:28
is open picker which is available from
5:31
this package if you see open picker we
5:33
are calling this function and this
5:35
function actually takes some parameters
5:38
first is the client
5:40
ID and then it takes your developer key
5:43
which is the API
5:47
key so all these things will be coming
5:49
from the Google Cloud console so I will
5:52
just show you how to create these things
5:53
so SEC the third thing is takes the view
5:56
ID view ID will be if you only want to
6:00
specifically see uh let's suppose only
6:02
see the folders forms PDF presentation
6:05
so this is all the things I need to see
6:08
all the documents so I will just pass
6:11
docs and then if you also want to upload
6:14
the file as well in you will say show
6:16
uploaded folders to
6:18
true and support drives will also be
6:21
true and if you select multiple files
6:24
multi select will be true as well and
6:28
then we have this call back function
6:29
which will execute once you select the
6:31
files from the file picker and this
6:33
function will
6:34
execute and here we can console log the
6:37
data that's all so now we need to get
6:40
these two things which is the client ID
6:42
and the developer key so just first of
6:44
all make sure in which port number your
6:46
application is running so by default I'm
6:49
running this application on Local Host
6:51
HTTP Local Host
6:53
5173 so you need to paste this URL so
6:57
once you go to Google Cloud console and
6:59
and you need to first of all enable the
7:02
apis and services and you need to enable
7:05
the Google drive file picker API so just
7:08
click on enable apis and services and
7:11
just search for the API Google
7:15
Drive
7:19
API so you just need to enable this API
7:22
just make sure that you enable this
7:25
secondly you also need the Google file
7:27
picker API as well
7:30
so again go to enable API services and
7:34
just search for file picker
7:44
API this is the API that I'm talking
7:47
about Google picker API so you also need
7:50
to enable this API as well I've already
7:52
enabled this so once you enable this go
7:54
to this option credentials and here you
7:57
need to create your API key and O client
8:01
ID both these things I've already
8:03
created the API key so what I will do I
8:06
will copy my API key simply copy to
8:08
clipboard and paste it in the developer
8:11
key option and for the client
8:15
ID uh you create the client ID like this
8:18
just click on o client ID web
8:21
application will be the application type
8:24
and in the authorized JavaScript origin
8:26
you paste here you paste the fly
8:30
URL of the website so I'm running it on
8:34
Local Host so I will just paste it and
8:36
also I need to also paste HTTP Local
8:40
Host as well alongside with the full
8:47
address so if you are developing it on
8:50
Local Host you need these both these
8:54
variations first is actually contains a
8:56
port number as well secondly HTTP Local
8:58
Host that's all and then in the
9:01
authorized redirect URI so once you
9:03
grant the access in which URL you want
9:07
the application to redirect again paste
9:09
the same URL HTTP Local Host 5173 just
9:14
pause the video and just make sure that
9:15
you paste the things and now click on
9:18
Create and now it will give you your
9:20
client ID client secret I only need the
9:23
client ID so simply copy this and paste
9:27
it so after getting these things if you
9:31
refresh your application
9:33
now and I think you click the button you
9:37
will see you will grant the permission
9:39
once you need to Grant the account
9:41
select your account Grant the
9:43
permissions and now you will see your
9:44
Google drive files appearing if you see
9:47
now we can see the Google drive files in
9:49
my Google file picker I can select these
9:52
files once you select it you will see an
9:55
object will be returned to us if you
9:58
see this object is return action is
10:01
picked and we have selected four files
10:03
and for each object you will see it
10:06
contains information about the actual
10:08
file which is the embed URL icon ID MIM
10:12
type name of the file so all these
10:15
things are returning and we just need to
10:17
display these things in the actual
10:20
browser so how to do this it's very
10:22
simple
10:33
so what we need to do right here first
10:35
of
10:39
all uh we need to display
10:44
actually show uploaded show upload
10:48
folders and I think we missed
10:51
a if I refresh it if you if I open the
10:55
file picker if you see we can't see the
10:57
screen for uploading the files
11:00
we only see the files appearing we can't
11:02
see the second screen for uploading for
11:05
uploading there is an option that you
11:06
can pass right here which is show
11:09
uploaded View and this option you can
11:11
toggle to true so now there also be a
11:14
portion where you can directly upload
11:16
the files so if you refresh this
11:18
application now again
11:22
click so you will also see a second view
11:25
appearing which is upload and here you
11:27
can directly upload the files simply
11:29
select whichever file that you want to
11:31
upload and now you can simply click
11:34
upload button and with this progress bar
11:38
your files will get uploaded so upload
11:41
process is complete now we just need to
11:43
display the files so what we can do we
11:47
can set the selected files to whatever
11:50
is the data dot docs now we just need to
11:54
map through all the files which are
11:56
selected by the user so right here after
11:59
after this button what we will do inside
12:01
this div element I will show all the
12:04
files which is selected by the
12:06
user so I will say display to flex and
12:10
flex WP
12:12
to
12:15
wrap I will just give it a gap of 20
12:20
pixel and justify content I will make it
12:23
as
12:24
Center and inside this I will inside
12:27
Curry bracket I will just say whatever
12:29
is the selected files we need to map
12:31
through each file and for each file we
12:35
need to have a div element and inside
12:39
this we will display the information
12:42
about the file such as the
12:45
name of the file and also the URL so
12:49
that the user can open
12:51
the file all the source code that I'm
12:54
using in this video will be given in the
12:55
description so don't worry about
12:57
it so so you can see we have written
13:00
some custom CSS and inside this we are
13:03
looping through each file and we
13:05
displaying the name of the file and then
13:07
the MIM type file. MIM type and lastly
13:10
we are having this anchor tag whenever
13:12
the user clicks on the link they will
13:13
open the file in a new tab so this is
13:17
overall the application guys if you
13:19
refresh it once again and now if you
13:23
select any files which is from the file
13:25
picker so I can select multiple files
13:28
like like
13:30
this so you will see it will
13:36
display uh it is saying
13:49
that I think there was just a typo
13:52
mistake just wait again if I click it
14:02
so you'll see it will display the files
14:05
in this tblo structure the file name MIM
14:09
type and we can directly open the file
14:11
it will open the file in the actual
14:13
Google Drive app this is a overall
14:16
application guys in react CH
14:17
specifically you can integrate the
14:19
Google file picker API to display files
14:22
or you can directly upload the files as
14:23
well alongside selecting it if you need
14:26
to upload the files you can select the
14:28
second option
14:30
and you can directly drag and drop your
14:32
files so this was the tutorial in react
14:34
chers on Google try file picker API so
14:37
thank you very much for watching this
14:38
video and do check out my website as
14:41
well free mediat tools.com which
14:44
contains thousands of tools regarding
14:46
audio video and MH and I will be seeing
14:49
you in the next video
#Business & Productivity Software
#Other
#Cloud Storage