Up next in 10

Python 3 OpenCV Script to Apply Instagram & Snapchat Blur Effect to Background of Image in Terminal
Jun 3, 2025
Get the full source code of application here:
https://codingshiksha.com/python/python-3-opencv-script-to-apply-instagram-snapchat-blur-effect-to-background-of-image-in-terminal/
Show More Show Less View Video Transcript
0:00
uh hello guys uh welcome to this video
0:02
so in this video I will show you a
0:04
Python script which will automatically
0:06
detect the background inside the image
0:09
and it will try to blur it uh same like
0:13
Instagram or Snapchat so filter so we
0:17
will take a very simple image example so
0:19
we have a simple image with a background
0:22
so what I need to do we need to blur
0:25
this background that is there inside
0:27
this image so it will automatically
0:29
detect this image analyze this image so
0:32
this background that you see right here
0:35
so we have these three images three
0:37
different images so I will show you how
0:40
I run this Python script so first of all
0:42
I will take this example image 1 jpg so
0:46
I will just provide this as a input file
0:49
and then I will simply run this Python
0:52
script and now as I run this Python
0:54
script it will detect the background and
0:57
it will try to blur this background and
0:59
then it will create a new
1:02
file so you will see a new file has been
1:06
created with a blurred
1:09
background so now if I show you you will
1:12
see this will be the effect which will
1:14
get created so you have seen these
1:16
images posted on social media such as uh
1:20
the images with a blurred background so
1:23
now you can see the it has automatically
1:25
detected this background inside the
1:27
image and it has blurred this background
1:31
and let me apply this to the same image
1:35
this one which is and again execute
1:39
this so this is a cool little effect you
1:42
can apply this on your images so that it
1:45
blurs your background so essentially
1:48
this is actually a Python script you can
1:51
see that again it blurs the
1:54
background you can't see your background
1:57
right here so it's a very good useful
1:59
feature because in either of the cases
2:02
if you don't want the background to be
2:03
seen you can blur the background inside
2:06
the image so this Python script makes
2:09
this pro possible
2:11
and then we take this image example
2:14
which is the profile jpg and let me run
2:17
the script
2:18
here and you can run this script
2:20
unlimited number of time so it is there
2:23
inside your local machine so now if I
2:27
show
2:28
you you can change the intensity of the
2:31
blur as well inside this Python script
2:34
you can see the background is blurred so
2:37
here you can increase this value it is
2:40
75 you can increase it
2:43
to 125 as
2:45
well it totally depends upon you so if
2:48
you increase this value the gshian blur
2:51
will increase so again if I run
2:57
this
3:00
so basically it analyzes the image and
3:04
then it uh blurs the background you can
3:07
see now it increases the blur right here
3:11
so now let me show you the libraries
3:13
that we are using for this so we are
3:15
first of all using the open cv package
3:18
so you just need to install this package
3:21
here which is open
3:24
cvash python so this is the first
3:28
package that you need to install pip
3:30
install open cv python i've already
3:33
installed this package after that you
3:36
also need to install this package which
3:38
is media pipe which is this AI package
3:43
which apply these algorithms of AI just
3:47
install this package as well and there
3:49
is another package which we are using
3:51
which is numpy which is again a very
3:54
useful package so install this package
3:56
as well so after installing these three
3:59
packages just make a simple app py file
4:02
and now let me show you step by step so
4:05
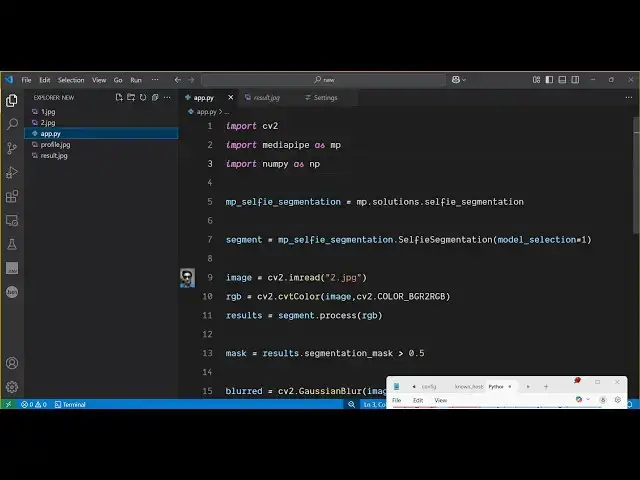
first of all we import the Open CV
4:07
package then we import the media pipe
4:10
package then we import the numpy
4:15
package after that we simply
4:20
initialize the actual library which is
4:23
media pipe it contains this function
4:26
solutions dot
4:33
selfie
4:38
segmentation so we are simply
4:41
initializing this the full script is
4:44
given in the description of the video
4:46
guys and then we again use
4:52
this it contains this function which is
4:57
selfie
4:59
segmentation and here we select the
5:02
model that needs to be
5:04
applied so it is actually
5:06
doing artificial intelligence so here we
5:09
are simply applying this model to
5:11
actually analyze the image and then blur
5:14
the background so we are actually making
5:15
use of artificial intelligence
5:18
here AI and then we load the image for
5:21
loading the image we are using open CV
5:23
so it contains this function image read
5:25
and here we specify the image that needs
5:28
to be used we are providing the path
5:31
here then we actually converting this
5:35
to RGB
5:38
color first of all so we call this
5:42
function
5:44
color
5:47
DGR
5:50
to
5:52
RGB so we convert this after that we
5:56
process this image so segment dot
5:59
process
6:01
RGB and then we create a binary
6:04
mask on the image so results
6:07
dot
6:11
segmentation_mask and here we put this
6:13
condition that if this is greater than
6:16
0.5 this is just computing going on and
6:19
then we apply the blur so to apply the
6:21
blur we have this function inside open
6:24
cv which is this gshian
6:27
blur function so which will blur this
6:30
image blur the background and here we
6:33
specify the image and then we specify
6:36
the amount of blur so here you can
6:39
provide this value here 75 by
6:43
75 0 so this will blur the image and now
6:47
we need to
6:49
actually blur the background for
6:51
blurring the background we are using
6:55
numpy we are applying this condition so
6:58
this will only blur the background not
7:00
the entire image and then we need to
7:02
simply save this image for saving this
7:05
image we are using image right and then
7:08
we say result dot jpg which will be
7:11
created and output image and then we can
7:14
simply write the line that image saved
7:17
with Instagram
7:19
style blur
7:21
background so this is a very easy
7:24
script a little bit complicated because
7:27
something computation is going on we are
7:30
using these three libraries OpenCV media
7:32
pipe and numpy in conjunction to apply
7:34
this effect so let me delete
7:38
this again run the script uh python app
7:43
py as soon as I run the script you will
7:45
see the script will run and then it will
7:48
create this result dot
7:53
jpg so you will see the background will
7:56
be blurred this is the original image
8:00
with the background visible and this is
8:03
actually the
8:04
image where the background has been
8:07
blurred so this is actually the script
8:09
guys if you need the script the link is
8:11
given in the
8:12
description and uh also check out my
8:15
website free media tools.com uh which
8:19
contains thousands of tools
#Programming
#Scripting Languages