Up next in 10

Node.js Google Cloud Text to Speech API Converter and Downloads it as MP3 File Using Javascript
Mar 12, 2025
Buy the full source code of application here:
https://procodestore.com/index.php/product/node-js-google-cloud-text-to-speech-api-converter-and-downloads-it-as-mp3-file-using-javascript/
#texttospeech #nodejs #javascript
Visit my Online Free Media Tool Website
https://freemediatools.com/
Buy Premium Scripts and Apps Here:
https://procodestore.com/
Welcome Folks My name is Gautam and Welcome to Coding Shiksha a Place for All Programmers. You can learn Web Development and Programming Tutorials.
Donate to Our Youtube Channel at :
https://www.instamojo.com/@geekygautam1997
Show More Show Less View Video Transcript
0:00
uh hello friends today in this tutorial
0:02
i will be showing you that how to
0:03
convert
0:04
the text into mp3 file or speech using
0:08
node.js and we will be using the google
0:10
cloud text to speech api
0:13
in node.js
0:14
so simply i will be showing you
0:17
in this video so let's get started so
0:19
first of all i will go to my desktop
0:21
directory and inside my projects
0:23
directory i will open command line here
0:26
and i will make a new nodejs project for
0:29
that i will be declaring a new directory
0:31
node text to
0:33
speech
0:34
after creating the directory i will move
0:36
into this directory node text to speech
0:40
so first of all in order to initialize
0:42
the nodejs project we will initialize
0:43
this command npm init dash y so this
0:46
will create the empty package.json file
0:48
after that we can open this inside
0:50
visual studio code text editor
0:52
so you can see it has created this
0:55
package.json file inside the root
0:57
directory so it contains very much basic
0:59
information about the project which is
1:01
name version description the main file
1:03
and the script section so now guys we
1:06
also need to install one of the
1:07
dependency which is a
1:10
node 1 which will automatically restart
1:13
the application and whenever we make any
1:15
sort of changes
1:16
so npmi node mod
1:19
so it will take some time
1:21
and it will install this so you will see
1:23
it is successfully installed and now we
1:26
need to make our
1:28
entry level file which is indexed.js
1:30
which is a main file
1:32
and now to
1:34
you need to add a certain script here
1:36
which is start script you just need to
1:38
write here node mod
1:41
index.js so basically we will just call
1:44
this script npm run start and this will
1:48
watch our application for any sort of
1:50
changes and it will automatically
1:52
restart it so now we just simply need to
1:54
run the application that is npm run
1:57
start
1:59
so you will see it will
2:01
automatically
2:03
see for the changes and it will
2:04
automatically restart the application we
2:06
need not have to manually start the
2:08
application so now guys there is a
2:10
dependency out there in order to
2:12
interact with google cloud text to
2:14
speech api inside this
2:17
node.js there is a module so in order to
2:19
follow along with the video i have given
2:21
the link in the video description so
2:23
this is my step-by-step blog post so
2:25
where you will find all the source code
2:27
and also the step-by-step instructions
2:29
in order to build this application so
2:31
just go to the video description this is
2:33
my blog post so this is the
2:35
library guys so simply you need to copy
2:37
this and go to npmjs.com this is the
2:40
official note shares packages website so
2:43
simply search for this package and the
2:45
very first package which comes in this
2:47
is a package we are talking about google
2:49
cloud text to speech
2:52
and if you click it you will see more
2:54
information about this package so you
2:55
will see 12 000 weekly downloads is
2:58
there so it's a very famous package
3:00
so now we simply need to
3:02
stop the application now and install
3:04
this npm i paste it
3:08
so like this so it will take hardly some
3:10
time to download this package depending
3:12
upon your internet speed so now it has
3:14
successfully installed it so for another
3:16
dependency guys we will use is it is dot
3:19
env so basically in order to store
3:21
security secure information we will use
3:24
make use of this uh module which is npmi
3:27
dot env that's it
3:29
so this is all about dependencies guys
3:31
so we can now again restart the
3:33
application
3:34
and pm run start
3:36
so you will see that and now guys first
3:39
of all you need to be having a valid
3:41
google cloud console account so if you
3:44
don't about if you don't know google
3:45
cloud just search google cloud console
3:48
here on google
3:49
and make sure that you link your
3:52
let me just see what is
3:55
you should be first of all be having a
3:57
valid
3:58
google cloud console account simply type
4:00
this and the very first link which comes
4:02
in simply click it for this you need to
4:05
be verifying your credit card
4:06
information just
4:08
if you're residing in india you can also
4:10
use debit card also so just just go to
4:12
the billing section and add your card
4:15
after adding it just go to apis and
4:17
services and you need to go to library
4:20
and here we will search for the api
4:21
which is the text to speech
4:24
just search for this api
4:26
and
4:27
enter it
4:28
so there are two apis first is text to
4:30
speech and second is speech to text so
4:33
in this we are using this cloud text to
4:35
speech api so simply click this
4:37
and click on manage
4:40
you will see it will go to the api
4:41
section here so here you need to create
4:44
a service account credential so
4:46
just go to this fourth option which is
4:48
credentials so there are many ways by
4:51
which you can interact with google apis
4:53
first is through api key second is
4:55
through client id and third is the most
4:57
secure one which is service account so
4:59
we will be creating service account for
5:00
this
5:01
application so click on create
5:03
credentials
5:04
and then you need to choose here service
5:06
account
5:07
and here you can just name your service
5:10
account credential anything test service
5:12
account
5:14
six
5:14
and create and continue click it
5:18
and here you need to give a role i will
5:20
just choose basic and owner so this is a
5:24
default option so click owner here
5:26
that's it click continue and click on
5:28
done that's it so it will create your
5:30
service account credential so now this
5:33
is your sample text test service account
5:36
six so simply click this and now to
5:38
create a key here so simply click key
5:40
section here and click on add key create
5:43
a new key and there are two options here
5:46
either json or p1 to json is the most
5:48
frequent recommended one click on create
5:50
it will download this as a
5:52
secure json file you don't need to share
5:55
this private key
5:56
which is
5:58
specific to your project so don't share
6:00
it with anyone it can be lost so secure
6:03
it in a secure location so
6:05
i will show the approach how to use this
6:07
inside the application so simply you
6:08
need to cut it and paste it inside your
6:10
working directory
6:12
so my working directory is node
6:15
let me move to the project no text to
6:17
speech this is the directory i think
6:20
sorry node text to speech
6:24
so this is a directory i will simply
6:26
paste it i will rename it as a
6:29
service account
6:31
dot json so this json file contains
6:34
secure information about your project so
6:37
don't share this file with anyone they
6:40
can also misuse and with your api keys
6:42
as well
6:43
i will not show you
6:45
for security reasons so
6:47
now guys first of all we will import
6:50
inside our index.js
6:54
i will make a new variable here text to
6:57
speech i will import the library that we
6:59
have installed here which is the
7:01
required statement
7:02
so here we will provide add the date
7:05
google cloud slash text to speech that's
7:07
it
7:08
now we also need to
7:10
invoke
7:11
or require the dot env so
7:14
as you know dot env is a secure way by
7:17
which you can store
7:19
credentials such as passwords keys so we
7:21
need to require it
7:24
dot env
7:25
and this this contains a config method
7:28
so simply call this and now you can
7:30
store
7:31
environment variables inside your
7:32
environment files so this is very simple
7:35
simply create your env file here inside
7:38
the same directory dot env and inside
7:40
this you need to call
7:43
uh
7:46
if you move here if you just see here
7:52
if you go to the blog post here you will
7:53
find the instructions but what you need
7:55
to do is that just create a dot env file
7:58
and here you need to paste this that
8:00
said google application credentials
8:03
so
8:05
the variable needs to be same which is
8:07
google underscore application underscore
8:10
credentials
8:14
so if the variable name is different
8:16
then you will see a error so simply you
8:18
need to provide the path so my path is
8:20
inside the same directory
8:22
service account dot json that's it
8:25
if you have a different path then you
8:26
need to provide the full path the best
8:28
practice is to store the same file in
8:30
the same directory that's it
8:34
after storing this guys we need to
8:37
request it to the library so for that we
8:40
need to
8:41
invoke or sorry include file system
8:43
module as well in order to store the
8:46
mp3 file inside the same system
8:49
file system this is a built-in module
8:51
and again we also need to require utila
8:55
also which is again a built-in module
8:57
of node shares require util
9:00
so after requiring this
9:02
we will create a new client
9:04
const
9:08
so this will be new
9:10
and
9:12
text to speech that we have invoking
9:14
text to speech dot
9:16
it contains a method which is a
9:19
text to speech client
9:23
that's it so it will create a new text
9:25
to speech client reference here after
9:28
that guys we can declare a function here
9:31
which will convert
9:34
text to
9:36
mp3 so simply we can call this function
9:39
and now we need to write this function
9:41
also
9:42
at the top here so this will be a async
9:44
function guys async
9:46
put a async keyword here async function
9:49
convert
9:50
text to mp3
9:53
so
9:55
whenever we load the application we will
9:56
call this functions so here we need to
9:58
define the text guys first of all which
10:01
text needs to be converted to mp3 so
10:04
here we can just provide john
10:07
latham is the
10:11
so basically this is a sentence that i
10:13
have written so which needs to be
10:15
converted to english mp3 file
10:19
later on i will show how to change the
10:20
language as well to hindi or different
10:22
sort of regional language it supports
10:25
all the languages inside the world as
10:27
you know google cloud text to speech api
10:29
so i will show you that aspect also then
10:32
we need to define the request so
10:34
whichever request we will make here so
10:36
this will be your object this will hold
10:38
various properties first is the input
10:40
text so we will provide the input text
10:42
inside
10:44
this
10:45
text property text is equal to text
10:47
whichever text that we have defined
10:49
and after that we will put a comma
10:52
as this is an object then we will put a
10:54
voice property here so which voice that
10:57
you wanted here so first we will be
10:59
language code
11:01
so basically from the name itself it
11:03
will point which language that you need
11:05
to put
11:06
your
11:07
files so i will put first of all english
11:10
so basically for every language there is
11:12
a two two letter code here en stands for
11:15
english and dash the country name which
11:17
is us
11:19
so this is a first of all i am providing
11:22
and the second is the
11:25
gender so ssml
11:28
gender g is capital so basically harry
11:31
it is saying which voice you want to
11:34
hear either male female or neutral so i
11:36
will put first of all neutral i will
11:38
show you all the voices as well
11:41
and you need to lastly it has a audio
11:45
config also audio config
11:48
so inside this configuration you will
11:50
just
11:51
have a property which is audio encoding
11:54
and here you just need to put the
11:56
extension of the sound file either it
11:58
can be mp3 wave as well so but mp3 is
12:01
default and it has a high quality so
12:04
after defining all these three
12:05
properties first is the input text then
12:07
is the voice
12:09
which contains language and gender then
12:11
there is it is the audio extension so
12:14
after defining all these three
12:15
properties we can just
12:20
pass these properties
12:22
we will again declare this variable
12:24
response
12:27
and inside this
12:30
sorry this needs to be
12:33
not
12:34
angular brackets this needs to be
12:35
angular bracket response
12:38
and here we need to call this function
12:40
which is
12:42
first we need to await it because this
12:44
is the async function so we are using
12:46
async of it
12:47
so client dot and this contains a method
12:50
guys which is synthesize
12:53
speech
12:54
so which will actually carry out the
12:55
process of
12:57
text to speech so here we can put our
12:59
request pass this request all these
13:01
options
13:02
so now we will get the response guys
13:05
so we need to store it inside
13:08
the local system so we can just say
13:09
constrict file
13:13
and
13:14
we can use util method here util dot
13:18
promisify and here we can pass
13:21
file system
13:23
dot write file so there is a method
13:25
inside file system which lets you
13:29
write the file to a local file system
13:31
path so we use this method
13:33
util.promisify
13:35
and we have passed filesystem.write file
13:41
so after that guys we just need to say
13:43
await
13:45
again a weight keyword you will write
13:46
and write file
13:49
and here we can pass the path to
13:51
whichever
13:52
let me call this as output dot mp3
13:55
and the second argument will be
13:58
response
14:00
dot audio content
14:04
and the third property will be binary
14:06
this will be a binary file this is audio
14:08
file
14:10
and lastly we can console log on the
14:11
screen that
14:13
audio text to speech has
14:19
has
14:20
completed
14:22
audio file has been saved
14:27
so now we can run this application in
14:29
the command line so simply
14:33
you will see it has successfully
14:36
rerun the application this node mode and
14:38
it has shown the message on the screen
14:39
that text to speech has completed audio
14:42
file has been saved so you will see in
14:45
the left hand side it has created this
14:47
output dot mp3 file
14:49
so basically if i play this file here
14:51
you will see the text that i have
14:53
written here
14:54
if i open this file
14:56
john williamson latham is the captain of
14:58
new zealand
15:00
so now you can see a person is speaking
15:02
those words here
15:04
and
15:06
you can provide as much text as as you
15:08
want so there is no limit out there
15:10
so
15:11
you can provide a long paragraph and it
15:14
will dictate it and it will create a
15:16
long file
15:18
so i will now show you different
15:19
languages as well you can test this
15:21
application you can try out hindi as
15:23
well so you can just
15:24
see just search for
15:27
random text here
15:34
so let me just copy this text and paste
15:36
it inside the application
15:45
so now you can see
15:46
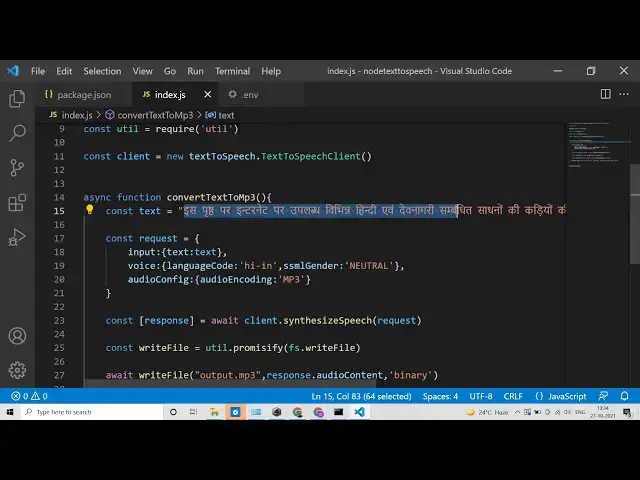
now this is a hindi text here so we also
15:48
need to conver change the language code
15:51
as well so
15:52
so for hindi there is a you can search
15:55
language codes on the internet so this
15:56
will be hi for hindi and dash
16:00
i n for india code
16:04
and once again if you run this
16:07
now it has again created this output.mp3
16:10
file
16:14
so now if i play this
16:16
is
16:26
so now it has you can just see here it
16:28
has spoken in hindi and
16:31
so in this way you can try out for any
16:33
sort of language either spanish or any
16:36
language in the world so you just need
16:37
to change this language code and
16:40
just the text out there
16:42
so thanks so much for watching this
16:43
video i will be seeing you in the next
16:45
video
#Programming
#Software
#Voice & Video Chat
#Educational Software
#Intelligent Personal Assistants