Up next in 10

Build Next.js FFMPEG WASM Timeline Video Editor in Browser Using Remotion Library in TypeScript
Jun 19, 2025
Buy the full source code of application here:
https://procodestore.com/index.php/product/build-next-js-ffmpeg-wasm-timeline-video-editor-in-browser-using-remotion-library-in-typescript/
Hi Join the official discord server to resolve doubts here:
https://discord.gg/cRnjhk6nzW
Visit my Online Free Media Tool Website
https://freemediatools.com/
Buy Premium Scripts and Apps Here:
https://procodestore.com/
Show More Show Less View Video Transcript
0:02
uh hello guys uh welcome to this uh live
0:05
stream so in this live stream I'll show
0:07
you a nextJS video editor that I
0:10
developed inside the browser here it is
0:16
works inside the browser here you can
0:18
see I'm running it on localhost 3000 and
0:20
it's built using a ReactJS framework
0:23
which is nextJS which is very much
0:25
popular the interface looks like this
0:27
you will land on this homepage of the
0:29
video editor and we have a button right
0:32
here to get started here so if you click
0:34
this button you will
0:36
uh get started here you first of all
0:38
need to add a project here and you have
0:40
a button here to add a project so if you
0:42
click on this button just need to name
0:45
your project here you can name this
0:47
anything and just click the create
0:50
button and as soon as the project is
0:53
created you will get this notification
0:55
and just click on that and now you will
0:58
land on this uh video editor right here
1:01
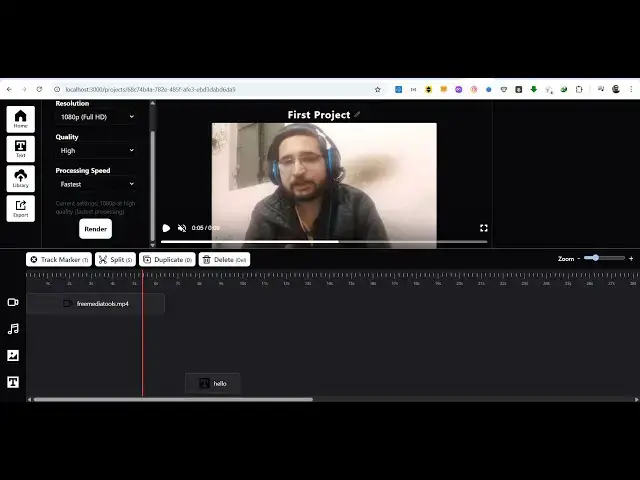
you will see you have a simple timeline
1:04
that you see inside any video editor so
1:08
it is using ffmpg web assembly library
1:11
which is a
1:14
library for video and audio processing
1:17
open-source library and also it is using
1:19
reotion library as well which is
1:22
specifically designed for react
1:24
applications
1:26
so here you will see this video player
1:29
as well so you will see the live preview
1:31
as soon as you add a video so we have a
1:34
button right here add media button so if
1:36
you click this button you just need to
1:38
select a video file to edit as soon as
1:41
you add this you will see this plus icon
1:43
and you just need to click the plus icon
1:45
to add the video to the timeline
1:48
and now you will see the video will play
1:53
so in the video player here and at the
1:56
bottom side you will see the timeline
1:58
and you will see all these controls out
1:59
there which is you can trim the video
2:02
you can split the video as well using
2:05
the timeline you can delete elements you
2:07
can duplicate elements as well so we
2:09
also have the option to add text on top
2:12
of the video image and then we have the
2:14
export button as well so this is a fully
2:17
fleshed project here inside next.js so
2:21
the full source code of this application
2:22
I've given in the link in the
2:24
description of this video so you can
2:26
directly purchase it and after
2:28
purchasing it you will get this zip file
2:31
which you can directly extract it and
2:34
this will be the directory structure and
2:36
you can see this whole application is
2:38
divided into multiple components which
2:40
are all coded inside Typescript each
2:42
file you will see the timeline component
2:46
this is the editor component so each and
2:48
every component is divided into
2:51
their respective components so if you
2:54
purchase it you will get the source code
2:56
automatically from Google drive and you
2:58
can let me show you the package.json
3:01
file here so we are using this remotion
3:04
library which is an open-source library
3:07
for constructing the video timeline and
3:11
also we are using ffmpg web assembly
3:13
library as well and you can see it's
3:16
compatible with the latest version of
3:18
next and you can see we are using react
3:21
18 which is the latest version
3:25
and once you get the source code you can
3:26
modify this source code as well
3:28
according to your own needs as well or
3:30
you can add more functionalities on top
3:32
of it so now let me show you the demo
3:35
here so as soon as I edit this video
3:37
here you will see the video is playing
3:39
and at any moment of time here you can
3:42
select the timeline and click the split
3:45
icon so let's suppose I only want to get
3:49
the first 5 seconds of the video so at
3:51
this moment of time right here I can
3:53
click the split button
3:56
and as soon as the I click this you will
3:58
see this notification your video is
4:00
split successfully it is divided into
4:03
two parts here this is the first 5
4:06
seconds of the video and this is the
4:09
rest of the video so now let's suppose I
4:11
don't want this so I can simply select
4:13
this portion and click the delete button
4:16
so now the rest of the video will get
4:18
deleted and you will only get the first
4:20
5 seconds so in this easy way you can
4:24
split your videos very easily without
4:27
needing a special software you can
4:29
directly do this all this inside the
4:31
browser itself so now we have also this
4:35
export button if you just need to export
4:38
the video you can select the options
4:40
here which is the resolution
4:43
you can select one 1080p full HD then
4:48
you can select the quality here which is
4:49
low medium high ultra fast
4:54
and then you can even select the
4:56
processing speed so it has all the
4:58
speeds available so then we have this
5:01
render button and as soon as the render
5:04
button is there you will see this
5:05
progress bar also showing right here
5:08
just telling you how much time is
5:10
remaining so it is all coming using
5:12
ffmpg web assembly library and it's a
5:16
userfriendly application so the user
5:19
will definitely see how much time is
5:21
remaining so
5:24
it also works with large files as well
5:26
but it will take some time to render
5:28
large files so now you can see the video
5:31
has been successfully rendered you can
5:33
play the output file this is we split it
5:36
and then we can download the video by
5:39
clicking this save video button welcome
5:41
friends and you can see you can play
5:44
this video file output file inside your
5:46
video player so this is a very simple
5:50
but very powerful video timeline editor
5:53
which directly works in the browser that
5:55
I built inside NexJS the link is given
5:58
guys in the description you can directly
5:59
purchase the source code on my website
6:02
procodestore.com
6:03
and after purchasing it you will get the
6:06
full source code from Google Drive
6:08
automatically and apart from that we can
6:10
even add text as well so we have the
6:12
text button and let's suppose you want
6:15
to add some text such as some watermark
6:20
so as soon as you you can select the
6:22
color of the text as well using this
6:24
color picker and then you click the add
6:26
text button you will see your text will
6:29
be added
6:32
and using the timeline it becomes very
6:34
much easy to control
6:37
how to align this
6:41
where to show this text
6:47
so you can see now this text will appear
6:49
for this period of time and you can see
6:52
that
6:58
you can control the video length as well
7:01
using the timeline
7:03
and on the right hand side you will see
7:06
different options if you select the
7:07
video you can also
7:10
change the color of the text from this
7:12
options as well control the opacity as
7:15
well
7:18
so you can see that so now it appears
7:22
and then goes away and in this you can
7:25
add multiple text as well
7:29
click now this is your second text again
7:31
you can control this accordingly you can
7:34
add multiple text inside the timeline
7:38
you can just zoom in zoom out the
7:40
timeline control the size
7:46
this is the first text this is the
7:48
second text
7:52
you can change the font as well
7:54
accordingly
7:56
starting time ending time similarly we
7:58
can even add images so if you want to
8:01
add images on top of the video as well
8:04
you can even add this just need to add
8:06
this to the timeline so once it is added
8:09
you can also control the
8:13
this is a fully fleshed project guys
8:16
inside nextJS if you are interested in
8:19
this the link is given in the
8:20
description
8:24
and definitely purchase the source code
8:27
and then it's very easy to run this go
8:30
to the terminal just first of all
8:32
execute the command npmi to install the
8:34
NodeJS modules which will create this
8:37
folder node modules and then simply type
8:40
npm rundev
8:42
this will start your development server
8:44
on localhost 3000
8:47
by default but I'm already running this
8:50
application so it will start your
8:52
application directly in the browser you
8:54
can create multiple projects
8:56
so if you go to the homepage it will
8:58
automatically detect that you created
9:00
one project
9:04
so this is the application if you are
9:06
interested guys definitely purchase the
9:08
source code the link is given in the
9:10
description and uh thank you very much
9:13
for watching this video please hit that
9:15
like button subscribe the channel as
9:16
well and I will be seeing you in the
9:19
next live stream