Up next in 10

Angular 13 File.io WebRTC P2P Upload & Download Files With Progressbar Using Socket.io in Typescript
Dec 22, 2025
Buy the full source code of application here:
https://buy.stripe.com/9AQ6rI9Rn40wbvO3iM
Show More Show Less View Video Transcript
0:07
Uh hello friends, today in this tutorial
0:09
I will be telling you that how to make a
0:13
web RTC peer-to-peer
0:15
upload and download kind of your
0:17
application in Angular. So basically you
0:20
will be able to upload files with
0:23
progress bar.
0:25
These can be any type of file, image
0:27
file, video file or any sort of file
0:30
that you have any extension. So
0:33
basically let me just show you a short
0:35
little demo of this application what we
0:37
will be building in this tutorial live
0:39
stream. So basically you [clears throat]
0:42
will be having a choose file button and
0:45
uh basically if you click this button
0:47
you can pick any file here which it
0:51
[clears throat] have having here. So you
0:53
can see here it is uh 3.35 mAB file. So
0:59
this is a video file. So now basically
1:01
you will see this is the progress bar.
1:03
It is giving you the percentage. So once
1:05
it reaches the 100% mark. So now you
1:08
will see the file is successfully
1:10
uploaded to the server. So we can simply
1:13
inspect element. And uh if I go to the
1:16
console, you will see that inside uh the
1:21
console we have a HTTP response object.
1:25
Inside the body, we see the file is
1:27
successfully uploaded to this link here
1:30
which provides you this unique link. If
1:33
you open this link inside the browser,
1:37
so the file is successfully uploaded.
1:39
You will see that this is your file
1:41
which is successfully uploaded here to
1:44
this website which is file.io.
1:46
So basically it's a file download
1:48
website where you can it's a Google
1:50
Drive version where you can upload files
1:53
and share with others. So simply you can
1:55
click the download file button to
1:57
download the file at the remote
1:59
location. So basically it's a
2:01
peer-to-peer uh upload and download kind
2:04
of application in angular. So we are
2:06
using web RTC for this to connect the
2:09
two clients and also we are using
2:10
socket.io.
2:12
Uh in the background we are making the
2:14
HTTP request and in return it is
2:16
uploading this file to this uh and
2:19
giving us this unique link and then we
2:21
can download the file. We can repeat
2:23
this process. We can choose image files
2:25
as well if you want. If I want to just
2:29
uh you can also put the image file you
2:32
will see that once it reaches 100% it
2:35
will again give you this HTTP response.
2:38
Now once again in the body you will see
2:40
that this file is successfully uploaded
2:42
and it gives you this unique link that
2:45
you can copy paste. Simply go to this
2:49
URL and uh here you can download your
2:52
image which is uploaded here which is
2:54
the screenshot. So now if you open this
2:58
you will see that in this easy way guys
3:00
you can make your upload and download
3:02
kind of application in angular. So let's
3:04
start building this application from
3:06
scratch. So I have given all the source
3:08
code in the video description. So if you
3:11
want to get download all the source code
3:13
you can refer my blog post which is
3:15
there inside video description. You can
3:17
simply go to the edit option.
3:20
So and in the video description you will
3:22
find out this is my
3:25
the source code. So one question is
3:28
there is this recorded stream not this
3:31
is not recorded this is a live stream
3:34
I'm uh coding live here. So if you have
3:36
any sort of question that you want to
3:38
ask me you can just uh type it in the
3:41
comment section I will also take your
3:43
questions while I'm coding. So it's not
3:45
a recorded stream it's a live stream. So
3:47
you can participate and ask questions
3:50
about programming or related to this
3:53
tutorial as well. [snorts] So I will
3:55
more than happy to answer your
3:56
questions. So let's start building this
3:58
application guys. So for building it,
4:01
you will need to create a new angular
4:03
project. So I will close all the windows
4:05
here and start from scratch. So we will
4:08
go to our projects directory. So first
4:10
of all guys please hit the like button,
4:12
subscribe the channel as well and uh
4:15
also hit the notification bell icon. So
4:17
we will make a new
4:20
file manager. I will cd into this.
4:24
And uh now to initialize a new project
4:26
of angular we would use the command ng
4:29
new and followed by the name of the
4:32
project which will be upload download.
4:34
So basically just create this project
4:37
guys. So this will ask some questions to
4:39
you that whether you want to include the
4:42
angular routing. So I will say no. And
4:44
we will use the CSS stylesheet format.
4:47
So basically guys, it will create this
4:50
inside your uh directory. It will
4:52
install all the packages. So it will
4:54
hardly take uh 5 to 10 seconds and it
4:57
will build out your application. So
5:01
if you see
5:03
this is our folder file manager and this
5:06
is our project folder. So once again if
5:09
I open this inside another window. So
5:11
you will see that it has created this
5:13
project and this is our brand new
5:16
angular project. Go to the source folder
5:18
app folder and you will find out this is
5:21
all the code inside app.component.html
5:24
and uh we don't need this code. Simply
5:28
delete this and inside app.component.ts
5:31
files. So once it completes guys we can
5:35
uh move with the application. So it is
5:38
just installing these packages. So just
5:41
wait.
5:58
So it is still installing these
6:00
packages. So it totally depends upon
6:04
your computer speed and internet speed
6:06
guys. So if you have a good computer
6:08
then it will take less time. So
6:12
now it is completed. So we can go into
6:15
the project directory which is upload
6:18
download. So for this guys we don't need
6:21
any sort of third party dependency. We
6:23
will only need the HTTP client library
6:26
which we need to include.
6:29
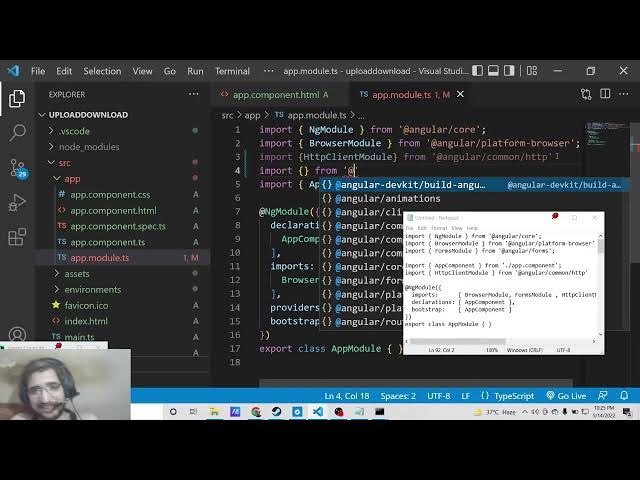
So basically the very first step will be
6:30
to go to the app.module.ts ts file and
6:34
here you here you need to include the
6:37
module that we need to install here
6:39
sorry include which is uh http client
6:42
module so basically it is present inside
6:45
the angular library angular/
6:50
sorry [snorts] angular/ uh common
6:54
and uh / http so [snorts] from this we
6:58
need to include this http client module
7:04
So just include this. And the second
7:06
dependency guys, we also need to work
7:08
with forms inside Angular. So we need to
7:12
include the forms module which is
7:13
present inside the angular/formms.
7:18
So we need to include this forms module.
7:20
So simply include this forms module. And
7:24
right here we need to include this
7:25
inside the imports array. So put a comma
7:28
and in include these modules forms
7:31
module and uh HTTP client module. That's
7:34
it. So now we have included both these
7:37
modules which is forms module and HTTP
7:39
client module. Simply close this file.
7:42
And now you need to open the
7:44
app.component.ts
7:45
file. So right here inside this file
7:47
guys what we need to do is that inside
7:50
our template we need to first of all we
7:54
will write our template. So inside the
7:56
template we will simply
8:00
have a simple input field.
8:04
So this will be file and uh just close
8:07
it. And here we will bind a event. So
8:11
when we click the upload file button,
8:14
this function will execute automatically
8:16
which is this upload method and it will
8:19
take this event object which is
8:21
event.target target
8:23
dot files. So just write this. [snorts]
8:28
And now to show the percentage also
8:31
right here beside this you will say
8:33
upload percent.
8:38
Inside double curly brackets you will
8:40
write percent. Done.
8:44
This is the percentage.
8:46
And you will have the break tag after
8:48
this.
8:55
>> [snorts]
8:55
>> So after this guys you will make a ng
8:58
container
9:00
tag.
9:02
So inside this ng container tag we will
9:06
have a if condition. So basically if the
9:09
file is successfully uploaded then we
9:12
will show the message that the file is
9:14
uploaded. So we will surround this
9:16
inside our ng if which is uh upload
9:20
success. So based upon this value
9:22
whether it is true and false we will
9:24
show the message to the user that upload
9:27
successful.
9:29
So basically when this value becomes
9:31
true then only this message will display
9:34
other than this message will not
9:36
display. So this is all the HTML code
9:38
that you need to write. Now moving on to
9:40
the TypeScript code. Just open the
9:43
app.component.ts
9:45
file. And here guys, you need to just
9:47
declare some variables here which is
9:49
percent den which is a number variable.
9:53
So just declare it like this.
9:59
And uh you need to
10:03
add a not symbol to it. This is the
10:07
latest Typescript version. Upload
10:10
success will be as I already told you
10:12
this will be a boolean parameter whether
10:14
it's to true and false depending upon
10:17
that we will show the message to the
10:18
user. So that's all you need to exe
10:23
declare and now we will have a
10:24
constructor guys. So inside the
10:26
constructor we will have a reference of
10:30
HTTP client. So we need to include this
10:33
HTTP client module. So it is
10:36
successfully upload uh included here.
10:38
You will see at the very top. So this
10:40
HTTP client is included from at the rate
10:43
angular/common/http.
10:46
That's it. So after this guys, what we
10:48
need to do is that we need to write the
10:50
function which we have binded which is
10:52
this upload method. So you know which
10:56
when we uh let me just start the
10:58
application and show to you. So ngsurf
11:01
we start this uh angular application.
11:05
So it will start this uh angular app at
11:08
port number 4200.
11:11
So it will generate all the bundles of
11:13
this application. So just wait.
11:17
So up till now guys if you have any sort
11:19
of problem you can ask in the comment
11:21
section.
11:30
So it is saying that uh event
11:34
dot
11:35
target dotfiles is current possibly
11:38
null. So for this guys what we need to
11:40
do is that uh the correct code will be
11:45
just remove this from here and here you
11:48
just need to paste it here. So right
11:50
here we will be pasting here like this.
11:54
So we will not be writing a separate
11:56
template inside the template
12:01
template string. We will be copy pasting
12:04
this like this. So if you now refresh it
12:24
>> [snorts]
12:34
>> So I have given the source code in the
12:36
video description guys. So let me just
12:38
do it.
13:09
>> [snorts]
13:10
>> Uh let me paste this code here.
13:23
[snorts]
13:29
So, [snorts]
13:36
so now there is no error guys. You can
13:39
see that. So, you can see that. So,
13:42
basically we are uploading these files
13:45
to this URL which is file.io. So, the
13:48
website that I talked about. So,
13:49
basically this website is very much
13:51
similar to Google Drive. So basically
13:53
you can share any sort of file up to 2GB
13:56
with uh you can just upload your upload
13:59
the files here and it will give you the
14:02
unique link. So basically it's a
14:04
peer-to-peer application. So so we are
14:08
doing it programmatically using angular
14:10
applications. So basically we are doing
14:12
the same process. We are making the HTTP
14:14
request here using this HTTP client
14:16
module. So you will see that and we are
14:20
also showing the progress bar in in as
14:23
well. [snorts] You can see that
14:24
percentage
14:26
and uh right here you will see we are
14:29
making it this post request. We are
14:32
passing this form data which we have uh
14:36
inside this input file. You will see
14:38
that when we click the upload file
14:40
button we are executing this method
14:43
which is this upload method. And here we
14:45
are passing this event. target.files
14:48
and also beside this we are also
14:50
printing out the percentage how much
14:52
percentage the file is uploaded and when
14:55
the file is successfully uploaded we are
14:57
showing the message that upload is
14:59
successful. [snorts] So this is the post
15:02
request we are making this and for
15:05
showing the progress bar we are using
15:06
the math module. So we are multiplying
15:09
it by 100. How much is the event dot
15:13
loaded divided by total.
15:18
So [snorts]
15:20
this is all the methods guys. I have
15:22
given the source code in the video
15:24
description. So let me test out this
15:26
application if it is working or not. So
15:29
if I go to localhost 4200
15:46
so I have shown you this this is the
15:48
project guys. So if you choose any sort
15:50
of file so if you it will give you this
15:53
percentage which is there you will see 1
15:57
2. So basically it is uploading the file
16:00
and also it is showing you the progress
16:01
bar as well with percentage. So that's
16:05
exactly my point. So we are uploading
16:07
files downloading files using web RTC
16:09
socket io and also we are showing the
16:11
progress bar. So so once it completes it
16:16
will give you this message that upload
16:17
successful. So basically it's a progress
16:20
bar. So the file is just uploading here.
16:24
after uploading it, it will give you
16:26
this uh once it reaches 100%.
16:32
So now you will see you get HTTP
16:34
response and inside the body you give
16:38
give this link here which is this link.
16:41
If I open this link
16:47
so this is your actual file which is
16:49
download uh uploaded. You can simply
16:51
click the download button to download
16:53
the file. So this is the overall project
16:56
guys. So please hit the like button,
16:57
subscribe the channel [snorts] and I
17:00
will be seeing you the next video.