Up next in 10

Power BI - Slicer
Watch more Videos at https://www.tutorialspoint.com/videotutorials/index.htm
Lecture By: Mr. Akshay Magre, Tutorials Point India Private Limited
Show More Show Less View Video Transcript
0:00
Hello friends and welcome to Tutorials Point
0:03
In this segment of the video I'm going to show you how Slicer work in Power BI Desktop
0:08
So guys, Slicer is being considered the one of the most powerful type of visualization
0:14
especially when you'd like to make your report a little dynamic. Now you must be wondering what is the Slicer
0:21
A Slicer is basically an on-canvas filter in PowerBi Desktop in such a way that it lets me look into a report segment
0:29
by a particular value. For an example I would like to view the visuals
0:34
according to different ears or I would like to see the visual according to region wise. All right guys. So how to
0:41
add this slicer is very simple. You simply have to go under the visualization
0:45
pane and you have to select the slicer visualization. Once you have selected the slicer visualization we have to go under the
0:53
field pane and you have to choose a field which you want to slice it
0:57
and you simply have to pick that field and draw it onto the slice place holder where you see the slicer
1:04
Alright guys, once you have dropped that slicer, you can see that the slicer that you can see on the report page automatically converts into list of elements with the check box
1:15
So you simply have to click on the checkbox to see your visualization
1:19
So how this slicer works and how to apply the slicer will go ahead and see in our practical approach
1:26
Hello friends and welcome. In this video we are going to see how to use slicer in Power BI
1:33
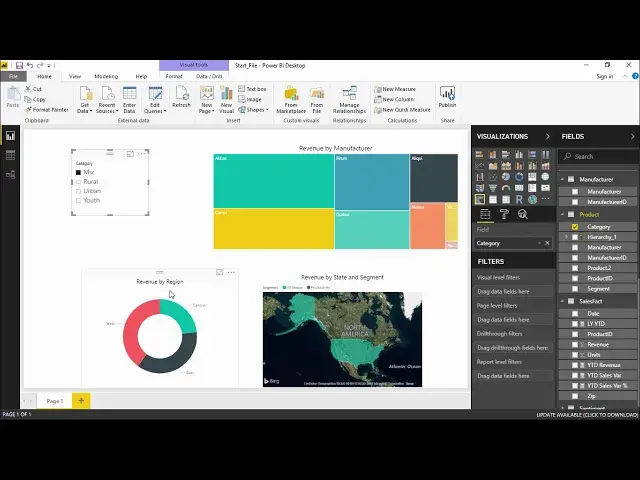
So let get started off Under the visualization pane we have something called as slicer So I simply select this slicer The moment I select slicer I can see an empty box out here in which I have to introduce the category So what we will be doing out here under the product table I have something called as category The moment I select this category and drop it under slicer you can see the unique values of all the category out here that is mix rural urban and youth We basically have four category out here So that the reason it is show
2:06
me all the unique values alright now I will quickly go ahead and increase the
2:11
size of it and see what happens under the format section I will go under the
2:16
items and I'll increase the text size so that it is visible to everyone all
2:20
right okay that sounds good that looks good now I can see the names out here
2:27
okay I'll simply go on the slicer now now what does a slicer is nothing but a
2:32
user interactive filter that means whenever I want to see a projection
2:36
for a certain category that means I want to see the projection for the rural category
2:41
so it is showing me the projection only for the rural categories now as you have
2:45
seen all these reports are interconnected the moment I select a slicer and a
2:50
select mixed category all my projection that is my tree map and my pie the
2:57
donut chart and the film map changes accordingly all right for youth it is
3:02
changing its color it is changing its revenue as well so it is a
3:06
basically a filtered out projection with the help of which with the help of a single click I can get my desired projection all right guys so this was something simple now let say that if I want to have multiple categories that means I want to see the result for rural and urban so I simply have to select the control button and then hit On urban so I getting the projection just for rural and urban itself
3:32
Alright guys so it's was very easy to use a slicer now we will go ahead and see what are the different type of slices that we have if I click on this drop down
3:41
It is firstly showing you as a list. It is also showing you as a drop-down. What do you mean by drop-down if I select this drop-down
3:48
You can see there is a drop-down for all. If I click on this drop-down, it is showing me list of all the responses
3:56
So, it's completely up to you which slicer that you have to use, whether you want to use a drop-down menu
4:03
or whether you directly want to select it, use it as a list
4:07
Now, we will definitely use a drop-down menu when we have long range of list, right
4:13
The categories, as of now, it's four. That's the reason I can see it in a list
4:16
But let's take for an example. I have 20 examples out here or 20 categories out here
4:21
So it will acquire more and more space and apparently making populated, making much more space for the slicer portion
4:32
Right. So this is what it is used for drop down and list
4:36
All right. So this was some basic thing. Moving on to the next thing that I will go under the format tab
4:41
And under the format tab, what we can do is basically I can change the layout, the colors, the way it is looking right
4:48
now but we will not focus on that this can be done by according to your own need the way
4:53
you wanted and the way you like to have the background color for all right as of now everything
4:58
is off because it just a simple plain slicer i would like to see it as simple as i can all right now the one thing which I want to show is the selection control if I click on this drop menu there the two options firstly it says show select all option so if I turn this
5:15
thing on see what happens to the slicer I will get an option of select all so I
5:21
can simply select all or I can select individually completely up to you so this
5:26
is what the select button is doing let's turn this thing off and let's try the second
5:30
one that is it says it is saying single select that means if I turn this thing off
5:38
see what happens if I turn this thing off it is giving me an option for checkbox
5:43
that means I can simply select one or one after the other without using the
5:48
control button as of now I'm not using the control button I'm just selecting it
5:52
one by one so that my filters or my slicer is giving me the results accordingly
5:58
upon the selection of category that I have all right guys so this is how it is
6:03
working now if I click on this drop-down menu there is an clear selection which
6:08
means if I want to remove this slicer if I can simply select this slicer
6:12
select on this so all the filters will be automatically removed so now we have
6:16
already seen that in slicer I can either get a list or a drop-down or if I want
6:21
to select multiple whether I want to keep it selected I simply have to go under this
6:25
format tab and under the selection control I can select the the required whether you want to select all option whether you just want a single select
6:33
right so depending on that i can modify my slicer according to my own need all right guys
6:38
so this was all about slicer how to use them how to modify them and how it works in power
6:44
b i hopefully you guys like this video see you and till next time
#Business & Productivity Software
#Credit Reporting & Monitoring
#Jobs & Education