Up next in 10


In this video, I assemble out the Yaheetech 6ft Pre-lit Artificial Christmas Tree with 250 Incandescent Warm White Lights
Check it out here https://geni.us/EwGFf9Y
DISCLAIMER: This video and description contains affiliate links, which means that if you click on one of the product links, I’ll receive a small commission. This helps support the channel and allows us to continue to make videos like this. Thank you for the support!
Show More Show Less View Video Transcript
0:00
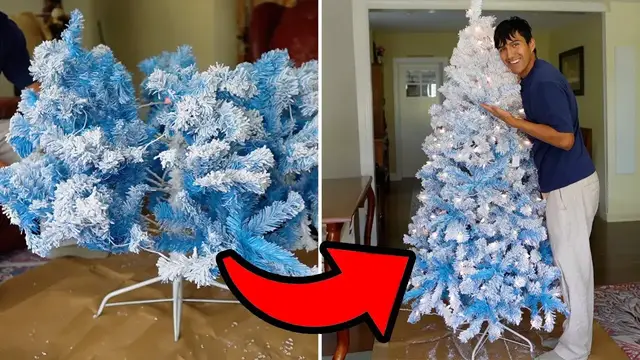
Yahi Tech sent me their Lake Blue Gradient Christmas tree, so let's check it out
0:05
So first up, we have the bottom section, and right here is the middle section, and finally we have the top section
0:11
There's also going to be some cardboard paper, a small box which has the stand, and finally the instruction booklet
0:17
Now here we have all three sections, and because this is going to be snowflacked, whenever you shake it
0:22
some white parts are going to come out, so it's good to use the cardboard piece just so the floor doesn't get too dirty
0:27
and I'm going to set this up right over here. Now we can grab the base and open it up and making
0:34
sure the holes are visible and before screwing in these right in here we're actually going to put it
0:39
right in the center and then grab the bottom branch labeled C and take the cap right off
0:45
and this can be placed right inside and now it's time to screw these in right here. So there's the
0:50
first one and then the second one and finally the third one and this prevents this from sliding in
0:54
place and also keeps these legs nice and secure. All right, so this is what we have so far and it's time to put these branches down simply
1:02
by moving them downwards just like so And this is what we get So there a bunch of holes over here and that because we have to fluff this up so i like fluffing up section by section so i going to start down here and
1:14
when fluffing the branches up make sure to start from the back side and move every single branch
1:20
all around spreading them outwards so they take up as much space as possible and each branch
1:26
should mix with one another so it looks nice and uniform as possible
1:33
And after about 6 minutes of fluffing, this is what we get
1:38
So now it's time to put the next section up on top and then do the same thing
1:43
So once again remove the cap. And this goes right on top
1:49
And before opening up the branches, make sure to connect the outlets, the plugs together
1:58
And then fluff everything up. so after five more minutes of fluffing here's what we get and now it's time for the last section
2:10
which is going to be this small right here so once again put it right on top and then before starting make sure the plugs are connected and there now it time to start fluffing all this up and after a couple minutes of fluffing
2:24
the top section up here's what we get so overall and it ended up looking pretty nice and this has
2:30
a lot of that white stuff a lot of that snowflake and you could see even some of it fell down but
2:36
i do want to fluff it up a little bit more just so it looks even fuller so i'm gonna do a little
2:41
bit more for a few minutes and I'll be right back. So I end up fluffing everything for a few more
2:51
minutes and all in all this looks a lot fuller than before and what I'm noticing so far is the
2:56
snow flocked is less at the bottom compared to the top. Here you can see it's really white whereas
3:01
as you go down it starts to get more and more blue and even some of that stuff wound up on the floor
3:06
which is good that we have this cardboard just so the carpet doesn't get too dirty. Now overall an
3:11
important thing when spreading this out is to make sure to go in all directions
3:15
up down left right and intertwine these with the other sections just so it's
3:20
hidden just so this looks as natural as possible as full as possible and there not like these big dark openings you know you just kind of cover it up like that And then here a closer look at the snow flocked This kind of looks like just cotton All right So now it time for the most
3:37
important part, which is to see how this lights up. So let me just connect this to the wall
3:43
and check it out this looks really beautiful I've never had a blue snowflot Christmas tree before
3:52
and this definitely looks real nice it gives it like a friendlier tone compared to something
3:58
kind of green so it is nice change of setting now the actual light colors are going to be like a
4:03
warm tone as opposed to like a bright white light but yeah overall I'm happy how the job turned out
4:09
I did a good job of fluffing it up and make sure to be patient when fluffing it up when building
4:15
starting section row at a time just to make sure everything is nice and big so it looks as full as
4:22
possible and all in all this took about less than 20 minutes to build and this is going to be six
4:28
foot tall but yeah that's a quick look at the blue snow flocked yahitech artificial christmas tree
#Computers & Electronics
#Holidays & Seasonal Events
#Home & Interior Decor