Up next in 10


In this video, I show you How To Build The Feandrea Clickat Collection Cat Tree.
Check it out here:
USA: https://amzn.to/4a22eqB
DISCLAIMER: This video and description contains affiliate links, which means that if you click on one of the product links, I’ll receive a small commission. This helps support the channel and allows us to continue to make videos like this. Thank you for the support!
Show More Show Less View Video Transcript
0:00
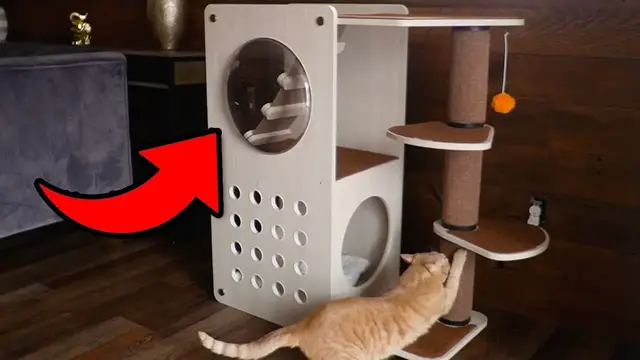
This is probably one of the heaviest catcheries I've ever gotten. This is going to be the Click
0:03
Cat by Fee and Dre. They went ahead and sent this to me. So I just want to do a quick unboxing and
0:07
setup and see if my cat Tiger goes ahead and likes this. So here's all the pieces it comes with
0:11
and the instructions. So the first thing to do is to grab piece C and then go ahead and face it
0:16
downwards. And then right over here we're going to screw pieces five and four together. Now we can
0:22
go ahead and grab piece B and flip it upside down so we can insert six dowels around over here from
0:26
the baggie labeled two. Now we can go ahead and lift piece B up and go ahead and attach piece D
0:33
E, and C to it. And now we can go to the back side of this and go ahead and screw in these long
0:39
screws labeled one and use these washers from baggie number six. And when screwing this in
0:44
make sure you put the plastic washer in first and then that brass piece. Now we can do the same thing
0:50
here for piece E and piece D. And here's what we get. And now we can go ahead and lay this flat
0:55
And now we can grab pieces G and insert them between piece E and C
1:00
And then use the long screws to screw it in over here. And then do the same thing for the other side
1:07
Now we can grab six wind dowels and place them all around over here. And before placing piece one on top of over here, we can go ahead and grab the plastic dome and place it right in the hole
1:17
And then screw in four screws from baggie number three. Now we can place the piece right on top, making sure that the window is on the left side
1:27
And when screwing this in, make sure you put the plastic washer in first, and then that brass piece
1:35
And here's how it should look like. So make sure to do that on all four corners. And in the center
1:39
you don't need that brass piece. And then same thing goes for the other side. So after flipping
1:43
this over we can go ahead and screw in these pieces on the four corners on both sides All Alright so now it time to attach these stairs up here and we can just drop this down here lift up this Velcro and this can be put right through the hole
1:56
And then we can attach it underneath with the Velcro and do the same thing down here. And now we can attach the scratching posts
2:01
and the boards together. So starting with piece M, we can attach one of the posts down here and up here
2:08
And now we can grab piece L and place it right on top here, followed by the last scratching post
2:13
And now we can insert this over here and attach the fuzzy ball on top
2:17
And now the last thing I do is just to put the pillow down over here. And so here's the final look of it
2:22
It ended up looking real nice. It wasn't too bad to go ahead and assemble. And I'm glad Tiger does like it too
2:27
He's just scratching the post at the bottom. And we are going to have these three different perch areas
2:31
Of course, he's going to be all the way on top. Now taking a look at these, one thing to note is these do not swivel
2:37
These are stayed how they are, so they can't accidentally go ahead and move as you see over here
2:41
And the same thing goes for the post. They're pretty nice and secure. Oh, he's playing with my hand as I squished it here
2:47
And of course, the ball is here too. So that's pretty good. He's pretty curious all around this
2:53
Now, as far as this part goes on top, this is stuck with Velcro over here. And yeah
2:57
he's pretty curious about this. So I don't think he'll take this off anytime soon. And then same
3:02
goes for everywhere else. Like at the bottom, they have the Velcro part too. On the inside over here
3:07
as well too. And then at the bottom, we're just going to have this soft pillow. And yeah, it's
3:13
It's going to be velcro at the bottom too. Now here's what the stairs look like. So overall I'm pretty happy about this cat tree
3:18
Especially because it's not just like a regular tree. Where just all the way vertical
3:21
There's going to be a lot more space. A lot more things to do. Whether it be perch over here
3:26
Climb the ladder. Take a nap in the cave. Or just go ahead and play with these holes in the wall
3:32
He's definitely liking it. And so if you have a cat. Or a few cats and you're looking for a new cat tree for him
3:37
That's a nice stylish piece as well too. Definitely check this one out by Fiendre
#Computers & Electronics
#Pets & Animals
#Birds
#Cats
#Building Toys
#Animal Products & Services