Up next in 10


In this video, I review the 10" Digital Microscope 1200X.
Check it out here: https://amzn.to/45qKaTJ
DISCLAIMER: This video and description contains affiliate links, which means that if you click on one of the product links, I’ll receive a small commission. This helps support the channel and allows us to continue to make videos like this. Thank you for the support!
Show More Show Less View Video Transcript
0:00
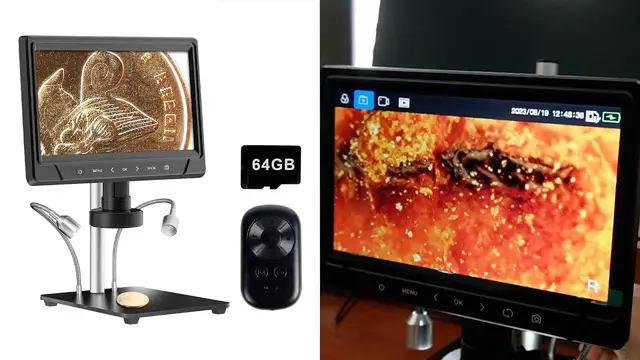
So today I'm going to be taking a look at this digital microscope, just seeing what's in the box
0:04
and also seeing what the end of my hair looks like. And I was sent this for the purpose of this video
0:10
But either way, let me get started. So right here, first thing I see over here is just going to be a little foam piece just to protect everything
0:18
And then in the front, yeah, this is where everything's neatly going to be packed
0:23
And right here to start off, this is just going to be the user guide. and this seems to actually fold out a lot over here so there's a lot of details over here that
0:32
I have to go ahead and take a look at make sure I go ahead and use it properly. The actual screen
0:37
itself on this screen does appear to go ahead and move up and down so it does tilt it doesn't
0:44
rotate although I can go ahead and adjust something here which I'll figure out in a little bit. Now on
0:51
the back side there's going to be a bunch of different things so for starters there's going
0:54
to be a reset button place to put the memory card. There's going to be like a little hole
1:00
over here. This is going to be for a USB type C and then the regular USB. And now in the front
1:07
there is a screen protector. And then there's a bunch of buttons. Now these appear to be just
1:11
capacitive buttons over here. The only physical button would be right here, which would be the
1:17
power and next thing here is gonna be this piece here so this is gonna be what actually holds up
1:27
the screen itself and this is gonna go ahead and actually tighten it and then these are gonna be
1:32
other knobs to go ahead and further adjust it as well too and now right here there's gonna be this
1:39
cable which is gonna be the USB-C and then there's gonna be two more cables these are both oh yeah
1:46
these are both USB-C here, so that means it comes in a total of three USB-C cables. These two are
1:52
going to be much larger than this one over here, and then I also see this part, which is probably
1:59
going to go on top because this is going to be the LED light, and then on the side over here
2:04
this is the switch to turn it on and off, and on the other side here is where I connect the USB-C
2:10
for power, and then there appears to be a knob here, probably to go ahead and adjust the brightness
2:15
of it. And then finally, I have this rod. This is what's actually going to go ahead and attach it
2:22
for the neck of it. And this does have some weight to it. And it is actually pretty thick as well too
2:28
So it's not fully hollow, but it does have a good thickness to it. And it does have two places where
2:33
screws are going to go ahead and go. And up at the top, there's nothing really. There's just this cap
2:37
over here. And then there's also going to be a cleaning cloth. Now this is going to be for the
2:43
screen so it's like probably a microfiber one and then I can remove this styrofoam and then at the
2:52
bottom there's going to be a lot of little goodies kind of tossed around here so the first thing is
2:56
going to be these tweezers and I love the look of these these look really luxurious they're stained
3:03
black over here with the initials ESD13 and then right up top it's going to be this plastic bit
3:11
just to protect them and this is what it looks like and yeah the tips of it are just going
3:16
to be just the regular metal steel color there and then I have this little card for the 64
3:25
gigabytes of memory which is pretty generous and then right here there going to be three screws followed by a hex key I also gonna have a little remote over here and it has a bunch of different buttons
3:39
two of which at the bottom this is gonna be to go and take photos and to record a video, so that's actually really cool
3:45
I'm able to go ahead and do that right on it. And then there's gonna be other buttons to go up, down, to reverse, or redo
3:54
Okay, and this might be like a menu button over here. and now I think this is the last thing and it actually does have a good weight to it but this
4:03
is going to go ahead and be the base yeah this is actually pretty heavy and then it also does have
4:08
these lights as well that go ahead and just move around and at the bottom it has okay it's going to
4:17
have these four corners and these are going to be the rubber feet so this is just to go ahead and
4:21
prevent it from kind of moving or sliding around and also protecting the bottom. And then right over
4:27
here there's going to be this bit that's fully attached. This I guess is to control these LED
4:33
lights. So right here it's going to be a little turning for the brightness and then right over
4:41
here once again for USB-C for the power. So I'm taking a look at the instructions and the first
4:46
thing to do is actually to go ahead and assemble the metal bracket to the base with the screws
4:50
so I have everything I need right over here and this is the bracket I'm talking about which I can
4:55
just put right over here kind of flip this to the side a little bit all right and there now this is
5:03
nice and tight over here and so next thing I can go ahead and do is just fix the host to the actual
5:09
bracket and I can do it just by putting this right on top over here I have to go ahead and actually
5:15
loosen this part up there so now it fits there there that's probably good just like so and now
5:24
I can tighten it and then I can go ahead and just connect the screen right on top over here and then
5:29
this light source goes at the bottom over here now I can start connecting the USB-C cables and the
5:35
first one is going to go right over here and I can connect it right up there to the screen itself
5:41
And then I can go ahead and get to the memory card and then just place it right in over here
5:47
And then the final USB-C cable to go ahead and actually power on the digital microscope
5:53
Alright, so everything's connected and ready for use. So what I have to do is just power this on here
6:06
And there it is. So I can go ahead and kind of cycle through all these different things
6:10
and then when I do go ahead and press it, it has like a little vibration feedback
6:14
Okay, so right here I can go ahead and just switch between the modes. So right here, here's a video, and this is just to go ahead and see any of the footage or videos that have been taken
6:24
And then this is just back to just camera at that point. And right here, if I press this, it'll go ahead and actually take a picture
6:31
So here, I'll do this, I'll put my hand here. And there, probably take a picture and I can go
6:40
Right here I can go ahead and check out this photo and there's the picture I just took
6:45
And if I press menu over here it gives me the option to go ahead and delete it or protect it
6:49
And I'll go ahead and just delete this. And delete current. Okay
6:55
And then there now it's deleted. And I want to go ahead and take a piece of my hair. But first I have to go ahead and make sure it's low enough
7:00
Because if I put a piece right over here this is way too big of a length And it not going to make a difference as you see on the screen here And it probably a good amount And I can still go ahead and just adjust this from this knob over here This can go either higher up or lower down as well too
7:15
And so one thing I did forget to do is actually connect the USB-C for these lights over here at the bottom
7:19
So I'll go ahead and do that now. And there, now these lights are on as well too. And I can go ahead and control the brightness from the back
7:26
And there, now it's all the way off and now they're all the way on over here. And so now I have a piece of my hair over here
7:32
But before I go ahead and put this one on, I want to go ahead and try this pretzel
7:36
So I'll just put a napkin right below it here. Oh, now I can see it
7:45
Oh, man. All I had to do was bring it a lot closer. Oh, wow, that looks weird
7:52
Oh, my gosh. Yeah, that's definitely a close-up of a pretzel now
7:57
And also what was also wrong was the fact that I went ahead and had it in black and white so I changed it to the actual color
8:08
And right here I'm just moving in. Oh it looks so weird
8:13
And this is only a pretzel. So here I can go ahead and kind of bring it a little bit closer
8:18
And now oh yeah. Oh wow that's all the salt crystals of it
8:24
Wow. Oh and there's the dark part of it. I wonder what part that is. Oh, so that part's probably that part of the pretzel over here
8:33
So now let me go ahead and see if you can check out my hair
8:37
Right over here. There. So here I took out a few pieces
8:43
And here's the hair. Yeah, there. That's my hair. So now I can go ahead and bring it even closer, actually
8:53
Oh, wow. Yeah. yeah and then all that white stuff at the bottom it kind of looks like spaghetti but that's actually
9:01
going to be uh the napkin before it at the bottom and yeah that's my hair yeah this thing's over the
9:09
hand magnifies it a lot and to actually go ahead and change the um change the color i can just press
9:16
this left here and it'll bring up this part of the menu and right here i can change it so right
9:21
not standard. We'll go black and white, warm, reverse, cool, green, and exposed. But I prefer
9:29
the standard. Honestly, the standard and the black and white doesn't make too much of a difference
9:33
just because the hair is black anyway. All it really does is change the background of it. Right
9:40
here I can kind of see more of the details of it. And then this is what it kind of looks like here
9:45
from here. All right, so I want to try one more thing, which is going to be my phone. So hopefully
9:49
this light doesn't really mess it up but yeah let me just turn the knob so it goes down
9:54
and yeah oh there it is so I can see each individual pixel let me see if I can go lower
10:03
nah nothing else happens it just goes black it's right here this is the sweet spot over here
10:09
then go ahead and move my phone around too oh and I see just a bunch of little bunch of little
10:17
white pieces over here so this just might be smudges or it might just be like little speckles
10:22
there on the phone itself yeah and I see a lot more over there and wow yeah everything is just
10:30
all those colors the red green and blue and then again I see this kind of thing over here I think that probably just the smudge I trying to see if I see a letter All right so right here This is a little bit different now Now There no green at all
10:45
So this might be part of the part of something. Let me see what is this is a letter
10:57
Oh, this is upside down Okay Yeah, I'm not sure what this is, but this is definitely going to be one of my applications over here
11:07
Yeah, I can see it. It's like the application box size. Let me go to the other side
11:16
And then right here. Yeah, it looks kind of weird. Yeah, this looks kind of weird. So maybe this is dead pixels, or maybe this is a word
11:24
Oh, okay. War. ah warhammer 40k okay this is going to go ahead and be uh for one of my apps right over here
11:37
oh it was actually reading the tiny letters over here oh wow
11:42
yeah and then one other thing that i can go ahead and do too is use the actual remote
11:50
so i went ahead and just took out the little tab over here and then there's going to be a bunch of
11:55
buttons here so for starters here this is going to go ahead and be to take a picture and there just
11:59
went ahead and took a picture or I can take a video as well too switches the video and let me
12:03
press it there now it's recording and you could see it's recording right up top over there so as
12:07
I go ahead and move it that'll go ahead and be what the video is going to be and I can just press
12:13
it again and they'll go ahead and stop the video and then once again I can just kind of switch back
12:18
to camera press it and it'll take that photo and then there's also other options over here too so
12:24
I can just cycle through it and this is actually a lot easier this way if I press it I don't have
12:30
to accidentally kind of move the screen over so here I cannot this button let me see yeah this is
12:37
going to be this button all right so yeah these two buttons over here it's probably going to
12:41
correlate with these two yep and I can just kind of switch the color over here yeah but I just
12:48
prefer the standard and then I can press okay disappear and then here this is going to be to
12:53
switch the modes. So right here, there's three modes again, camera recording, and then all the
13:00
files. So right here, here's my photo files. And these are the two that I took earlier. And then
13:06
I'll just leave it there for now. I can go back over here and then I could check out the video
13:11
files now. And this is going to be what I played out before. And I'm shortly going to go ahead and
13:19
start moving it yep there it is and yeah that's cool and then there's one more button over here
13:25
that i didn't do which is going to be this one it's going to have three horizontal lines
13:30
um so actually let me go back over here all right back to the camera now i press the horizontal lines uh and it just okay basically
13:43
just goes to the settings the the menu button over here so i can just kind of cycle through
13:48
these things, or move, yeah, or I can press it again, and it'll move over to the right, and then
13:55
from here, I can just go ahead and just change whatever settings I want, and if I press it again
13:59
it'll go back to over here. But yeah, this is a cool little remote, makes it easier to kind of go
14:05
ahead and maneuver instead of me having to press it over here. But anyway, this is a pretty cool
14:09
and yeah, that's an overview of the digital microscope
#Computers & Electronics
#Consumer Electronics
#Camera & Photo Equipment
#Scientific Equipment