Up next in 10



Website:
https://www.proshaper.com
Our Amazon Storefront:
https://www.amazon.com/shop/proshaper
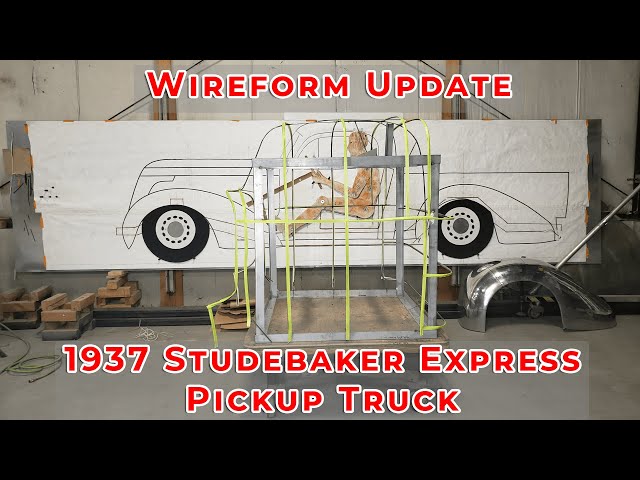
We had 2 students who took advantage of our 130 hour program Travis and Larry. Both had very little to no experience. Travis worked on the Studebaker truck fender using our wireform as a guide and did beautiful work! With about 5 days left to go Travis and Larry wanted to learn how to create a wireform so they took on the studebaker truck cab. After a few days they did a great job outlining everything, now all we need to have done is putting the lines for the doors and windows and then seeing if any corrections need to be made.
Email: [email protected]
Website: https://www.proshaper.com
Facebook: https://www.facebook.com/ProShaper/
Instagram: https://www.instagram.com/proshaper/
Twitter: https://twitter.com/ProshaperM
Linkedin: https://www.linkedin.com/company/proshaper/
Show More Show Less View Video Transcript
0:00
[Music]
0:18
hi
0:18
it's ray from pro shape a workshop look
0:20
at this this is a studebaker truck i've
0:23
been hoping it would be a little bit
0:24
more advanced than what it is now this
0:26
is what we did last summer with peter
0:28
from chicago peter came over he wanted
0:31
to learn at my class how to do the
0:33
drawing
0:34
we had a little model i'll show you the
0:36
model in a minute
0:37
and a lot of photographs and
0:40
from that model we determined that we're
0:43
going
0:44
to have to make some changes so we made
0:46
the cab a little bit bigger when we did
0:48
this
0:49
this is with my magnetic drawing board
0:52
this is magnetic plastic strip similar
0:54
to a
0:55
refrigerator magnet and this is tyvek
0:59
and you can just move this around and
1:03
move it just like you do a cad line
1:05
until you really like it we set the
1:07
wheel base
1:08
i made the wheelbase i think two inches
1:10
longer than the standard
1:12
37 studebaker pickup which i consider
1:15
one of the nicest looking trucks it has
1:17
this beautiful
1:18
slope back grill that follows all the
1:20
way back on the cowl
1:22
so peter was really happy he took i
1:26
think 130 hour class
1:28
and were able to get this drawing all
1:31
done
1:32
and then peter made this wire form
1:36
and this was the first wire form that
1:39
peter had made
1:41
and he wants to build his own car a lot
1:43
of my students
1:44
see that's a really good way to go and i
1:47
believe that's the best way to go
1:49
a lot of people are a little intimidated
1:51
in building their own car
1:54
it's actually inexpensive you can build
1:56
your own car oftentimes a lot cheaper
1:58
than you can
1:59
restore a car depending of course on the
2:01
car
2:03
but when you're building your own car
2:05
you can shoot for the moon you can make
2:07
anything you want you can make
2:08
a rolls-royce or a duesenberg or a
2:10
bentley
2:11
or ferrari or studebaker whatever you
2:14
want
2:15
and from that
2:18
wire form that peter made i just had 230
2:22
hour students
2:23
and larry and travis and travis had
2:28
zero i mean zero experience he'd never
2:31
put a piece of metal in an english wheel
2:33
at all
2:34
and i showed him how to do what he
2:37
needed to do
2:38
and larry had about maybe five or six
2:41
hours he said
2:42
total in wheeling and he had only made
2:45
these little pots before
2:47
so this was their first attempt at
2:50
making an entire fender off of this wire
2:53
form
2:54
and they did a beautiful job the welds
2:56
on the back side look nice
2:59
all flanged this is going to be a wide
3:02
edge here this is o60 aluminum
3:04
there's a few minor flaws there's a
3:07
little over development right here
3:09
i'll be able to heat that and slap that
3:11
right down no problem
3:13
not going to do that yet and then we
3:15
made a flexible shape pattern off of
3:17
this
3:19
and larry started making the other side
3:23
which would be this is the left side
3:24
fender
3:25
and this would be the right side fender
3:29
so we have to the travis made some of
3:31
the gauges with the flexible shape pad
3:33
and the gauges
3:34
you don't need a buck for the other side
3:36
we'll just use those gauges and flexible
3:39
shape pad to make the three pieces
3:41
it's one piece here one piece here and
3:44
one piece here
3:46
it was all shrunk using my gathering
3:49
tool
3:50
and the shrinking facilitator and then
3:53
hammered out in the center a little bit
3:55
so a combination of shrinking and
3:57
stretching
3:58
then they said well we only got a couple
4:00
more days left here
4:02
so i they both wanted to try wire for
4:04
them and so i says well
4:06
we got to wire form the cab the cab is
4:08
the essential element on this
4:11
uh we have the wire form for the rear
4:13
fender
4:14
i have an original fender it's all rusty
4:17
but the shape is all great
4:19
and we started making flexible shape
4:22
patterns and gauges off of that and
4:24
those will be made
4:26
all from the flexible shape pad engages
4:28
the front fenders
4:30
and the hoods are basically pretty flat
4:32
uh
4:33
we'll we'll make some kind of wire form
4:35
buck for the top part of the hood
4:37
but the sides are all all flat the
4:40
grille is a different deal altogether
4:43
and the bed is all flat stuff so that's
4:46
pretty easy so the
4:47
the most difficult part of building this
4:49
whole uh
4:50
truck is to build this cab section first
4:55
and the cab section the original
4:57
dimensions
4:58
uh if you go by them your shoulder is
5:02
going to be right up against the
5:03
shoulder so
5:04
uh we we sat down in chairs and we
5:07
measured our outside shoulder dimensions
5:10
two side by side was i think it was
5:12
larry and myself sat side by side
5:14
and it was 53 inches so
5:17
then we figured about two inches for the
5:20
thickness of the doors so it's a 56 inch
5:22
total
5:23
width so they want to do the wire form
5:27
and that's already somewhat in
5:31
here as far as the length we expanded
5:33
the length here but we needed to figure
5:35
the length for the width
5:37
so larry and travis
5:41
first wire form attempt they made this
5:44
nice cabin closure here it's not
5:46
anywhere near finished
5:48
then it might have to be adjusted a
5:50
little bit but
5:51
it's a really good start and like i said
5:54
this was the first time they had ever
5:56
wire formed so i told them
5:58
let's make a box structure inside so you
6:01
can attach all the wires to
6:03
and i had some of this i think a 16
6:05
gauge
6:06
bent up stock here and uh
6:09
they mig welded a nice little box in the
6:11
middle with inside the confines of the
6:14
outside of the body
6:16
and larry was proficient in fusion 360
6:21
the free
6:22
software program that you can get online
6:25
from autocad and
6:28
using the side view drawings i had here
6:33
and and coupled with the model so here's
6:36
the little model
6:37
and larry took this model and
6:41
took photographs from the top view
6:44
the rear view the front view and we had
6:48
the side view
6:49
already which is a modified version of
6:51
this like i said we expanded it a little
6:53
bit
6:54
uh and taking into consideration those
6:57
modifications of enlargement
6:59
uh larry took the drawings in through
7:01
fusion 360
7:03
and his outlining tool and from that he
7:06
created dxf
7:08
files and this isn't the way i do it but
7:10
larry was comfortable with that method
7:12
and i have a cnc wood router
7:16
with a pen in it it's a 4x8 wood router
7:19
so we took that those dxf files loaded
7:22
them onto that
7:23
wood router and was able to draw the
7:26
drawings out full scale
7:29
which then they bent the wires and
7:32
they factored all the measurements from
7:34
larry's drawings of where the wire
7:36
spacing was going to be
7:37
now this wasn't exactly the way i would
7:39
do it when i do it
7:41
i do it just on the magnetic board which
7:43
is very simple to do
7:46
but larry you felt comfortable doing it
7:48
that way so it says okay go with it
7:50
and uh their results are pretty good uh
7:53
like i said we might have to tweak them
7:55
a little bit now these are just basic uh
7:58
what i call
7:58
primary lines now these got to be
8:00
enhanced
8:02
by what we'll do is we'll take the lines
8:05
i have for the door there
8:07
and those will all go in here so now the
8:10
door will get defined
8:12
and the windows will get defined the
8:14
windshield post needs to be defined
8:17
this might be in the way we'll lop that
8:19
off if it if it is
8:20
not a problem and the back window i'm
8:23
going to put a little bit bigger back
8:25
window than standard in the
8:26
in the original 37 so all those
8:30
enhancements have to be
8:32
have to happen yet maybe some student in
8:34
another class
8:35
might might want to partake in learning
8:38
the process and doing all that too so
8:40
that might happen that way
8:42
but overall i was pretty thrilled that
8:44
they did some
8:45
really good work in a short amount of
8:48
time
8:49
and with results like that i mean they
8:52
speak for themselves
8:54
so the studebaker project moved forward
8:56
a little bit
8:57
i just thought that it would be
8:59
something that
9:01
my youtube audience would like to see
9:04
keep those comments coming
9:05
please subscribe tell all your friends
9:08
about my channel
9:09
we're growing and this is an ongoing
9:12
relationship you guys
9:13
are going to learn a ton of stuff we're
9:15
going to keep evolving this
9:17
thanks for watching
9:27
you