Up next in 10


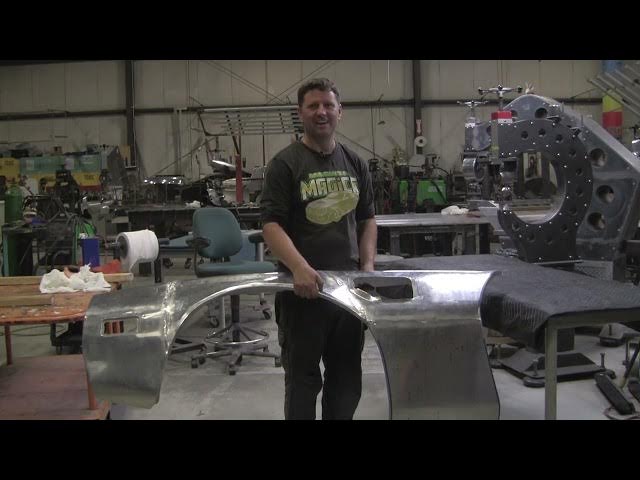
English Wheeling Aluminum Panels - 1979 Firebird part 3
This is Tim's final video for this year as he is taking everything back with him to Australia. We enjoyed having him here and hope to see him again next year!
Show More Show Less View Video Transcript
0:00
all right it's ready for in Pro shaper
0:02
Workshop in Charlton Mass and we're
0:04
talking to Tim terzais who's been here
0:07
from Australia on the The Churchill
0:10
cries and uh he's working on a 79
0:15
Trans Am turning out some aluminum
0:18
fenders this is the first vendor he did
0:21
yeah it was much harder than the
0:23
anticipated doing Factory stamped panels
0:27
then
0:28
um I guess the more flowing lines of
0:30
classic cars so there was a lot of
0:32
features and a lot of really subtle
0:34
things in it that took a really big
0:36
amount of time
0:37
and putting it all together was yeah
0:40
quite a quite a struggle so it's
0:42
particularly finishing it up so we got
0:45
most of the way there on both of the
0:47
fenders and there's just some yeah
0:49
slight things but I learned a lot along
0:50
the way and that was the important part
0:52
and point out some of the subtleties
0:54
so in the top line of the panel you've
0:58
got it's starting out with a nice flare
1:00
out there but then it goes into a subtle
1:02
reverses the panel goes along
1:04
and you're also joining sections as
1:07
you're going as well so that reverse has
1:09
to match each of those sections and then
1:10
gradually become bigger all the way
1:13
along to the nose of the panel the other
1:15
thing that was important was this point
1:16
is a high point in that panel as well so
1:18
everything's coming up to a Crest there
1:21
so that was kind of hard to put not a
1:23
flat line through it but having to bend
1:25
with that up that down that down and the
1:27
reverse running through it all the
1:30
flanges they were pretty hard because
1:32
they were quite complicated flanges
1:34
running down it they also had to meet in
1:37
the join sections which made that quite
1:40
hard and that's on a lot of the
1:42
different joins there
1:44
so they were about five pieces in this
1:47
and then hand forming on the indicator
1:50
recess in there as well which was quite
1:52
tough to do and that was after the panel
1:55
was formed so
1:56
doing both of those and then also
1:58
putting in
2:00
um the vent on the back and while I
2:03
didn't get to finish out the vent and
2:05
weld it in I've got that locked in so
2:08
I've locked all my edges and it's on the
2:10
right angles for the rest of the vent to
2:12
go in say there was quite a bit of shape
2:15
that also went through this section here
2:16
and there is a kind of roll a little bit
2:18
of a reverse in through there at the top
2:20
of it and that sort of Fades out so
2:23
there is a line there that faded out and
2:26
a line there that faded out so nothing
2:28
was uniform everything was very
2:30
stylistic and definitely
2:33
um yeah quite a difficult panel to
2:35
produce but I got there in the end and
2:38
that's the important part to say you've
2:40
got two of these out and yeah beautiful
2:42
job and can you explain how you capture
2:45
the information
2:46
so I went on to the car and then used
2:50
Ray's flexible shape patterns which were
2:53
instrumental in making something this
2:55
complicated it's quite hard so the old
2:58
way that I'd learned previously was the
3:00
the brown paper the butcher's paper and
3:02
magnets and like cutting or folding over
3:07
for your shrinking and stretching so
3:09
that really wouldn't have made this
3:11
panel it would have been still quite
3:12
difficult to do it that way with all the
3:14
features and things that are going on in
3:16
it and all the curves so it was quite a
3:18
complicated panel to make I suppose the
3:20
flexible shape pattern allows you to put
3:22
the areas in and the area was really
3:24
important because the area was English
3:28
world into the actual panel and gave it
3:30
the shape the initial shaping or volume
3:33
I guess you'd call it and then it also
3:36
allowed me to know exactly where I've
3:38
got to start those bins so I wasn't
3:39
guessing and all that information is
3:42
captioned in that flexible shape pattern
3:44
so using the flexible shape pattern the
3:46
10 templates knowing where they go
3:48
following all occurs profile gauges yeah
3:51
so there are yeah it was a numerable
3:54
profile gauge is because
3:56
there was yeah I've had a yeah a really
3:59
tough time sanding in cardboard and all
4:02
the other things to make up all of the
4:04
gauges that go on the panel so it really
4:06
was quite a complicated panel and a lot
4:08
of information was going on at different
4:10
stages so even in panel sections where
4:12
it looks quite
4:14
um plain there was actually a lot going
4:16
on so yeah it made it quite difficult to
4:20
make this panel and without that
4:22
information captured it would have been
4:24
even more difficult and to do a
4:26
traditional wood Buck it would I would I
4:29
would guess it would take a month to
4:30
make one
4:32
yeah so the wooden bark make this would
4:35
be
4:36
um would be just a waste of time it's
4:38
it's very very difficult
4:40
um yes you can capture information but
4:42
then trying to make it over the buck
4:43
that's just about impossible there's
4:45
just too much going on even though even
4:47
a wired form which is very difficult
4:49
yeah like there's just a lot of
4:50
information going on and it certainly
4:52
was a lot harder than I thought and this
4:55
is the first panel I've ever made so
4:58
particularly welding up uh aluminum was
5:02
quite difficult and it's a medium that I
5:05
do work in but I wouldn't do a full
5:07
panel like this or run wheels that long
5:09
so
5:10
learning that was a really key skill for
5:13
me and the amount of times you have to
5:15
go back to the flexible shape pattern
5:17
back to the gauges and back to
5:18
everything even after welding is is
5:21
quite incredible so it all brings it
5:23
together but it was a great learning
5:25
exercise and yeah I've learned a lot
5:27
yeah so I'd like to thank everybody Ray
5:30
in particular for teaching me and this
5:33
is my I guess an advancement into coach
5:36
work and learning more about restoration
5:38
and making things from scratch which was
5:41
been absolutely brilliant there's been a
5:43
lot of people Mark in the workshop here
5:45
Brian Dane all the other people that
5:48
have helped me along the way also my
5:50
friend Dan from Charlton police so it's
5:53
been brilliant I really enjoyed my time
5:55
and I've learned an absolute lot and I
5:57
look forward to putting it into practice
5:58
back in Australia you feel confident now
6:01
that when you go back to your shop
6:02
you'll be able to pretty much knock out
6:04
anything yeah like this was super
6:06
complicated and probably that's one of
6:09
the things that I really did enjoy it
6:10
was quite a challenge and we set the bar
6:12
really high in that first video and I
6:15
think you know over the time that we
6:17
went on I obviously went away for three
6:20
weeks to American Welding Academy in
6:23
Missouri and also went over to
6:25
California and then I came back so
6:27
there's a bit of a bit of a gap in
6:28
between what we've done on the panel
6:29
yeah like it's I've learned a lot and I
6:32
think confidently I can go back and
6:34
reproduce definitely on the skylines
6:36
without any issue from scratch
6:38
and that's a really key skill to have so
6:40
and this will allow me to do that and
6:42
thank you everybody for following me
6:44
with the firebird it's 10 from Pro
6:47
shaper Workshop in Charlton
6:49
Massachusetts thanks for coming Tim no
6:52
problem thank you for having me
#Hobbies & Leisure