0:00
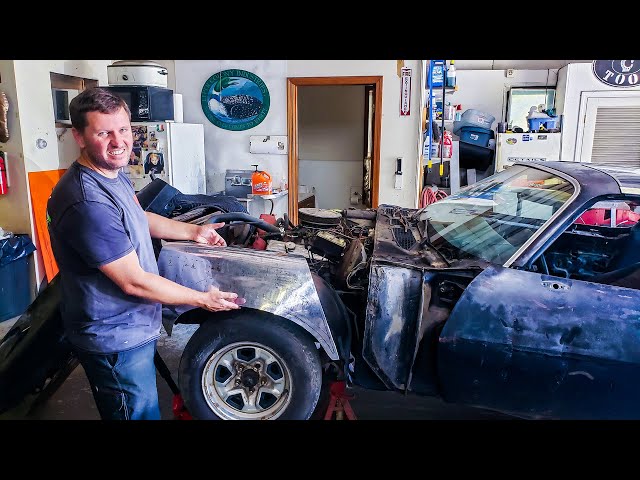
hi I'm Tim and just giving an update
0:01
quickly on the Trans-Am project and what
0:04
we've been up to a lot of it's been
0:05
pulling the car apart and getting
0:07
flexible shape patterns marked onto the
0:09
different areas of the car lot the
0:11
fenders the doors the hood lid and the
0:14
inner fenders we've decided to do as
0:16
well so a lot of the work's been prep
0:18
work the front end of the car we've got
0:20
pretty stripped down discovered a few
0:22
things along the way that needed to be
0:23
fixed up and basically I'll just take
0:26
you for a bit of a look so we've got the
0:27
rear boot area the rear boots come off
0:30
pull off the rebar and got the Rio of
0:33
course we've come across a lot of rust
0:34
along the way which was to be expected
0:37
so we've had a few Shear offs and bolts
0:39
and things that have held us up a bit
0:40
but I managed to get through it and if I
0:43
take you around this way of the car made
0:45
the flexible shape patterns for the door
0:47
and dial all that in ready to go making
0:50
sure that we're trying to keep the swage
0:53
and then obviously we've been pulling
0:54
apart the front inner fenders are out
0:58
and we've molded those up in a flexible
1:00
shape pattern and also taken the guards
1:03
off in a few other areas of the front
1:04
end to sort of get it a bit more
1:06
workable so the car's been stripped down
1:07
so that's taken a lot of time
1:09
particularly because of the rust so some
1:12
of the shapes are quite complicated and
1:14
that's taken quite a bit of time but
1:16
this particular shape here this is the
1:17
inner Fender that we're going to do an
1:19
aluminum so that should be quite an
1:21
interesting challenge
1:23
it's all taped up ready to go and then
1:27
reference points after the tape's gone
1:29
down and then do our flexible shape
1:31
pattern over the top of that to capture
1:32
all the detail in it and there is quite
1:34
a bit of detail the left and the right
1:36
look quite different so there's it's
1:38
literally one shape pattern for each
1:40
side each of our front guards have been
1:44
captured on our left and right side a
1:47
lot of the work's been forming up these
1:50
particular sides so we've got 10 pieces
1:52
in total that form up the front guards
1:54
these are the that's the nose section
1:56
for the right hand side and what I've
1:59
found along the way is that there's a
2:00
lot of really subtle little reverses and
2:02
compound curves going on in a lot of
2:05
different directions half panel full
2:07
panel all sorts of different things and
2:10
because it's a stamped process to make
2:12
these panels the designers get a bit
2:14
more fluidity with what they could do
2:16
and design into the actual panels
2:18
themselves so while it looks fairly
2:20
simple a lot of the little small details
2:22
and subtle points have been really hard
2:24
to capture and that's taken a fair bit
2:26
of time the front two guards are
2:28
captured in eight individual panel
2:30
sections so sorry 10 individual panel
2:33
sections to make up those front guards
2:35
so basically there are 10 pieces this is
2:40
with an underlay section about to be
2:46
so that's it's coming along so a lot of
2:49
the uh the com the curves and things
2:50
have been quite difficult these piece
2:52
has been particularly difficult which is
2:54
where the flaring goes um to capture
2:57
that it's quite subtle but there's a lot
2:58
of area built into it
3:00
this is in its raw form so we haven't
3:02
finished this up it's still
3:04
being processed at the moment
3:07
but that gives you an idea of the amount
3:09
of shape and work that has to go into a
3:11
panel section like this and how good the
3:13
flexible shape patterns are for covering
3:14
this sort of work we've also got the
3:17
left hand side lower section ready to go
3:20
and I'm just about to form up
3:23
some Hammer forming for the vents that
3:28
actually have to house the indicators
3:30
inside that actual section there so
3:33
we're about to form these up from that
3:34
and then Hammer form those into that
3:36
panel that's already been formed up
3:39
a lot of the other work has been
3:42
nose sections of the left hand side
3:45
we've obviously got the
3:48
the very distinctive sort of Center
3:50
where the the grill goes in that that's
3:53
been formed up as well
3:55
ready to go and a lot of the process has
3:57
been about taking a lot of measurements
3:59
and getting like a lot of the detail
4:02
built into the actual design so while
4:05
they may seem like it's a
4:07
straightforward and it's a firebird and
4:09
a Trans Am at that the the complexity
4:12
and the shaping a lot of the European
4:15
designs and the Maseratis and everything
4:17
else they're long and flowing they're
4:19
quite clean lines and they were designed
4:20
to be hand built whereas when you go
4:23
onto something like the Trans Am it
4:25
wasn't a hand-built car it was stamped
4:27
in the panel press and it's a lot more
4:29
complexity in forming up those shapes
4:31
they're not as fluid there's a lot of
4:32
things where they design it in clay and
4:34
they take bits and pieces out that make
4:36
it a bit more complex and I'm realizing
4:38
that and forming these up now so
4:40
something that may seem fairly simple on
4:42
its face actually turned into being
4:44
quite complex but hopefully within the
4:47
next couple of days I'll be able to weld
4:49
up these panel sections and get the two
4:51
gardens together so just to give you an
4:53
idea of how the panels form up you've
4:55
obviously got your flexible shape
4:57
pattern that comes off all that
4:59
information is translated onto your
5:01
sheet metal you then have your gauges
5:04
which work they're contoured so they're
5:07
matching the panel forms and as you can
5:09
see it actually changes quite a bit in a
5:12
lot of these shapes in the bottom of
5:15
and by the time you're going sort of
5:17
down you go into a different shape at
5:18
the front so there's different things
5:20
going along in the different Stations of
5:22
the panel and then you end up with a
5:24
section that looks like that so that's
5:26
the bottom back piece
5:29
and that's got the curve and everything
5:30
built into it so this has to have a
5:34
little bit of finishing work and then be
5:35
welded up but that essentially makes up
5:42
the other thing that we did was the boot
5:44
so we formed up the stations on the boot
5:46
and the flexible shape patterns made for
5:51
that's another process where we're
5:53
getting developing up the
5:55
the stations for it now to get the
5:57
Contours built in and then that'll be
5:59
put into aluminum as well and that wraps
6:02
up the Trans Am for now