Up next in 10


https://www.proshaper.com
Our Amazon Storefront: https://www.amazon.com/shop/proshaper
Alfa Romeo Scratchbuild Update
Email: [email protected]
Website: https://www.proshaper.com
Facebook: https://www.facebook.com/ProShaper/
Instagram: https://www.instagram.com/proshaper/
Twitter: https://twitter.com/ProshaperM
Linkedin: https://www.linkedin.com/company/pros...
Show More Show Less View Video Transcript
0:00
hi it's Ray from Pro shap of Workshop in
0:02
Charon Massachusetts and believe it or
0:04
not we really do want to work on that
0:06
Alpha the reason why it has been this
0:08
big Hiatus is right here was like three
0:11
big giant tables filled with this
0:13
architectural job that we did that took
0:16
forever to do and then we had to buff it
0:19
and uh in the process of buffing this
0:21
this red uh buffing Rouge got everywhere
0:25
and we had to clean the shop up and it's
0:26
just been a total disaster we've been
0:28
doing some deep uh thinking about where
0:30
we're headed and uh we we we really want
0:34
to do this Alpha as much as possible
0:36
last week I was intending to do a video
0:39
but there's always something in the way
0:40
there's always a project I got to get
0:42
done something to got pay the bills I
0:46
want to talk about where we are with the
0:47
alpha it's going to be probably a little
0:49
bit of repeat of what I did in the last
0:52
episode but to bring up some of the new
0:54
people and to refresh your mind what we
0:56
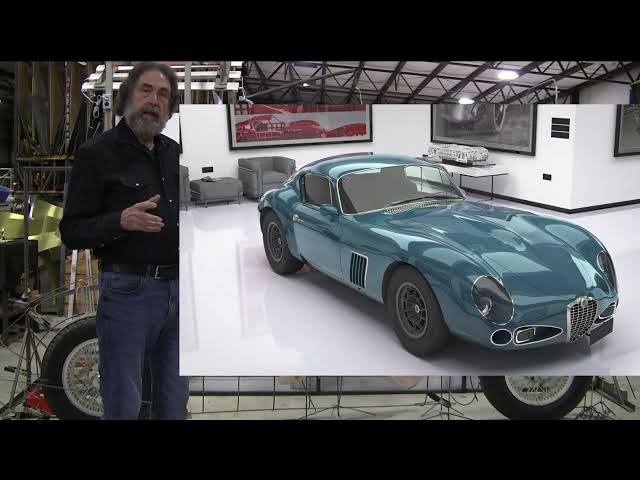
did was we took this picture which is an
1:00
AI design artificial design from mid
1:02
journey.com what we did on this is we
1:06
interpreted that drawing and made this
1:08
wire for all by eye I think we only have
1:13
at most probably like under 10 hours or
1:16
so invested so far here and we put this
1:20
stand in the back so that you could see
1:22
the wire form because you need the White
1:24
cardboard and everything so I've been
1:27
thinking about this all along as to what
1:29
the next Next Step would be and I might
1:31
even be re reiterating some of the stuff
1:33
here is that what has to happen now is I
1:38
can't uh project the center and and go
1:41
up to the center line here because I
1:43
need to know the width of the car these
1:46
lines here are preliminary wires that we
1:49
bent in a in a in a uh quick way so they
1:53
have to be all checked and I might have
1:56
mentioned this before too but I'm going
1:58
to go over it again is what you have to
2:01
do is take on Long uh flows of of Curves
2:06
and Straits you use a 3/16 wire and this
2:10
is quarter inch wire for the wire form
2:12
and you can put that 3/16 wire and you
2:16
just go like this and you measure how
2:19
it's hitting these here so now this is
2:22
this is pretty tight this one's tight
2:24
that one's tight no that one's got a
2:26
little Gap in it see so that might have
2:28
to come up so some these wires are going
2:30
to have to be done over again and then
2:33
now we go like this and we've got and
2:37
this wants to be pretty straight right
2:38
in here we've got a wire that's
2:41
deficient by about 38 of an inch here
2:44
and we got to do this on every wire and
2:46
see what the continuity of that line
2:48
does so this one's definitely bad we got
2:50
to adjust that so those have been Mig
2:52
welded in and we can just break the Mig
2:54
Wells or make a new wire so that process
2:57
has to happen that means we we have to
3:00
qualify every one of those wires and
3:03
correct them maybe add a few more wires
3:06
into this wire for so we'll check them
3:09
all with the that 3/16 rod and then some
3:13
of them that you have to do a Bend to
3:15
like this we'll use a 1/8 inch rod and
3:18
we'll check all of those wires as well
3:21
see so um
3:25
meanwhile uh at the start of this
3:27
process um this guy steuart Brown who
3:30
owns a company called Forte Vision he's
3:33
a really accomplished CAD guy and he has
3:35
a really expensive scanning machine and
3:38
he he's well known in England he's in uh
3:41
Dorset England down by the coast uh he's
3:44
only I think about 20 miles from the the
3:46
ocean from the channel basically he he
3:49
befriended me online we've had many
3:52
conversations now on the phone and on
3:54
his own volition he sees the promise of
3:58
AI design and he took in the same
4:01
picture and he's created a cad model
4:04
he's got the model all done he designed
4:06
the interior and everything now I may or
4:08
may not use that he's coming over uh
4:12
next month and he's going to stay here
4:14
for a couple weeks or more and he wants
4:17
to little learn a little bit about uh
4:19
shaping and we're going to be
4:20
transferring uh some information back
4:23
and forth sort of an exchange uh just on
4:25
a friendly basis and uh uh he'll be
4:28
working on this with me and uh he'll
4:30
have his laptop and we can consult about
4:33
a lot of the stuff here I know what I
4:35
want and he probably knows what he wants
4:38
but I've looked at his Model A little
4:39
bit and to me it looks like he flared it
4:42
out here and he might be right so uh I
4:46
might incorporate that but that would
4:48
come later so that's going to be some
4:50
interesting videos when when Stuart
4:53
comes over he's a really great guy and I
4:55
always enjoyed talking to him tomorrow
4:57
we're supposed to have another
4:58
conversation on another subject
5:00
about another car and uh what we got to
5:03
do again on this is get all these wires
5:05
right and then what we're going to do is
5:08
we're going to number each wire we'll
5:10
put a piece of tape with a magic marker
5:12
and we'll have them all numbered so we
5:14
can account for uh where they belong and
5:17
what what uh placement and then we're
5:20
going to put cardboard a big sheet of
5:23
cardboard in the back and trace this
5:26
curve and and uh get this all uh
5:29
patented on a piece of cardboard and
5:32
then a smaller piece of cardboard after
5:34
these get corrected and we'll Trace all
5:36
these and we'll have a number and a
5:38
tracing for each wire and we're going to
5:42
fill in a little bit more so there'll be
5:43
a couple more wires than what we see
5:45
here so then with that tracing we'll
5:47
Bend all the wires and they're going to
5:50
be all symmetrical and then we have the
5:52
the the measurements for the when we put
5:55
this cardboard up here we'll have
5:56
measurements between each one of these
5:58
wires so we'll be able to mark off the
6:01
new wire we'll have to make a
6:02
symmetrical copy of this whole side of
6:05
the car so this is the left side we be
6:07
making the right side of the car and the
6:09
reason why I want to do that is because
6:11
now we can take the right side of the
6:14
car and the left side of the car and we
6:16
can place it we'll probably put it here
6:18
in the middle of this space here and I
6:20
have the alpha rear end we'll put the
6:22
alpha rear end here and the alpha front
6:25
end here and that will set the track WID
6:28
and we'll also be able to make sure that
6:29
we have enough clearance on the on the
6:31
tires and everything and once we
6:34
determine what the width of the body is
6:37
actually supposed to be then we can put
6:40
the center wire in and then start
6:42
filling it in if we made the center wire
6:46
right here now that's that's a big guess
6:49
and we could easily screw up on the
6:52
track with uh because you need to to be
6:55
able to see the car from all angles you
6:58
be able to walk around it and if we have
7:00
the two sides if we need to move them
7:02
out an inch this way or an inch in this
7:04
way we'll be able to do that and we'll
7:06
have the rear end and front end plugged
7:08
in so we know that the track width is
7:10
right and we'll be able to see the
7:12
aesthetic as we create the center wires
7:15
now the big mystery is uh the front is
7:18
defined well but the back is not now uh
7:21
Stewart has defined the back in his uh
7:23
is CAD model I might go with that and I
7:27
I after we get this assembly all
7:29
together and it comes to the point where
7:31
I'm starting to fill in the center and I
7:33
want to get that back section filled in
7:36
I can just freeform it with the wires
7:39
but I also have another alternative and
7:41
I'll show you that I did make a quick
7:44
little video of showing the modeling
7:46
process of making a scale model and uh I
7:51
I this is another AI design and I did it
7:54
by gluing up Pine and uh I'll talk about
7:57
that in a minute but this is actually
7:59
the Alpha I Glu this up uh probably like
8:02
two weeks ago or so and I was going to
8:04
carve this similar to I carved this how
8:07
I car it is with a grinder so it's an
8:10
outdoor job the dust is everywhere and I
8:13
take a a 24 grit on a 5-in grinder and
8:16
just grind away have the picture there
8:18
to give me a little guidance and uh this
8:21
one I probably got uh I don't know maybe
8:25
30 40 hours in it or something now I've
8:27
been doing an hour at a time
8:30
and this is a a n a late 30s uh French
8:34
uh coach building design it could be a
8:36
uh uh foni fashi or S saic I think uh
8:42
and's a couple other French designers
8:43
did similar work in the late 30s and
8:46
I've always loved this style and this
8:48
one is exceptional I was going to do
8:50
this originally with the pine core just
8:52
like this and then put the uh Clay on it
8:56
but I decided instead to do this Bondo
9:00
and uh it's taken a while and it's still
9:02
you know probably another four or five
9:04
hours it just keeps going on cuz I'm a
9:07
crazy perfectionist I've got this front
9:09
fender where I want it now and I got to
9:11
you got to dial in the Symmetry as well
9:13
as possible too so I want to make this
9:16
actually an all painted model and all
9:18
dressed up with all the little details
9:19
and everything but this one is the alpha
9:22
and this will be a little bit different
9:25
um I might just kind of car the pine out
9:28
with the grinder and and then instead of
9:30
using Bondo I will use clay and I'll
9:33
clay model this and that will give me a
9:35
way that's another way of how I want to
9:38
shape that back end because the back
9:39
end's really important it's probably you
9:42
know 50% of the design or not that much
9:45
maybe 40% of the design the back and the
9:47
front are the most important and then
9:49
the silhouette so I want to get that
9:51
back really nice looking design and it
9:54
might take two three iterations with
9:56
Clay it's pretty easy if you're going to
9:58
do it with Bondo not so much if you do
10:00
it with wire it's going to be a little
10:02
tricky too because you bend all the
10:04
wires and you might have to cut them off
10:06
with the with the clay you know okay you
10:08
need to fend this to protrude a little
10:10
bit more you put a little more Clay on
10:11
you don't like it take the clay off it's
10:14
pretty simple so I might just
10:16
concentrate on the back end of this
10:18
model so I get some ideas and I think
10:21
that's going to help out a lot but
10:23
that's a little further down the road
10:25
because we got to get the two sides done
10:27
right and uh then
10:30
we're going to fill in the middle once
10:31
we get the two sides right we're going
10:33
to put it over here so we got a lot of
10:35
work ahead of us thanks for watching
10:37
it's Ray from Pro shaper Workshop in
10:39
Charlton Massachusetts