0:00
Hello friends welcome to Solid Works
0:02
tutorial and in this tutorial we will
0:04
learn rotate move and pattern sketch you
0:08
can also visit my website macne
0:10
nexus.com and you can visit this
0:14
SolidWorks tutorials tab where I have
0:17
written so many tutorials on solid works
0:21
where you can follow the step by step
0:26
parts if you like my method of teaching
0:29
then you can also support me on kofi.com
0:32
you can buy me a cup of coffee your
0:36
small support will help these channels
0:38
to grow and it will motivate me to
0:41
create more awesome content on solid
0:43
works so let's come back to our
0:47
tutorial as you can see that I have
0:50
launched solid works now to learn the
0:55
sketch rotate move and pattern we will
1:00
and we will select the part and click on
1:06
here we have the three planes front top
1:09
and right we will select the front plane
1:13
and uh we can click on here sketch or
1:16
you can right click and click on this
1:19
sketch icon you have both the options
1:21
either you can use this one or this one
1:25
so now we are in a front plane now first
1:28
we will learn r rotate option in a
1:32
sketching to learn the rotate options we
1:35
will uh select a two point rectangle and
1:41
rectangle and now we will constrain it
1:49
dimension so here my unit in inches I
1:56
millimet again I click on uh sketch
2:00
and I will give my length 100
2:17
50 so this is the very simple rectangle
2:22
now first we will learn the rotate
2:25
sketching so for this if we go here then
2:30
we can see here move copy and third
2:36
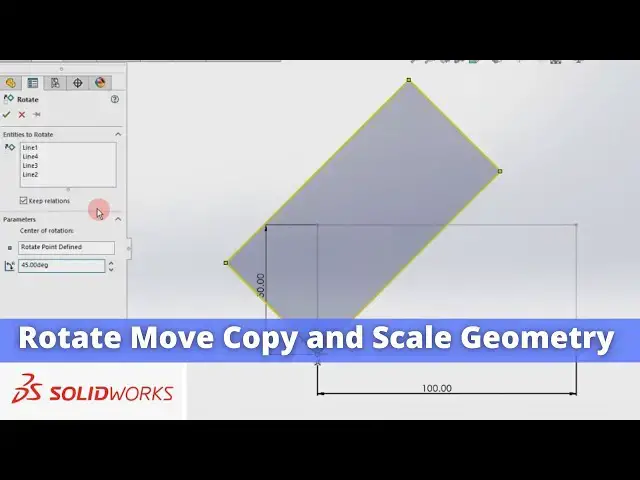
rotate so we will click on the rotate
2:40
entities we will get a popup window at
2:44
the left hand side where entities to
2:47
rotate so we will click on this box and
2:50
select the entities which we wanted to
2:55
rotate and here is the options to keep
3:04
will keep the relations and here center
3:08
of the rotations means we have to define
3:11
a point we will click here and click our
3:15
points now here is angle we will give
3:20
45° so you can see that uh our sketch is
3:24
rotated as we have keep the relations
3:28
which means that when then this was
3:31
horizontal then this line and this line
3:33
was perpendicular and this line was this
3:36
line was perpendicular so that is the
3:38
benefit of keeping the relations so we
3:41
have rotated our sket to the 45° we can
3:45
simply add the degree to our sketch and
3:50
it and click on okay so this is how we
3:55
can rotate our sketch you can select any
3:58
point either this one this one this one
4:02
or this one or you can also create a
4:06
points and you can rotate your
4:10
sketch now let's move to the next one we
4:15
will delete it and uh next we will
4:18
create a simple rectangle like uh
4:25
one and we will click on Smart Dimension
4:29
again again we will give it
4:41
here we will learn the move option we
4:46
will click on the Move entities so we
4:49
will get a very similar popup as we got
4:53
for the rotate so entities we wanted to
4:56
move is the all four lines
5:00
of our rectangle and here is a parameter
5:04
from to two or X or Y so you have two
5:08
options if we select from two then we
5:11
will select this uh origin
5:23
points we will select it and uh click on
6:56
now we will learn move entities option
6:59
in solid works for this we will uh
7:04
rectangle and we will give it a
7:08
dimensions of 100 mm in
7:22
it before that we have to understand
7:27
that this is a coincidence relations if
7:29
this this relation exist then we cannot
7:31
move it so we will delete
7:34
it and now we will click on the Move
7:37
entities options and from here entities
7:40
to move we will select all four lines of
7:46
rectangle and here we have the two
7:49
options from to two or XY if we select
7:53
XY then we can Define the dimension for
8:01
y so you can see that uh our rectangle
8:06
moved 15 x Direction and 100 in a y
8:10
direction second option is that we can
8:13
freely move anywhere we want so we will
8:17
select this points you can select any
8:20
points but I will select this origin one
8:23
and I am free to move my sketch anywhere
8:26
on my screen so let's place it on here
8:30
so this is how we can move the entities
8:37
box next tool we will
8:41
learn we will create again a simple
8:48
rectangle and we will see the other
8:51
options so we have a learned the move
8:55
option we have learned rotate option now
8:57
next we will learn the copy options we
9:00
will click on the copy entities and here
9:04
rather than selecting all line manually
9:08
one by one you can simply drag from
9:11
right to left to select all so as you
9:14
can see that when I drag from right to
9:17
left all the lines got selected and here
9:21
is the same from to two or XR y I will
9:24
select on X and Y and I will select this
9:29
origin point and create a copy so we
9:32
have the two copies of a same sketch
9:37
can copy our sketch in a solid
9:43
Bo scale options Let's uh learn it click
9:47
on the scale for example I want to scale
9:51
this rectangle so for this let's
10:00
select smart Dimension and uh give it a
10:07
100 and uh we will select this one and
10:12
this one and we will add equal
10:16
relations now it is a square
10:21
now we will select the scale
10:26
entities we will drag from right to
10:30
left we have selected all the lines now
10:34
here we will enter the scale
10:36
factor let's say two times we will click
10:40
here and select our point from where I
10:44
want to scale so I will select this one
10:49
okay so now this was 100 if I measure
10:54
this one then it is a 200 so we have
10:59
scale our square into the two times that
11:03
is how you can scale the sketch geometry
11:10
walk now let's uh delete it and now we
11:21
pattern so we have a 100x 100 square we
11:26
it and uh click on the linear pattern so
11:31
once you click on the linear pattern you
11:33
will have the two options x-axis and y
11:36
axis so x-axis let's I delete it and I
11:42
give my xaxis this one and uh I delete
11:46
this y- axis and I Mal select this
11:48
vertical line as my Y
11:53
here I want my number of instances 20 in
12:07
y and here is a distance Let's uh give
12:11
the distance of uh 200 in X and 200 in
14:46
now we will learn linear pattern in
14:49
solid works for this we will click on
14:51
the sketch select two point rectangle
14:58
now we will give the horizontal
15:05
Dimension let's give horizontal
15:09
500 and a vertical dimension of
15:24
okay now we have a very simple rectangle
15:29
now we will create a circle inside our
15:36
rectangle for this we will select on the
15:38
circle tools and create one
15:43
Circle and now we will uh choose the
15:48
dimensions and give the dimensions let's
15:54
horizontal click on okay
16:10
vertical so instead of a 10 mm Let's uh
16:18
horizontal and 20 mm
16:26
vertical now we will give the diameter
16:29
to our Circle Let's uh give it 20
16:38
now we have a very simple sketch of a
16:42
rectangle and a hole inside of it now we
16:47
will use the linear pattern to pattern
16:54
this we will select the linear sketch
17:00
so the axis is already got selected X
17:06
distance this is the 20 and radius is a
17:11
30 so we will give it a 40 mm in the X
17:21
directions and number of instance let's
17:38
directions let's select this line for y
17:41
directions and uh give the number of
17:46
10 and from here inter to pattern is
17:56
circle now select this horizontal center
18:00
X and from here we can flip it and from
18:04
here we will uh change it to the
18:11
10 and change this to the
18:18
five distance I changed to the