live_tv
Livestream Starting Soon
00
Hours
:
00
Minutes
:
00
Seconds
Up next in 10


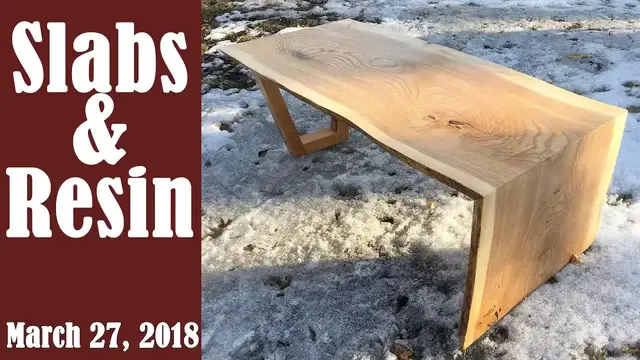
Finished up the first waterfall table and got started on the other two by surfacing the slabs. One of the waterfall tables will get a resin river so I put together a small sample to see how everything will look before I move forward with the main pour.
Master of None:
LIVE EDGE WATERFALL TABLE PROJECT:
Ecopoxy Liquid Plastic: {available through dealers}
Dealer I went through:
Pearl Ex True Blue:
Sheathing Tape:
West System Epoxy Resin (Gallon):
West System Epoxy Slow Hardener (Quart):
West System Metering Pumps:
VIEWER PROJECTS
Warhammer by Scott
Show More Show Less View Video Transcript
0:00
Hey everyone, my name is Matt. Welcome to my shop. Today is March 27th and this is my weekly shop
0:05
update. So, biggest thing this week is the first waterfall table is all done. Got that finished up
0:11
last week and I am super happy with the way this thing turned out. I ended up making a trapezoidal
0:15
frame type base for it and I used some bridal joints to join that together. Something that looks
0:20
really nice with the end grain of the top and bottom poking through the sides just has a really
0:25
the nice detail and the taper that results from that trapezoidal shape kind of matches the live
0:29
edges of the overall slab. So I made the base out of cherry. I used a piece of I think it was
0:35
supposed to be 12 quarter stock. It was cut kind of weird on the bandsaw. I think this one ended up
0:41
kind of rolling as it was cut so the cut kind of tapers in both directions from one end to the
0:46
other. So it was one of the reject slabs that I just happened to hold on to and dry just in case
0:52
I'd use it for something someday, and this is the day. I think this was cut back in like, I don't know, 2012
0:58
2013, something like that, long time ago. And I ended up drawing a full size pattern for this
1:03
It made it super easy to get the proportions right. I just figured out the taper that I wanted for the sides
1:09
and then I picked up the angle and then the overall length of the bottom based off that taper
1:14
So after I cut all the parts to size, I started cutting the bridle joints, made all the cheek cuts on the table saw
1:20
using a tall auxiliary fence and a little push block on the backside to help guide the work piece through
1:25
On the mortise part, I did the bulk waste removal at the table saw, making a few passes
1:29
to get most of the waste out of there, and then I cleaned up the remainder with some chisels at the bench
1:33
On the top and bottom that received the tenons, I removed the bulk of the waste with the hand saw
1:37
at the bench and the chisels back to the scribe lines with some chisels
1:50
So with that guy in the house, I can move on to the next tables
2:00
These are going to be the river tables for the guild project. So this one here is going to get a glass inlay and this one here is going to get an epoxy
2:08
fill in this kind of gap area up top here. So I got both of these guys flattened last week using the router and while I was at it I also grabbed the slab that going to become the top of the outfeed table and got that flattened as well so that ready to go as soon as I kind of ready to start working on that And the slab here for the
2:24
outfeed table, I think that's going to look pretty darn nice. This is the next slab off
2:31
the log from the waterfall table I just finished up. So it has the same kind of knot thing going
2:39
on here with the compression figure as well as the blue staining on the other end. So it's going to
2:44
be quite a nice outfit table to look at. So I'm getting really excited about these slabs here
2:50
because they are just absolutely gorgeous. The crotch figure in both of these guys is like two
2:55
feet long so it's just absolutely incredible. This one here is going to receive a waterfall joint in
3:02
the crotch so this crotch figure is going to wrap over that corner. I think it's going to look just
3:06
incredible. This one here is going to receive that epoxy fill and the waterfall joint is going to
3:11
occur in the middle of that fill. So that's going to look pretty cool as well. So before I get into
3:16
the actual filling on the slab, I did do a little bit of a test sample kind of thing here, mostly to
3:22
figure out how much of this metallic pigment that I want to add to the epoxy to get the whatever
3:27
look is going to give me. I have like zero gauge to know how much this results in what effect. So
3:34
having an actual piece with an actual known amount of pigment in it gives me a good idea of
3:39
what direction I want to go with, with how much pigment to add to the mix for the real one
3:43
The other thing it does is I'm trying out this product called Eco-Poxy. It's a liquid plastic
3:49
I've seen that on the internet a lot, like a lot, so I figured I'd give it a try and see
3:54
what the fuss is about with it. So far, it's very pleasant to work with. The biggest advantage of a
4:01
product like this is a casting resin, so you can do thicker pores, deeper pores without any worry
4:07
about heat buildup. And the other thing it gives you as well is it gives you time for the bubbles
4:12
to rise to the surface if you're going to have any, and then pop them. So this takes 24 hours
4:18
to even start tacking up. So you could probably remove bubbles for at least 18 hours. That gives
4:23
a lot of time for bubbles to rise to the surface, and it takes a full 72 hours to actually cure
4:28
So very slow curing epoxy which gives you like I don know like probably the easiest way to get the best results possible I guess because all the variables are kind of taken out of it I definitely recommend
4:41
if you're going to do something like this, do a small one just to kind of test things out. This is not a cheap process by any means. This was a 4 liter kit, so these guys here
4:52
these guys here, this box, that's $160. So the real slab I'm going to do is probably
4:59
going to take a full kit of this. I have two of these, so you definitely
5:05
don't want to screw this up because it can be kind of costly. As far as cost goes, this is more expensive
5:11
than the West System Epoxy, which I usually kind of show. Now you can use this for a fill like this
5:18
but the hardest thing with this, or the problem this is going to need to be poured in thinner layers
5:23
This generates a lot of heat because it cures a lot faster than this. So with a lot of heat buildup
5:27
it can cause some issues with the epoxy curing correctly. But as far as the cost basis goes
5:32
the gallon kit for this, usually the resin is like $90 and then the hardener is like $45
5:39
So $135 for the gallon kit. That gives you 150-something ounces mixed
5:45
So it's like $0.87 an ounce. This is going to come in
5:49
at I think $1.15 or $1.17 an ounce. So a little more on the expensive side
5:55
but I guess it gives you a little bit of an easier way to get the results that you are after
6:00
So here is my sample river table. This is a couple pieces of mulberry
6:04
and this is the pigment. It's the True Blue Pearl X. Pretty cool looking stuff
6:11
I'm not really sure what it's going to look like though because right now my judgment is kind of skewed
6:15
because it has this purple look because I have this red sheeting tape on the bottom of the form
6:20
just to hold the epoxy in there. So it's going to be interesting to see what that looks like
6:25
when the thing is removed from the tape. So we'll see. So far, though, the metallic pigment is really cool
6:33
There's a lot of cool light play in there. It just looks really, really neat
6:36
So I think I'll probably be messing around with some of these things some more in the future
6:41
And these come in all different kinds of colors and stuff. So that's what's going on in my shop this week
6:46
Let take a look at some viewer projects First this week is a Warhammer by Scott Scott says that everything he made has been for a specific purpose and he figured it was time to build something simply because he thought
6:56
it would be fun. Sometimes you've got to build something ridiculous. He says it's most likely
7:03
never going to be used but it currently sits on his desk at work so it's a way to intimidate people
7:08
to get their work done when they're late. Next is a crib by Greg. Greg built this crib for his son
7:14
and Ethan is built from hard maple and finished with water locks. It contains 72 moors and tenon joints
7:21
and he says, needless to say, my next project will see me taking a break from moors and tenon
7:28
This was Greg's most serious project to date, and he says it's a joy to see his newborn son sleeping in it
7:33
Next, the Mid-Century Modern Desk by Jim. Jim says that most of his stuff is mid-century inspired
7:39
but with a more handmade approach. This desk is all solid walnut with maple drawer sides
7:43
and zebra wood shop saw veneer drawer fronts. All of the drawer and casework dovetails are cut by hand
7:49
as well as the sculpted legs and the handles. And you can find more of Jim's work over on Instagram
7:54
Last of this week is a sawmill by Wayne. This is an interesting take on a bandsaw mill
7:58
in that it kind of operates and functions the same way as a chainsaw mill
8:02
The mill rides directly on top of the log, just like a chainsaw mill, and you make your sequential cuts
8:07
referencing the previous cut all the way down through the log. I'll leave a link to Wayne's channel down in the description
8:12
He's got a video over there that shows the process he went through to build the mill, as well as a bunch of videos on actually using it, and it is pretty sweet to see
8:20
Just a heads up, if you're following the waterfall table build over in the guild
8:25
there won't be a video this Friday. I need some time to get ahead with these things to get them kind of further along
8:31
before those videos start coming out. There are three more videos left in that series, one for each of these tables
8:36
and then the wrap-up video, and that one is done as well. Woo-hoo
8:40
so in case you don't hear from me hope you guys all have a great Easter
8:45
hope you get to spend some time with your families and just enjoy your families and stuff
8:50
so I think that's about all I have going on in my shop this week
8:55
thank you as always for watching I greatly appreciate it if you have any questions or comments about anything on top of today
8:59
or anything here in my shop please feel free to leave me a comment
9:03
as always I'll be happy to answer any questions you might have and until next time happy woodworking
#Design
#Home & Garden
#Construction & Power Tools