Up next in 10

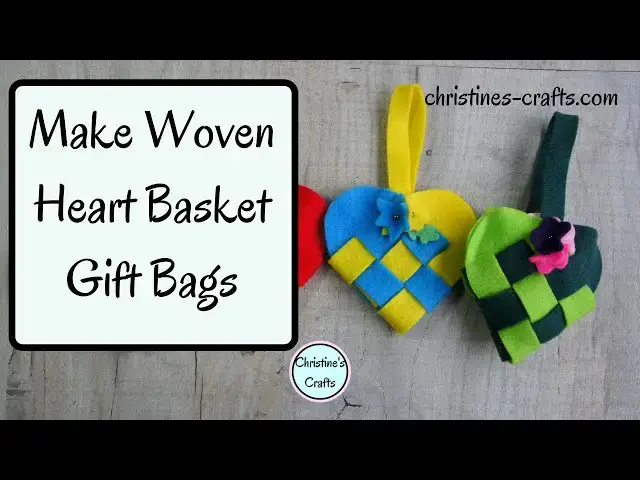
HOW TO MAKE WOVEN HEART BASKET GIFT BAGS - From Felt or Paper
Jan 15, 2025

These woven heart basket gift bags are super easy to make and make any small gift special. They are fabulous for Valentines and Mothers Day gifts but they are also great for a gift at any time. You can make yours out of felt or paper. They only take a few minutes to make so you could make loads of them for gifts or to sell for charity.
In keeping with this channel they are really inexpensive to make so keep you crafting on a budget.
You will need the template shown in the video which you can get for free from my blog at https://christines-crafts.com/woven-heart-baskets/
You will also need felt or paper, scissors, ruler, pen and glue. These are a great craft idea for kids groups to do as they cost so little.
Let me know in the comments below what you think of these baskets and how you get on making yours.
Show More Show Less View Video Transcript
0:00
hi and welcome to christine's crafts
0:02
today i'm going to show you how to make
0:04
these beautiful woven heart baskets
0:06
the ones i'm showing you here are made
0:08
with felt and as you can see i've
0:10
decorated them all in different ways
0:12
you can also make these out of paper
0:14
which make them a great activity for
0:16
kids particularly if you have a lot of
0:17
kids at a group
0:18
that you need to keep them all busy and
0:20
you don't want to spend a lot of money
0:21
but these felt ones are quite resilient
0:23
you can put all sorts in them and use
0:24
them as little gift bags
0:26
so that's just a few ideas so let's get
0:29
on
0:30
i'm christine of christine's crafts and
0:32
i hope you'll enjoy all my crafts here
0:34
on youtube
0:36
so what will you need you're going to
0:38
need this template that's available from
0:39
my website
0:40
if you go into the description below
0:42
you'll see a direct link
0:44
to it it's completely free you just
0:45
download it print it off
0:47
you're going to need some felt or paper
0:49
i recommend two different colors but you
0:51
can obviously do it all in the same
0:52
color if you prefer
0:54
you're going to need some scissors i've
0:56
got two pairs because i've got one for
0:58
the paper
0:59
and one for the fabric but you might
1:01
only need one
1:02
you're gonna need some sort of pen i'll
1:04
use a sharpie so that you can see it but
1:06
i recommend a pencil
1:08
or an air erasable pen and a ruler
1:12
and also which i'm not showing you here
1:13
you're going to need some glue
1:16
so once you've got your template print
1:18
it off
1:19
and cut it out hang on to the rest of it
1:22
because it's got some dimensions you're
1:23
going to need
1:24
but let's get that template cut out
1:27
cut up the slots in the middle because
1:30
that's what you're going to do to your
1:31
fabric as well so get your piece of felt
1:35
i'll keep referring to felt because it's
1:36
easier than keep saying felt or paper
1:39
place your template on and draw around
1:42
it
1:42
you need to mark those slots as you can
1:45
see i'm doing it with three dots rather
1:46
than putting the whole line there
1:48
it means i'll be able to see where to
1:50
cut but there isn't a big line that i
1:51
have to hide
1:53
so cut around your template making sure
1:56
that if you have got pen marks that you
1:58
cut them off
1:59
you'll see i have to go around a little
2:00
bit to get them where i haven't but
2:02
mainly that's because i've used
2:03
a big marker pen fold your piece in half
2:08
and then cut from the dot at the bottom
2:11
to the dot at the top now you're
2:12
obviously cutting through two layers of
2:14
felt
2:15
and you're going to end up with those
2:16
slots cutting
2:19
you'll see when i open it up
2:22
just what it looks like great
2:26
so now you're going to repeat that with
2:28
your other piece of felt
2:30
draw around it making sure you don't
2:33
draw on your table like i just did
2:36
cut around it carefully again making
2:38
sure you get rid of all the pen
2:42
this time i'm marking it after i've cut
2:44
it
2:45
just showing it doesn't matter and now
2:48
you've got two
2:50
so we're ready to start building the
2:51
basket
2:54
but if you want a handle on your basket
2:56
that's what the other instructions are
2:58
for
2:59
on your sheet it tells you what size
3:01
handle makes a good handle
3:03
clearly you can make it bigger you can
3:05
make it smaller but this is what i found
3:07
to be a good size
3:09
cut your strip
3:12
and then that will be the handle ready
3:15
again i'm making sure i get rid of all
3:17
the pen
3:25
and then the interesting part of this
3:26
craft project is assembling it
3:29
we're going to weave those strips
3:30
together in
3:32
and out so take one take the one on the
3:35
right
3:35
the dark pink one we're going to feed it
3:37
through the light pink one
3:40
just for that first strip and then as we
3:42
come to the second strip
3:44
we're going to take the dark pink around
3:47
the outside
3:48
of the light pink center strip
3:51
and then for the final we're going to
3:54
take the dark pink strip
3:56
and put it inside the light pink strip
3:59
so we have woven it throughout now feel
4:02
a bit messy and it
4:04
it just feels a bit wrong at the moment
4:06
until you get them all done
4:07
but just persevere you can tidy it all
4:09
up in a moment
4:11
it's gone into one over the other and in
4:14
the next one
4:16
so we come to the center one from the
4:17
dark pink and we put it
4:19
over the first strip of light pink and
4:22
through the center strip of the light
4:25
pink
4:27
and then over the end one
4:32
and you can start to see that woven
4:34
effect appearing
4:36
you'll find yourself pulling bits
4:38
through
4:39
making sure they're all right
4:40
particularly if you're doing the felt if
4:41
you're doing the paper they tend to lie
4:43
a little more easily
4:45
but with the felt it can just sometimes
4:46
not want to play the game
4:48
so just keep pulling it making it ready
4:50
so our final strip
4:52
the dark pink is going to go through the
4:54
first strip of light pink
4:57
around the second strip of light pink
4:59
[Music]
5:01
and through the final strip of light
5:04
pink
5:06
and then you will have woven all your
5:09
bits together
5:11
and you'll find probably like mine looks
5:14
a little bit
5:14
messy doesn't look quite how you want it
5:17
to
5:18
so this is where you start just pulling
5:20
it gently tweaking it making it lie
5:22
flat getting it to the position you want
5:25
it to be make it look how you want it to
5:27
and the more careful you were cutting
5:29
out the easier that will be because
5:31
they'll all be exactly the same size and
5:33
they'll fit through the slots nicely
5:35
so there you've got a lovely woven heart
5:38
when you open it up you'll see it opens
5:40
up very wide
5:42
which is great that's fine but if you
5:43
want to put lots of things in them and
5:45
use them as a gift bag
5:46
you might find that that's a bit wide
5:49
it's got a handle
5:50
it's just going to go in the top just
5:53
like that
5:54
so let's move on to gluing our handle
5:57
and
5:58
in my case glue the sides of the heart i
6:01
find that's a bit
6:02
wide and when i put little chocolates
6:05
and things in them
6:06
they fall out so just get some glue this
6:08
is ordinary
6:09
multi-purpose glue you could use a
6:12
fabric glue if you have it
6:14
and just put a little up that edge as
6:16
far as you want to stick it to be honest
6:19
it's your basket and it just makes it
6:22
more of a container
6:23
easier to put gifts in and then for the
6:26
handle
6:27
take one end of your handle and apply
6:30
some glue
6:31
just a little bit on the end and then
6:34
stick that to the
6:35
inside at the back of your heart
6:40
and then glue on the other end and stick
6:42
that to the inside
6:44
of the front of your heart and there you
6:46
have it
6:47
a whole bag all done ready super as a
6:50
gift
6:51
so great as a gift at any time obviously
6:53
brilliant for mother's day
6:55
valentine's day and christmas
6:58
so thank you for watching i hope you've
7:00
enjoyed it remember you can
7:02
decorate them however you like as i have
7:04
done here perhaps so some flowers on
7:06
some beads
7:07
glue some pictures on whatever you like
7:10
so if you've enjoyed watching this
7:11
please give me a thumbs up below
7:13
you leave me some comments let me know
7:14
how you get on
7:16
and remember you can subscribe below and
7:18
if you hit the bell you'll know every
7:19
time i release a video on youtube
7:22
so thanks for watching good luck with
7:24
your baskets
#Crafts
#Fiber & Textile Arts
#Fiber & Textile Arts
#Art & Craft Supplies
#Ceramics & Pottery