Up next in 10

How To Make a Pop Up Card That WOWS!
Sep 20, 2025

Join me for 30 days of mixed media card making! In this video, learn how to make a 3D card that you can make your own. This tutorial teaches you how to make a handmade card that anyone would love to receive using supplies you probably already have.
As an Amazon Associate I earn from qualifying purchases
--------------------------------------------
HOW TO ACCESS THE FREE PRINTABLES:
Simply visit my website at https://christines-crafts.com/enjoy-the-craft-gardening-resource-library/ and sign up to my regular newsletter.
You can unsubscribe at any time
--------------------------------------------
Resources you will need:
Card mine is 8" by 8"
Pretty Papers
Glue - https://amzlink.to/az0ab8UUcr2Ls
Sticky pads - https://amzlink.to/az0guIJcXnNwj
Free printables
--------------------------------------------
Show More Show Less View Video Transcript
0:01
Welcome to day 11 of the 30 mixed media
0:04
card challenge. Um, you'll be able to
0:06
find all the other videos in the
0:07
description below and playlist on the
0:09
screen on my channel. You'll find them.
0:12
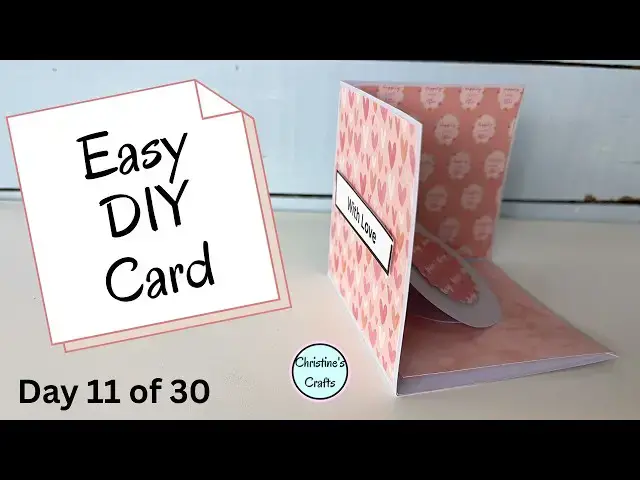
But today, we're going to make this card
0:14
here. It's something a little bit
0:16
different, but it's just using supplies
0:18
you'll have at home. Don't worry, let's
0:21
get started.
0:23
All I'm using is a square of card. Now,
0:26
mine is 8 in by 8 in, but you can do any
0:29
size you like. All that matters is that
0:31
it's square. And you're going to fold it
0:34
in half. And then make sure that's a
0:36
really good crease. Now, if you've got a
0:38
tool for doing that, great. If you
0:40
haven't, just get yourself a nice
0:42
plastic ruler and rub it along the
0:44
crease. And it'll just give you a really
0:45
good fold. Open it up and then fold it
0:49
the other way. So, you're basically
0:50
splitting it into four equal squares.
0:55
like that.
0:57
And then what we want to do is we want
0:59
to score from the center to one of the
1:03
corners. Now, I'm using a little tool
1:05
with a ball on the end, but it doesn't
1:07
matter what you use, just something to
1:08
score it. The back of your scissors will
1:10
be just fine. And then do the same to
1:12
another square next to it. So, you can
1:15
see how I'm doing that. Just one next to
1:17
the other. And then the straight line
1:20
between those two score marks, you're
1:23
going to cut to the center.
1:26
Just like that. And now when you overlap
1:29
those, it'll form that cube card. And
1:33
what we're going to do is fold along
1:35
those score lines to the back. The
1:37
easiest way is to turn it over and then
1:40
fold the triangle. And again, the trusty
1:43
rulers back. And we're just going to
1:46
make sure those are well and truly
1:48
folded.
1:50
You want it to be easy to fold along
1:52
that line.
1:56
So when we turn it back over,
1:58
we can overlap them and make that cube.
2:01
But before we do that, we're just going
2:03
to stick those two sides together. So
2:06
I'm using double-sided tape. You can use
2:08
glue. It really doesn't matter. There's
2:11
no hard and fix rules, you know. You use
2:12
what you've got available. I quite like
2:15
the double-sided tape. It holds well and
2:17
of course it's super quick. You just do
2:19
it and it's done. I'm putting three
2:21
strips on. Just being over cautious
2:23
probably, but I just want it stuck down
2:25
well. I don't want any surprises. And
2:28
then the difficult bit of actually
2:29
getting the protective paper off before
2:32
I can stick it down.
2:38
Yeah, I hate the protective paper on the
2:40
back of double-sided tape. I like the
2:42
tape. But then fold it over so that they
2:45
overlap perfectly
2:49
and stick it down
2:51
because we want those folds that we made
2:54
to line up perfectly. Something stuck to
2:57
my fingers. And then we can fold it up
3:00
inside the card. So you can see how your
3:02
card will look from the outside and the
3:05
inside. So what we've done now is made
3:08
the structure.
3:10
Let's make it pretty. So, here is where
3:13
you can get really creative, but I'm
3:15
going to show you what I've done that
3:17
you can then embellish. I've just picked
3:19
some squares of paper. You can see I've
3:20
got this little pad, but you can cut
3:22
them from larger squares, obviously.
3:25
And I'm just choosing two that I think
3:27
will go together, and I'm going to put
3:30
them on those squares in the card.
3:34
So, these are going on the back to form
3:37
the backdrop of the card.
3:40
And again, you can stick those on
3:42
however you like. I think I'm going to
3:44
use my glue stick. Um, I can get right
3:47
to the edge, make sure there's no bits
3:49
sticking up, and it should hold
3:51
beautifully.
3:53
So, just cover one with glue, position
3:56
it. Now, what I should say here is you
3:58
can make the squares the same size as
4:00
the card or you can make them smaller.
4:03
You could cut the edges with some
4:05
pinking shears to give a nice edge. Get
4:07
creative. You could stick three or four
4:10
squares on of different sizes. They're
4:12
your backgrounds. You create them how
4:14
you want. Just make sure you do stick
4:17
them on the back,
4:19
not on the bottom piece, which is of
4:21
course double thickness. So, you can see
4:24
how that's working. And now we're going
4:27
to do a piece for the bottom. I think
4:29
I'm going to choose a lighter, less busy
4:32
piece. And we're going to stick it down.
4:34
This time we're only sticking to half of
4:37
the base.
4:39
So, be careful. I'm going to put the
4:41
glue onto the actual card to make sure I
4:44
only stick half of it down.
4:49
And then I'll show you why. Cuz when you
4:52
close it, it's going to fold like that.
4:54
And you want it to flick up like that.
4:57
And it can only do that if you've only
4:59
stuck half of it down. And then time for
5:02
some decoration. Now, I might use these
5:03
two circles. I might only use one of
5:05
them. We'll see. But I'm just going to
5:07
put a smaller circle on. And I'm going
5:09
to use foam pads to do it. Now, here the
5:12
sky's is the limit. If you've got some
5:13
great little cardboard cutouts that you
5:15
use for cards, they're perfect for
5:17
putting in here. So, whatever your
5:20
theme, you're just going to stick
5:22
something that pops up. And as you can
5:25
see, I'm just building mine just from
5:28
paper, so I didn't have to have any
5:30
fancy embellishments. Now make a little
5:32
tab. And again, mine's 3 in by one and a
5:36
half inches, but that's purely because
5:38
that's what fits in my card beautifully.
5:40
Fold it in half. And then you're going
5:43
to stick half of it to your
5:45
embellishment and half of it to the
5:48
base. And this is going to give you that
5:50
popup element.
5:52
So just get plenty of glue on and glue
5:56
it to whatever you're going to put
5:57
there.
6:02
and then position it where you want.
6:04
Now, a word of caution, just make sure
6:06
you position it so that it does fit when
6:09
you fold the card closed. So, just have
6:12
a little bit of a play around and make
6:14
sure you've got it positioned so that it
6:16
works when it's open and when it's
6:18
closed. You see, I'm just having a
6:21
little look and being careful. You want
6:23
it to look good, but you also want it to
6:25
function.
6:28
And then it should,
6:30
she says,
6:32
fit nicely when you try and close the
6:34
card.
6:37
So you can see how that looks.
6:40
And then you can close it
6:44
just like that. Now, when you want that
6:46
card open, you can have a little bit of
6:49
um what's the word I'm looking for?
6:51
Velcro to hold it down. I haven't, but
6:54
you can do or even a little bit of
6:56
blu-tack. Now, I've just chosen another
6:59
piece of paper to stick on the front.
7:00
And again, I'm just doing it with a glue
7:02
stick. And this is just to make the
7:04
front of the card and whatever greeting
7:05
you might want.
7:08
But it'll look really pretty when
7:09
somebody opens it before they get the
7:11
surprise of the 3D.
7:17
Again, you can embellish however you
7:19
like. Get really creative. Once you've
7:21
got the structure of this card, you can
7:23
make whatever you want. And I'm going to
7:25
use one of my greetings that you can get
7:27
free from my website. Just click the
7:29
link in the description or on the
7:31
screen. And there's a whole load of
7:33
these greetings. I'm sticking it on with
7:35
these foam pads just to make it a little
7:37
bit 3D. If you're enjoying this video,
7:40
could you give it a thumbs up, please,
7:41
so it spread shreds? No, spreads to more
7:44
people and then everyone will be making
7:47
these 3D cards. So, I'm going to keep
7:50
mine nice and simple. I'm just putting a
7:53
simple greeting on the front, but you
7:55
could do whatever you like. In my
7:58
opinion, the best thing about this
8:00
series of cards is that they are all
8:02
individual and you can make them for any
8:04
occasion you want. Even though I've done
8:06
one thing, you can adapt it. So, you can
8:09
see how easy they are to fold up and how
8:11
cute they are when they're open. So,
8:13
good luck with your card.
#Arts & Entertainment
#Crafts
#Crafts
#Greeting Cards