0:00
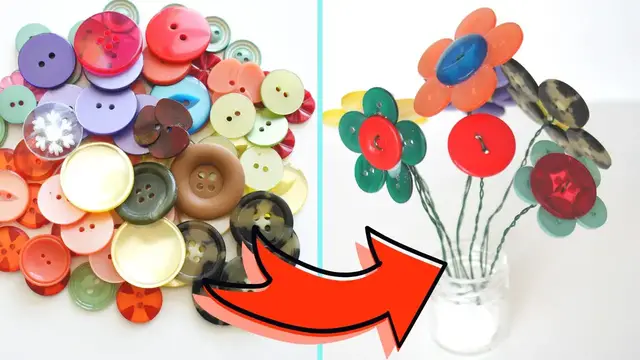
So let's look at how to turn that stash of buttons into lots of pretty flowers
0:04
You can make it completely with buttons or you can use felt or paper to back it
0:09
So we'll start with the ones that have felt or paper. If you need a template, there's a link in the description below
0:15
And if you need any other supplies, there are some Amazon links in the description below
0:19
So once you've got a template, which you can use any template you like for your flower
0:23
you're going to need a button and some felt or some paper to form your petals
0:29
So in this case, I'm going to use felt and all you're going to do is draw around your template
0:35
You don't need to use a big black marker pen. I'm just doing it so it shows up nice and clearly for you
0:41
And then you're going to cut that out. Now, if you want a bit more of detail to your flowers or make them a bit more substantial
0:48
especially if you're making them in petals out of paper, you could use two or three layers
0:53
So you could cut several of these out for each flower, perhaps in different colours
0:58
I'm sticking to one because I've got quite thick felt and I just like the way they appear
1:03
I like the simple flower, but it's entirely up to you. All my projects are about you getting creative and doing what you want with them
1:12
So you keep going and cut it out or as many as you want
1:16
Now, if you have used something quite dark to draw around your petals
1:21
and there's still a little bit of it left at the end, don't worry, just snip it off with your scissors until you're completely happy with it
1:30
Once you're completely happy, it's time to think about assembling your flower
1:36
So for as many layers as you want, you'd stick those layers together. And then the final step is to add the button
1:43
Now here I'm using a tacky glue and I really don't recommend it. I wasn't happy with it
1:47
I swapped to a multi-purpose glue and I recommend you just start with a multi-purpose glue
1:51
so it can hold that button securely. And then let it dry
1:55
You can make loads and leave them all drying and then move on to adding the wire
2:00
Why I've swapped to a red one, I don't know. I really need to think a little bit more as I'm doing these
2:05
I think I'd been to sleep. So what you need to do is get a needle and poke it through two of the holes of the button
2:12
You want to make a decent size hole so you can easily get your wire through. And then you're going to use some thin wire
2:18
I'm using floristry wire, so mine's green and I'm going to fold mine in half
2:22
But all you need is a small bit at the end folded over so that you can twist it at the back
2:28
And then feed the two ends of the wire from the front of the flower through to the back
2:34
And just pull them through, push them through. Just get them through so they're nice and tight
2:40
And then all you need to do is twist those two bits of wire together
2:45
Now I recommend you get yourself some pliers because you really, really want to get it nice and tight
2:50
Because if you can get it nice and tight up behind the flower, it makes it much easier to position your flower head how you want to
2:57
once you're putting it in your vase or your jam jar or your bouquet or whatever you're doing with it
3:03
So just twist those wires together. And you can do most of it with your fingers, but you want it nice and tight up behind the flower
3:12
And then once they're twisted together, if you've got plain wire and you would like to
3:16
you could always wrap it in green tape to make it look more natural. And there you go
3:21
You've got a flower all completed. And carry on and make loads of them
3:26
Now I did say I would make some flowers completely out of buttons as well
3:30
which you saw at the beginning. So this time you're going to need five buttons to make the petals
3:35
and then a larger one for the centre. Position your five so they look like the petals
3:42
and then make sure your big one easily covers them. You need it to cover all of the flowers
3:48
all of the flowers, I mean all of the buttons a little bit so that they glue together
3:52
So you're going to take multi-purpose glue again and place it on the inner edge of those circles of those buttons
4:01
So you can see where I'm putting it and you can see I've got the buttons the face down so that I've got the flatter bit on the top
4:07
This just means I'm going to get a bit more surface glued together. It's up to you how you do it
4:12
I didn't do that with all of mine. And then place the centre
4:17
and then adjust those petals so you're happy with them. Then press the button down and just make sure you're happy
4:22
And once you're completely happy, leave it to dry. Make a load more
4:28
Once they're all dry, we can add the wires to the top
4:32
And top tip for me would be leave it overnight to dry. So again, we're going to have to double the wire over
4:38
So this time I'm just going to use a little bit at the end instead of going in the middle like I did last time
4:44
I'm just going to bend a little bit over and we're going to feed it through two holes in the button from the front
4:54
So straight through and then straight through with the other end. Make sure it pulls through but be careful
5:03
These buttons are very fragile. Well, I say buttons. The flowers are very fragile
5:08
The buttons are not. So you will very easily pop the petals off where you've glued them on
5:14
They're only held by a little bit of glue. So as you're doing all this work of twisting the wire at the back
5:20
be very careful and make sure you only apply pressure to that central button
5:26
If you start applying pressure to the petal buttons, they're likely to pop off
5:32
And I have to say that's true throughout the life of the button. They are delicate. They look delicate
5:37
They look gorgeous. But they are delicate. And if you drop them or you push on those petals, you will be able to pop them off
5:45
So take your time and be careful doing your twisting, particularly as you bring the pliers in
5:52
Just take it steady as you twist and get it nice and tight
5:58
And then again, you've got completed flower. You can go on and make lots of flowers
6:03
Now I've left this in this video showing you how I'm struggling a little bit
6:07
to get it tight behind the flower and struggling to use my pliers
6:11
Because I don't want you to give up if you have that struggle. Just persevere and keep going
6:17
And if you do pop a petal off, just glue it back on. Nobody will ever know
6:24
So I hope you've enjoyed this and that you'll give me a thumbs up to share it to more people
6:28
And enjoy arranging your flowers in a vase or a jam jar or even a bouquet