0:00
Welcome to day 23 of the mixed media
0:03
card challenge. 30 cards using craft
0:05
supplies you probably got at home. So if
0:08
you want to find all the others on the
0:09
screen in the description on my channel
0:11
you'll find them. And today we're making
0:14
this one here. So let's get started.
0:18
You're going to need a piece of card
0:19
folded in half to make your card or a
0:22
card blank if you like to start with one
0:23
of those. Mine is 7 in x 5 in. Plus some
0:28
pretty paper. Now, you could use some
0:30
crafting paper or you could just use
0:31
some pretty wrapping paper, whatever
0:33
you've got available. And then you want
0:35
to cut it down so it just fits nicely
0:37
onto your card. Now, you'll notice I'm
0:40
not cutting mine. I'm ripping it against
0:42
a metal ruler. Um, I just like that
0:44
rough and ready edge that you get, but a
0:47
little word of warning, as you're going
0:48
to see me do now. If you try and take a
0:51
small amount off using this technique,
0:54
it can be a little bit tricky and
0:56
doesn't necessarily just rip down.
0:58
nicely. Your small bit can tear and then
1:02
you can really struggle. So, I just I'm
1:04
going to leave that in and show you what
1:05
can happen when you're taking those
1:07
little bits off if you're not careful.
1:10
Um, but I still like this technique. And
1:12
I'm going to do the same on the top and
1:13
the bottom because I want that same
1:15
rough and ready edge on both. You see
1:18
that went off beautifully.
1:21
And just do the other end.
1:24
If you like measuring and you like it
1:26
nice and straight, then please feel free
1:28
to measure out the um shape you want and
1:32
then cut it out. I'm just going to stick
1:35
it on with an ordinary glue stick. I'm
1:36
just putting it down flat. I don't want
1:39
this sticking up at all. And I'm just
1:42
making sure it's got a good coverage on
1:46
Now, because I know what I want to do
1:47
here, I am thinking about my lace coming
1:53
And I'm thinking about my greeting at
1:55
the bottom. So that's where I'm going to
1:57
place it. Again, no measuring. If it
1:59
looks right by eye, it is right. I'm
2:02
putting that pen there to remind me
2:03
because I keep forgetting to do any
2:05
little details. So, I'm just running
2:08
some lace down the side. Any sort of
2:10
lace will do this, but I really like
2:11
this one with the flowers on. And as you
2:13
saw, I've got a little flower from some
2:15
other lace that I can stick on later.
2:18
Lots of different ways you can attach
2:20
lace. I'm going to stick this long
2:22
length down using some multi-purpose
2:25
glue. And you have to be a little bit
2:27
careful with that because while it
2:28
theoretically dries clear, you actually
2:31
can usually see it. But I want to
2:34
include lots of different ways of doing
2:36
these things. So you can use whatever
2:38
you've got available. And then it's a
2:40
case of pressing that lace down. And I
2:43
find because it can come through the
2:44
lace a bit, I like to get a bit of
2:46
kitchen paper and press it down. Now,
2:48
unfortunately, that can pull your lace
2:50
up. So, just be a bit careful,
2:53
unlike me, and keep it down flat,
2:57
and it'll just hold in place
3:03
And then for this little flower that is
3:06
really really um delicate, I'm going to
3:09
use some PVA based glue that will
3:12
definitely be very clear and stick that
3:14
down. But again, I'll use the kitchen
3:16
roll. If you're enjoying this video,
3:18
could you give me a thumbs up so it
3:20
spreads to more people, please, so that
3:22
we're all making gorgeous greeting cards
3:24
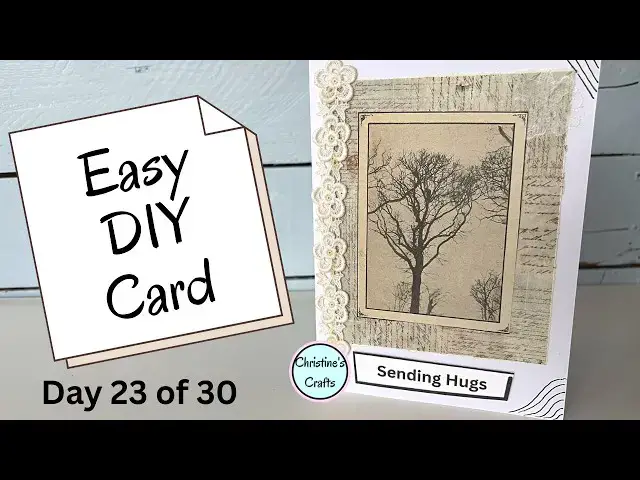
for all our friends. So, I've got a nice
3:26
base there. And then I've got a picture
3:28
here that I just found in an old
3:30
encyclopedia, and it's just to add a
3:32
nice image to the front. So, you might
3:34
have some card toppers, you might have a
3:36
picture of an old card somebody gave you
3:39
or something out of a book. Now, you
3:41
could raise it up on the little foam
3:43
pads to give a 3D effect, but I would
3:45
have had to stick this to some card
3:46
first because it's far too floppy as it
3:49
is. So, if you've got something really
3:51
thin and you want it to stick up, stick
3:53
it to some card first. Now, my little
3:56
greeting that I've got here that you can
3:57
get for free, link on the screen and in
3:59
the description below, I'm sticking that
4:01
on with the little foam pads to give a
4:05
And I'm sure you've all used those
4:09
And there we go. Now, that to me could
4:11
be completely finished, but I wanted to
4:14
encourage you to start drawing on your
4:16
cards, adding details. You could even
4:18
use a ruler and do some perfect straight
4:20
lines. I'm not particularly artistic
4:23
when it comes to drawing. I'm not
4:25
artistic at all, but even I can manage a
4:27
few straight lines or a few curls. So,
4:30
do think about adding them to your
4:34
So, I hope you've enjoyed it and I hope
4:36
you're going to make your own cards in a