Up next in 10


This is a DIY on replacing a sway bar link and suspension bushing on a BMW 2005 Z4. Replacing bad suspension parts are a must on BMW's, as they sit pretty low to the ground.
On a Z4 however, its even more important because these cars sit extremely low on the ground. It's impossible to neglect the suspension on a BMW Z4, unfortunately I needed to purchase a low-profile jack just to get this car off of the ground.
Show More Show Less View Video Transcript
0:00
Hey viewers, Steve here and this is E36 Fanatics. Today I'm going to be replacing a sway bar link
0:08
and a sway bar bushing on a BMW Z4 2005. This car has about 80,000 miles on it and these cars
0:22
they're so low to the ground that once any suspension parts starts going you really
0:27
really notice it because it's just so low to the ground. So I like to keep on these cars. I like to
0:34
keep the suspension top notch. So this sway bar link has quite a few miles on it so I'm going to
0:40
go ahead and replace it. So here's the old one right here. It's really easy actually to
0:46
replace the sway bar link. It's only held right here at the bottom and then one bolt here at the
0:53
top. And here's my new one right here. You see the two bolts that hold it to the sway
1:04
bar link or to the frame. And now I'm going to go ahead and replace it
1:12
Okay, so to remove your sway bar link, you're going to take a 16 monkey wrench, and you
1:26
see the bolt right here? You're going to put it behind there
1:30
This bolt, you can go ahead and put a socket on it and turn it, but it's not going to turn
1:37
unless you actually put a monkey wrench behind it once you have your monkey wrench on it you can go ahead and start turning it and it come loose pretty easily Now once you get the top done you just repeat the process for the bottom and you go ahead and pop it out
1:53
It's really easy to pop out. Now if it has trouble coming out because it's been sitting there for years and it may be a little rusted inside
2:01
give it a tap with a rubber mallet on the end of the bolt. You're not going to use it again anyway
2:09
Okay, so when you're replacing sway bar links there's a couple really important things to look for even before you replace them just to check if it's about time for it to be replaced
2:20
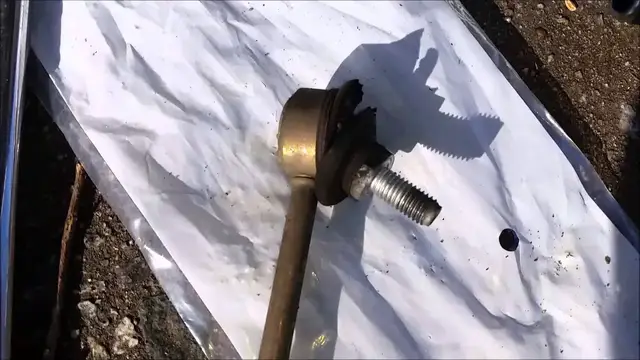
First off, as you'll see with this right here, see this one has a really big crack on it
2:34
And that's an obvious sign that it's time to be replaced when you're doing these
2:39
another sign is when you're looking at it just take a look
2:46
just take a look at the rubber and see if there's any cracks or anything on it
2:52
on this one there were plenty of cracks on both of them
2:56
and then there's that tear on the end which means it's automatically ready to be replaced
3:01
and if you see my thumb here you can see me wiggling it around and everything
3:07
You know, it's pretty easy, it's really easy to move around. It's loosened up
3:13
Now when I go back to the new one right here and try and wiggle it around, you see that's
3:19
a lot tougher. It's not moving anywhere. As these things age some of the lubricant gets out and the rubber breaks down so it a lot more it a lot easier to move them around Whereas the new one it basically rock solid
3:36
You can't really move it around. So as a little side note while doing this job, you might need a floor jack to hold up
3:50
the sway bar once you remove the link. Once you remove the link the sway bar will drop just a tiny, just a tad bit
3:59
And that's enough with this German engineering to get the sway bar link off
4:05
So what I did is I just took a floor jack and just raised it up just a tad bit so it
4:10
would fit in and then it went in just perfectly. And now all you got to do is tighten it and of course you have to hold the other side the
4:20
same way as you took it off and tighten it on this side
4:24
And just tighten it real good. Then we can move on to the sway bar link or the sway bar bushing
4:35
Okay so to go ahead and replace your sway bar bushing it's pretty easy
4:40
You just got two bolts, one here then one up on the other side in there
4:47
And what I used is I just used a 13mm long socket, deep socket
4:56
And then I used a little extension and just a regular ratchet
5:01
And you just loosen up those bolts up here, the two bolts around it
5:06
And this metal bracket right here you just pop off Then you can just pull off the rubber right here go ahead and pull off the bushing It got a little indention in it at the top of a big cut through it so you can just pull
5:19
it off instead of trying to fish it down the sway bar
5:28
Okay so I've removed the sway bar bushing and it's very easy to remove in general
5:36
Once you get the bolts off you might have to fiddle with the metal casing right here
5:40
a little bit with a screwdriver. But it's pretty easy to remove
5:45
As I said before it's got a crack right here to where you can turn it
5:53
Once you've got the metal casing off you can turn the bushing around and just pull it right through
5:59
Now when you have the new one you're going to have to, what I generally do is I lubricate
6:04
it a bit with either PB Blaster or WD-40 so I can just slide it back on and it's in the same spot
6:13
that the old one is and then you put back on the metal casing and put the bolts on and you're home
6:18
free. No Loctite or anything is required. Actually don't use any, I wouldn't use any Loctite on that
6:25
on this bushing. However, for your sway bar link, if you want to throw some blue Loctite on there
6:33
you're more than welcome to. It's probably a good idea to go ahead and throw a little bit of
6:39
blue Loctite on. And that about completes this job. I'm just going to put my new one on
6:47
Unfortunately AutoZone didn't have mine ready yet, so I got to wait a day or two for it
6:53
But I hope this helped y'all and y'all have a good one
#Vehicle Repair & Maintenance
#People & Society
#Vehicle Modification & Tuning