Up next in 10

Python 3 Openpyxl Script to Export Excel XLSX File & Tables to PDF Document Using ReportLab Library
Jan 9, 2025
Buy the full source code of the application here:
https://procodestore.com/index.php/product/python-3-openpyxl-script-to-export-excel-xlsx-file-to-pdf-document-using-reportlab-library-2/
Official Website:
https://freemediatools.com
Show More Show Less View Video Transcript
0:00
uh hello guys welcome to this video so
0:02
in this video we will talk about that
0:04
how to export your Excel file into PDF
0:08
document so I will basically show you a
0:12
very simple example in Python that I
0:14
constructed the script right here and as
0:18
I execute the
0:21
script uh there will be this Excel file
0:25
which is available right here in the my
0:26
directory which is XLS file and XLS so
0:29
these are two extensions which you are
0:31
there you can see that XLS and XLS we
0:34
will convert this to a PDF
0:37
document
0:39
so as I go to the command prompt just
0:42
write here Python excel2 pdf. py and
0:46
here we need to provide our Excel file
0:48
so it is present in the same directory
0:50
so first of all I will provide X sample.
0:53
XLS so let me show you the content which
0:57
is available in this file if you open
0:58
this this is the actual table which is
1:01
present inside this Excel file it has
1:03
first name last name gender country age
1:05
date and we have these columns out there
1:07
these rows out there so now I need to
1:09
convert this into a PDF file so I will
1:12
call my PDF as result. PDF as I execute
1:16
this python script you will now see
1:17
Excel is successfully converted to PDF
1:21
so if I now check the result in the same
1:23
directory you will see result. PDF is
1:25
got created and if you open this PDF
1:28
file you will now see your table will be
1:30
there inside your PDF document with
1:32
default styling that you
1:34
provide the it is having yellow
1:37
background color for the rows and the
1:40
gray background color for the columns so
1:43
first name last name all these things
1:45
have been successfully converted to a
1:47
PDF document so it has contain only a
1:49
single page and in the middle of the
1:51
document the table is there you can
1:54
control everything guys The Styling you
1:56
can control the background color you can
1:58
change to any color I show you in this
2:00
tutorial how I do this in Python and we
2:03
are using two dependencies for this
2:05
purpose you can even convert this XLS
2:08
file as well same goes the process
2:10
process will be the same if you refresh
2:12
it so we are using two dependencies
2:16
first report lab report lab is actually
2:18
a python module to actually uh generate
2:22
PDF documents simple command is there
2:24
pip install report lab the second we are
2:27
using open pyxel open pyxel is
2:31
a actual python library in order to read
2:34
and write Excel files in Python it's a
2:37
very simple Library so pip install open
2:41
p two commands are there pip
2:45
install report lab and open pyxel so
2:50
these are the two packages we are
2:52
required for this tutorial guys simply
2:54
install this by invoking this command I
2:56
have already installed this so now I
2:59
will start coding this application so
3:03
just create a python file and I will
3:04
delete all this source code and start
3:06
from scratch so the very first thing we
3:08
will do we will first of all import the
3:11
system module and also we will import
3:14
the operating system
3:16
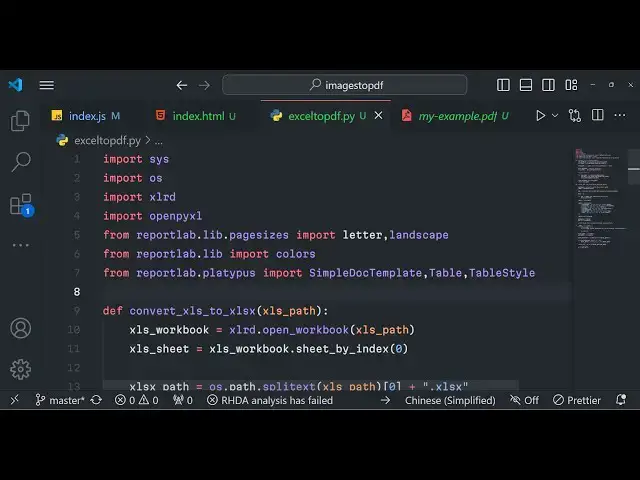
module and then we also need this EXL
3:20
xlrd and also import open py
3:24
Excel and we will import from report lab
3:28
li. page sizes
3:30
from that we will be importing letter
3:32
comma
3:34
landscape and from report lab. lip we
3:38
will import the
3:41
colors and then from report lab
3:45
dolat here we need to import simple doc
3:49
template table and table style so all
3:52
these things we need to import so we
3:54
have imported all the libraries that we
3:56
will be using in the script so after you
3:58
do this you need now need to define the
4:00
main function so every python script has
4:03
a main function and here we will be
4:06
defining if name is equal to main so if
4:09
you need the full source code guys the
4:11
link is given in the description you can
4:13
directly purchase it if you face any
4:16
sort of problem in running this code
4:17
with full documentation the code will be
4:19
available the link is given we directly
4:22
purchase it so after this we will simply
4:25
have if condition if length of the
4:27
system. argv
4:30
is not equal to three so here we will
4:34
accept basically accepting the user to
4:37
have provide at least three
4:39
arguments so we will simply tell the
4:42
user how to use the
4:44
script so we will excel to PDF py and
4:50
here we need to provide the Excel file
4:54
path and the output PDF path as
4:58
well
5:00
like this so we system.
5:03
exit so now if the user does provide the
5:06
correct argument in that case we will
5:08
basically read the Excel path that is
5:10
provided by the user by system.
5:13
argv 1 and then we will get the PDF path
5:17
which is also provided by the user
5:19
system. argv
5:21
2 so we will basically get all the all
5:25
the two arguments which are provided by
5:26
the
5:27
user and uh we will basically print out
5:31
if I just print out Excel path and print
5:34
out PDF path so now if I call the script
5:37
right here what is meant by this if I
5:39
call this Excel to PDF if I don't pass
5:41
any argument then it will tell me that
5:44
you need to pass these two argument
5:45
Excel file path and output file path if
5:48
I now part sample. XLS and sample.pdf so
5:53
now the command will work and it will
5:54
print out the path you will see that so
5:57
now it is working so now what we need to
5:59
do is is that we now need to extract the
6:02
extension so file
6:04
extension now to extract the extension
6:07
you will use operating system path split
6:10
text and we will basically say Excel
6:14
path 1 so we will basically extract the
6:17
extension and here you will simply
6:19
compare that if file
6:22
extension is double equal to X do XLS if
6:27
the extension comes out to be this first
6:29
of all we need to convert this file to
6:32
XLS file
6:35
to excel XS there are two extensions if
6:40
you know do XLS and
6:43
xlsx so we will basically convert this
6:46
XLS file to XLS if the user provides
6:49
this extension so here we will Define
6:52
this custom
6:54
function which will actually convert
6:57
this file to this
7:00
so for converting this file we will
7:03
actually use uh open pyxel we will
7:06
Define a custom function which is
7:08
convert XLS
7:10
to XLS and here we will get our XLS
7:16
path so here we'll first of all open the
7:20
workbook by using
7:22
xlrd and it basically contains a method
7:25
called as open workbook and here you'll
7:27
pass the path here which is
7:30
excelsor path after opening this
7:34
workbook we will open the
7:36
sheet by using XLS workbook and Sheet
7:43
by index we will basically open the
7:47
first sheet here XLS unor
7:51
workbook sheet by
7:55
index you will get the first thing and
7:58
after this XS path you will save this
8:02
operating system. path. spit
8:06
text
8:10
exls
8:12
path zero and we'll concatenate this
8:16
extension which is do
8:20
excel so now we just need to do this
8:25
Excel as workbook open pyxel it contains
8:29
this uh workbook method and now to embed
8:32
the sheet right here you'll simply say
8:35
XLS uncore workbook do
8:40
active so now we need to copy all the
8:43
data which is available in this file so
8:44
we will simply copy the data for copying
8:48
the data we will use a simple for Loop
8:50
for row index in
8:53
range
8:55
excelsor sheet DOT number of rows which
8:59
are
9:00
available for each row we will basically
9:03
repeat this step which is XLS
9:07
uncore sheet do row uncore
9:14
values we will basically provide the
9:16
index right here after
9:18
this we'll copy all the data in the
9:20
sheet by using the append method and
9:22
passing here row
9:24
data and lastly after completing this
9:27
step we will simply app this save this
9:30
data into the workbook by using the save
9:32
method and passing the output path which
9:35
is XS path and here we will simply
9:38
return this file from this function XLS
9:40
path so we have successfully converted
9:43
the XLS file to xlx file we are
9:47
returning this and
9:49
uh we are simply calling this
9:52
function sorry
9:55
convert XLS
9:57
to so we have calling this function if
10:00
the file comes out to be this so if the
10:04
file is not excels then in that case we
10:08
will not be executing this
10:14
function so if the file is not this one
10:18
then we will simply call this function
10:20
which is create PDF from Excel and here
10:23
we will simply pass the Excel path and
10:26
the PDF path as well to this function
10:31
function now we need to Define this
10:33
function which will actually create the
10:36
PDF from the Excel
10:38
file Define create PDF from
10:44
Excel and we have this Excel path passed
10:47
and the PDF path passed as two arguments
10:50
right here in this function so this
10:52
function basically uses the report lab
10:56
Library which is a third party package
10:59
that we
11:00
installed so now first of all we need to
11:02
open the workbook by using open pyxel
11:06
and it basically contains this function
11:08
which is load workbook and it will open
11:10
the Excel file by using the path so
11:13
first of all we are opening the data
11:15
opening the Excel file and then we will
11:18
simply get access to the active sheet
11:21
workbook do active and then we will
11:24
simply use Simple doc template which is
11:27
uh used in uh Port lab library and we
11:30
will basically pass PDF path and
11:35
uh second argument is the page
11:39
size so here the page size will be
11:42
either you can use here landscape or
11:44
portrait I will use landscape and pass
11:48
letter and here comes the data it will
11:51
be empty by default empty array and now
11:54
we will simply use a for Loop for each
11:56
row what we will do in the sheet we will
11:59
iterate
12:01
through like
12:03
this so values only will be
12:10
true so for each value we will append
12:13
data R append
12:15
row so now we get all the data in this
12:18
data array so now what we need to do in
12:20
the next step we need to Simply
12:22
construct a table from this data so we
12:26
are constructing the table from this
12:29
data so this table is available if you
12:32
see in the report lab we have basically
12:35
imported this from the report lab
12:38
Library package so we will constructing
12:42
a simple table and we will now
12:45
be constructing the Styles here so here
12:48
table style is available so this
12:50
function takes an array of parameters
12:52
that you can control for your table so
12:55
you can control the background color
12:58
text color all the stuff you can control
13:00
so background you can select any
13:04
color so this color minus one 0 so all
13:09
these colors you can select your colors
13:17
gray so put a common this will be the
13:19
background color of the table similarly
13:22
with have the next property for the text
13:28
color
13:30
so here you can select any color of your
13:33
choice depending upon
13:36
that then we have
13:38
this third one here which for be the
13:42
text color white smoke I'm
13:45
using the next property will be
13:48
alignment how you need to align the
13:50
table in the PDF document
13:58
so
13:59
so we need to align it in the center
14:01
position we will write here
14:03
Center so what font you will
14:12
use so you can use any for we will use
14:15
this font hel fold you can check check
14:18
out the documentation it is having all
14:21
these options and all the values that
14:23
you can control so Bing bottom padding
14:28
as well you can control
14:30
here
14:31
so these are all the styles that you can
14:34
control guys so what I will do we copy
14:41
this these are all the Styles background
14:43
color text color alignment for name
14:45
bottom padding background grid so all
14:48
these things you can control after
14:50
having this we will need to apply these
14:52
Styles so we will simply say table do
14:54
set style and we'll pass the style that
14:58
we constructed Ed that's all and then
15:02
elements it's present in the table and
15:05
you will say dog dot
15:08
build the
15:12
elements so now we can simply print out
15:15
a message that your uh Excel file is
15:19
converted exported to PDF
15:23
successfully that's
15:25
all that's all this is all the script
15:27
which is necessary if I I delete this
15:31
result. PDF and execute once again just
15:35
call this script and I call this as
15:39
output.pdf
15:41
so you will basically see in the left
15:43
hand side this file is created
15:45
output.pdf
15:46
now you can see uh it has having yellow
15:49
background color let me change this
15:52
color schemes just to I change it to
15:57
Green
16:02
so again if you run this now if you see
16:07
the background color of the table will
16:08
change to Green of the headers here if
16:11
you see the color has been changed from
16:13
Gray to green and similarly you can
16:16
control this color also which is Beach
16:19
bee color you can basically change it to
16:27
Black
16:35
so you can see now it has been changed
16:37
to black color so just change to here
16:42
red so all these colors are available
16:45
you can customize the look and feel of
16:47
the table which is generated in the PDF
16:49
document so now you can see that it has
16:52
the red color
16:54
here so you get this uh idea about how
16:57
to EXP ort the Excel file to PDF file
17:01
guys and Export the table which is
17:04
present in Excel to PDF so if you're
17:06
interested please hit that like button
17:08
subscribe the channel if you need the
17:09
full source code the link is given you
17:11
can directly purchase the full source
17:12
code and I will be seeing you in the
17:15
next video Until then thank you very
17:18
much
#Business & Productivity Software
#Other