live_tv
Livestream Starting Soon
00
Hours
:
00
Minutes
:
00
Seconds
Up next in 10

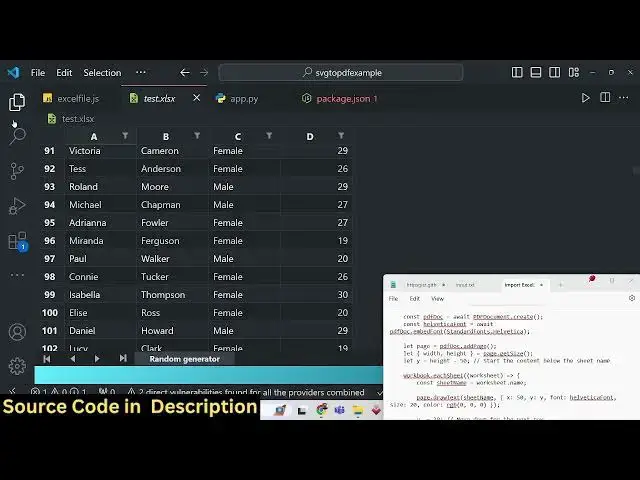
Node.js ExcelJS Tutorial to Export Excel File to PDF Document Using PDF-LIB Library
Jan 9, 2025
Get the full source code of application here:
https://gist.github.com/gauti123456/88a6c2d573c3b611b058ad5e02db8f95
Show More Show Less View Video Transcript
0:00
uh hello guys welcome to this video so
0:03
in this video we will actually look at
0:05
how to export your Excel file Microsoft
0:08
Excel file to PDF document inside
0:12
nodejs you'll be using two dependencies
0:15
for this Exel JS and PDF lib so I have
0:20
actually written a nodejs script right
0:22
here and uh I have this Excel file right
0:26
in my root directory test. XLS so it has
0:30
some sample records first name last name
0:32
gender age so if you see these are
0:35
different records out there about 5001
0:39
records out there so our task is very
0:42
simple we need to convert this Excel
0:44
file to PDF document so I have WR the
0:46
script which actually converts this
0:49
Excel
0:51
file so the command is very simple node
0:56
index.js node Excel file
1:02
file JS so if I just run this script you
1:05
will see Excel file converted to PDF
1:07
successfully and on the left hand side
1:09
you will see a file.pdf has been created
1:12
if I open this file in the browser you
1:14
will actually see all the Excel file
1:16
records is converted to PDF file and you
1:20
can see it is shown in a tabular
1:22
structure these are the column names
1:24
first name last name gender age so these
1:27
are different rows out there different
1:28
records so it contains multiple pages so
1:31
so the records were 5001 so it has
1:34
splited into multiple pages in The PDF
1:36
document so 14 pages are there so you
1:38
can see how clearly formatted the table
1:41
is so all the records in the Excel file
1:44
has been converted to PDF document so in
1:46
this way we will be looking at how to
1:49
actually make this application so we are
1:51
using two packages for this Excel JS
1:55
which is a library for working Excel
1:58
documents inside node JS so npmi Excel
2:01
JS this is the module it has got over 1
2:04
million weekly downloads and also we
2:07
will be using PDF lib Library which is
2:09
used to actually work with PDF documents
2:12
if you want to create edit or delete PDF
2:15
documents you can use this Library
2:17
900,000 weekly downloads are there so
2:20
now to get started first of all inside
2:24
your
2:26
project need to initialize empty in it
2:30
npm in-5 file so this will actually
2:33
create a package.json file for your
2:36
project and then you need to
2:38
[Music]
2:41
Simply then you need to Simply uh create
2:45
the or install
2:48
modules we can simply say here npmi
2:52
Excel JS PDF lip these are the two
2:56
packages which are required for this
2:58
purpose so simply install these these
3:00
two packages so I've already installed
3:02
it so what I will
3:05
do so inside your package on Json file
3:09
all these modules have been
3:12
installed so I will write this code from
3:15
scratch I will explain you each code
3:18
what this
3:20
does so the very first thing we need to
3:22
do we need to require all these modules
3:25
so we need to say
3:26
import the Excel JS module
3:31
from the Excel JS package and then we
3:35
also need to import the fs module which
3:38
will be coming from the file system
3:40
module to actually save
3:41
files and then we need to in
3:46
basically get three things from this
3:48
package PDF document RGB and standard
3:54
fonts from PDF lip these three methods
3:58
are there for working with PDF
4:00
documents and uh then we need to Simply
4:02
make a function async function I can
4:05
make this function and the name of the
4:07
function will be to con uh convert Excel
4:11
to PDF so all the source code guys I
4:14
will be using in this video is given in
4:16
the description you can check
4:19
out and uh PDF file path it will take
4:24
these two arguments the Excel file and
4:26
the PDF file so whenever you are calling
4:28
this function you you need to actually
4:30
pass these two arguments so why what I
4:33
will do is that I will simply say Excel
4:35
file path so it is basically this
4:37
sample. XLS file is already this test.
4:41
XLS file is already present in the root
4:43
directory so what I will do I will
4:45
change the name to test.
4:47
XLS and for the PDF file path I will
4:52
make this to test. PDF so now we just
4:56
need to call this function which is
4:58
convert Excel to PDF
5:00
so here we need to pass these two
5:02
arguments the Excel file path and the
5:04
PDF file path as two arguments this is a
5:07
Asing function it will actually return a
5:10
promise so inside this promise we can
5:13
handle this using dot then and here we
5:15
can actually write a console log
5:17
statement that Excel file converted to
5:22
PDF
5:26
successfully like this so now inside
5:28
this a asynchronous function we need to
5:32
write the business logic here so first
5:34
of all what I need to do we need to get
5:36
access
5:37
to the
5:39
workbook so how we can do this we can
5:42
simply say new Excel JS and we can be
5:45
using the workbook
5:49
Constructor like
5:51
this this W is capital here just make
5:54
sure W is capital workbook so here we
5:58
instantiating a new instance of excel GS
6:02
and then we simply need to say await
6:06
workbook do XLS you'll be using this
6:10
read file
6:11
function and here we'll be passing the
6:14
input Excel file which is passed the
6:17
path here so what I what this line is
6:19
doing it is actually opening the
6:20
workbook the sheet number it is reading
6:22
the content of this Excel file that is
6:24
passed right here test. exls so first of
6:27
all it opens this file it reads all the
6:29
content which is present in this file
6:31
and store this inside this variable
6:35
workbook and after reading this what we
6:37
need to do we need to actually create a
6:39
new PDF document by using
6:41
await PDF document it contains a
6:44
function called as create in PDF lib
6:47
Library so we actually instantiated this
6:49
function we included this function right
6:51
here at the top and it contains a create
6:53
function to actually create a new
6:54
instance of a PDF document now to
6:57
actually add some font we will be adding
7:00
this
7:02
helvetica font and for this we will be
7:06
using uh this object PDF Doc and it
7:10
contains this method embed font so embed
7:14
font what this does basically it allows
7:17
you to embed Uh custom fonts so in PDF
7:22
live there are various standard fonts
7:24
which are also available we'll be using
7:26
the standard fonts and one such font is
7:29
hel
7:31
we will be using this font
7:34
Hela as you can see we also have various
7:37
fonts if you just uh see in the drop-
7:39
down we have various fonts are times
7:41
Roman all these fonts are pre-built
7:44
inside uh PDF lip we'll be using this
7:47
font and then we'll be adding the
7:51
page to PDF now for adding a brand new
7:55
page we'll be using let page PDF doc and
7:59
it contains a method called as ADD page
8:02
so it will add a new page to the PDF
8:06
document and then here we need to
8:08
mention the width and the height of the
8:11
page so we can simply get this value by
8:14
using the get size function it will
8:17
return the width and the height So based
8:19
upon the width and the height we will
8:22
actually calculate the Y and the x
8:24
coordinate so the y coordinate will be
8:26
used equal to height
8:29
minus 50 so you can basically change all
8:34
these values customize this script later
8:36
on but here we are calculating the Y
8:38
index the
8:40
starting how to basically place this uh
8:43
Excel file in the PDF file and after you
8:47
do this y coordinate you will Loop
8:50
through all the content workbook do each
8:53
SE
8:54
sheet so in the Excel file there can be
8:58
multiple sheet sheets as well but in
9:00
this Excel file there is only a single
9:02
sheet which is random generator so we
9:05
need to Loop through all the worksheets
9:06
in the Excel file by using this each
9:09
sheet function so it will Loop through
9:12
and first of all we will be printing the
9:13
name of the worksheet by using worksheet
9:17
do name so if you just console log it
9:20
just and if I now run this uh script so
9:24
what this it will print out
9:27
basically a node Excel file F
9:31
JS
9:36
sorry so you can see that random
9:39
generator random generator is actually
9:41
the sheet name that is you can just see
9:44
this is actually the sheet name present
9:46
random generator so it is just doing
9:48
this so we are successfully printing the
9:51
sheet number of the Excel file after
9:54
that what we need to do after we do this
9:58
uh we need to
10:03
simply draw
10:06
the we will be using this function
10:08
called as uh page dot draw
10:14
text you can draw Circle you can draw
10:16
ellipse all these things you can draw
10:18
but here we'll be using the draw text
10:21
function and we'll be drawing using the
10:24
sheet
10:25
name and these will be the coordinates X
10:28
is equal to 50 y size will be 20 font is
10:32
helvetica font color will be this black
10:35
color page. draw
10:42
text so if I delete this
10:46
file so at this moment of time we just
10:49
added a simple Heading by the name of
10:51
sheet name so if you want to save this
10:54
PDF document how what we can
10:57
do we can simply come out of this
11:01
uh uh right here this
11:08
function okay we we can come and
11:10
basically save this as PDF now for
11:14
saving it we can simply use PDF bytes
11:17
await PDF Doc and it contains the save
11:21
function and after saving it we can
11:23
simply say file system and you you need
11:26
to save it right file function we'll be
11:29
using it PDF file path and PDF btes so
11:34
now using this two lines of code if you
11:37
see on the left hand
11:39
side if I run this you will actually see
11:43
test.pdf has been created if I open this
11:47
file you will see that this sheet number
11:50
has been placed random generator so this
11:53
basically you can see that you can
11:55
change the x coordinate you can also
11:57
change the size as well
11:59
50 and let's suppose I change the x
12:02
coordinate to be
12:03
100 uh I change the color of the text to
12:06
red color if I make this change again
12:09
run
12:11
this so red must be at least zero or at
12:15
but sorry just make it
12:18
one because we are using RGB value
12:22
that's
12:25
why so now if you see basically the text
12:29
size has been increased and it is placed
12:33
right in the center position because we
12:35
changed the x coordinate so let me reset
12:37
all the
12:39
values like this so after we do this uh
12:44
now we just need to place all these
12:46
content which is available in this file
12:48
this Excel file in this PDF file so how
12:51
we can do that after adding this heading
12:54
we just need
12:57
to uh uh move down so we need to move
13:01
down to this from this
13:04
heading so we need to manipulate the Y
13:07
uh coordinate so why we need to Simply
13:10
subtract
13:11
it minus is equal to 30 so it will come
13:15
down in the
13:16
page and inside that we can basically
13:20
dup through all
13:23
the column withd we will be declaring
13:25
this an empty array and then what we
13:27
will do worksheet
13:30
and we'll Loop through each
13:32
row all the records one by one and uh
13:36
this row we'll be using this each cell
13:40
uh
13:41
function and for each
13:43
cell there will be this column number
13:47
and the cell number attached to
13:51
it so now we can actually get
13:59
actual text
14:05
width
14:09
so for each record that needs to be
14:11
inserted there will be a text width
14:14
associated with it so we are simply
14:17
writing this we are calculating this
14:19
text width by altica font width of text
14:24
at size you're passing cell. text to
14:31
similarly you'll be calculating the cell
14:36
width it will be coming from column
14:40
BDS column
14:45
number then we need to Simply subtract
14:49
it by
14:50
one and then plus 80 this is we are
14:54
simply calculating these all these
14:57
parameters which is useful to actually
14:59
embed that Excel file in the PDF
15:01
document you can change all these
15:04
formulas later on whenever you make this
15:07
application cell height let me set it to
15:11
20 and then we need to draw the actual
15:14
Excel file on the page for that we'll be
15:17
using this draw rectangle function so
15:21
inside this draw rectangle function we
15:23
will pass an object which will contain
15:25
all these properties the x coordinate
15:27
which will be equal to the with y
15:29
coordinate we have calculated subtracted
15:32
30 from it width of the object this is
15:37
height cell height border color is black
15:41
border width is one
15:47
so if I just run this script right here
15:50
so what you will
15:53
see it is saying
15:56
that options X must be
15:59
type uh just
16:10
wait draw a rectangle
16:31
let me just
16:39
uh let me just paste this full source
16:42
code once again you can basically find
16:44
this source code in the
16:47
description this is a source code
16:49
basically some mathematics is involved
16:52
guys
16:53
so you will not fully understand this
16:55
code but once you write this code you
16:57
will understand what what is happening
16:59
right here so in this function we
17:01
looping through each record which is
17:03
present right in this Excel file and
17:05
here we are simply calculating the uh x
17:08
coordinate and the y coordinate how to
17:10
place this all these records in this PDF
17:13
document with equal precisions
17:15
formatting we we calculating the color
17:18
border color border width by using this
17:20
draw rectangle and then we drawing the
17:23
text by again using the draw text method
17:26
which is available inside PDF lip
17:33
so if you just basically run this Excel
17:36
file will be converted
17:38
and test.pdf file will
17:43
be sorry we can change the name here to
17:47
test.pdf
17:53
so you can just see here all these
17:57
records have been
17:59
successfully converted this is was the
18:02
Excel file test. XLS all these records
18:06
were there and it has been converted to
18:09
PDF document so all this has been placed
18:12
so in this nodejs script we have to use
18:15
two libraries Excel JS to actually read
18:17
all the content which is present in the
18:19
Excel file and then PDF lip which is
18:22
used to actually embed this Excel file
18:25
in the PDF document and we have actually
18:28
used both these libraries in
18:30
conjunctions so these two methods are
18:32
responsible draw rectangle and uh draw
18:37
text let me just zoom
18:43
in so this draw rectangle method is used
18:46
for
18:47
actually
18:49
embedding these rectangles out there
18:52
these rectangles that you see for the
18:54
tabular structure the table
18:57
structure and inside rectangles inside
19:00
these rectangles we are embedding this
19:02
text by using this function called as
19:06
draw text this function is responsible
19:09
for adding this value which you see in
19:11
this rectangle this is actual value that
19:14
you embedding in the PDF this Excel
19:21
file first of all we add these columns
19:24
right here these columns which are
19:25
present in the Excel file
19:29
we just using this each cell method we
19:31
looping through each record it contains
19:34
a cell and the column
19:36
number and uh in this we are using draw
19:40
rectangle and the draw text
19:43
method so once you basically make this
19:46
you can modify customize the width and
19:48
the size of the table everything you can
19:51
customize the Border color border size
19:54
of the table as well so once you get
19:56
this code the link is given in the
19:58
description deson and uh once you dite
20:01
this code you simply need to execute the
20:03
script just change your part of your
20:06
Excel file in the PDF file and it will
20:08
be generated so thank you very much guys
20:10
for watching this video and I will be
20:13
seeing you in the next video please hit
20:14
that like button subscribe the channel
20:16
as well and I will be seeing you in the
20:18
next one
#Programming
#Computer Education