Up next in 10

How to Setup Java SDK & Run Java Program in Visual Studio Code Full Tutorial For Beginners
Feb 21, 2025
Watch My Visual Studio Code IDE Setup Video For Fonts,Themes & Extensions
https://youtu.be/Bon8Pm1gbX8
Hi Join the official discord server to resolve doubts here:
https://discord.gg/cRnjhk6nzW
Visit my Online Free Media Tool Website
https://freemediatools.com/
Buy Premium Scripts and Apps Here:
https://procodestore.com/
Show More Show Less View Video Transcript
0:00
uh hello guys welcome to this video so
0:02
in this video I will show you how to set
0:05
up Java inside Visual Studio code and
0:08
simply I will run a simple hello world
0:10
program in this video from scratch so
0:13
let me verify and go to the command line
0:16
and just type here Java you will see
0:17
Java is not recognized as an internal or
0:20
external command so we are just starting
0:22
it from scratch so the very first step
0:25
in setting up Java inside your Visual
0:28
Studio code so first first of all you
0:30
need to download the Java SDK simply
0:33
type on Google Java SDK download the
0:36
very first website which comes which is
0:38
the Oracle website Oracle is the
0:40
official website for Java so go to this
0:43
website and just download the latest
0:45
version for the Java 23 it is at the
0:49
time of recording this video so Java 23
0:51
is the latest version so simply select
0:54
Java STK
0:55
23 and select your operating system so
0:59
my system is Windows system so I will
1:01
simply select this and then it comes
1:04
with this x64 installer so my is 64-bit
1:08
computer so I will just select this x64
1:11
installer right here you simply select
1:14
this and download this so it's almost
1:17
264 megabytes so simply the download
1:19
will start so after downloading it there
1:23
will be this simple setup file simply
1:25
run the setup and it will guide you with
1:27
the next next instruction so as soon as
1:31
you run
1:37
this so in my system the software has
1:41
already been installed so it is telling
1:43
me that would you like to reinstall it
1:45
so let me just say yes so let me just
1:47
show you once again installing
1:53
it so it will actually install all the
1:56
SDK so now this will be the window right
1:59
here Welcome to the installation which
2:00
of java SDK development software
2:03
development kit and now here you need to
2:06
specify where you need to install Java
2:08
so by default it will be stored inside
2:10
your C drive program files Java and then
2:13
it will create this STK jdk 23 so stick
2:18
to the default location and then click
2:20
on next so now it will install Java
2:23
files SDK files inside your system so
2:27
this will hardly take 15 to 20 seconds
2:29
for the install to get complete and then
2:32
we will start building the Java project
2:33
inside Visual Studio code so there is
2:36
one extension you need to install in
2:38
Visual Studio
2:39
code and in the description of this
2:42
video If you want to get started on how
2:45
to set up vs code with the theme plugin
2:49
settings so you can watch that video to
2:51
set up V Visual Studio code in this
2:54
environment you can see I literally
2:56
customize vs code according to my
2:58
preference so if you want to get this
2:59
this all these plugins extensions you
3:02
can watch that
3:03
video so the I've given the link in the
3:06
description of this video so now it is
3:09
just installing it so just wait for the
3:11
setup to
3:16
complete so in the
3:18
meantime you need one extension that you
3:22
so go to the extensions inside VSS code
3:25
so you can see jdk has already been
3:28
successfully installed
3:30
so now if you check your C directory go
3:34
to the program files and uh then it it
3:38
has created this Java folder if you see
3:42
and it has the latest jdk which is 23
3:45
and go to the bin right here and now it
3:49
contains this Java compiler so this is
3:52
your
3:53
actual path here full path by default so
3:56
simply copy this path here right click
3:59
copy
4:00
and uh this is because we are doing it
4:03
because if you open command line here
4:05
and just type Java right here so by
4:07
default it will be detected you will see
4:10
that Java you can print out the version
4:12
as well Java Das Dash version so it will
4:15
tell you the version of java that is
4:17
installed in your computer which is Java
4:20
23.0.2 so if you are not seeing this
4:23
message by default it will add this
4:25
inside your environment variable but if
4:28
for some reason it hasn't detected this
4:30
so go to your environment variable and
4:33
just check here system variables and
4:36
just here inside the path
4:39
here
4:40
just paste this location as you can see
4:44
this setup has already pasted this
4:46
location so if this path is not present
4:50
then that's just paste this path and
4:52
simply restart the terminal so whenever
4:56
you type here Java the command will be
4:58
successful so now it is is detecting
5:00
that Java is already successfully been
5:03
installed now we come to the vs code and
5:06
uh we need one extension right here so
5:09
simply type here in the extensions tab
5:11
which is Java extension pack for Java so
5:15
this is used by almost 33 million
5:19
developers so simply install this
5:21
extension it is developed by Microsoft
5:24
so simply select install so it will
5:27
install all these extensions related to
5:30
Java so just wait for the installation
5:32
to complete and then we will create a
5:34
brand new project for
5:38
Java so just wait for this extension to
5:51
install so you only need one this
5:54
extension so it has it is actually
5:56
installing all so now it is installed
5:59
right here
6:01
and now you can close this so now just
6:04
press your shortcut key on the keyboard
6:07
control shift p to open the Explorer and
6:11
right here you will just type here
6:14
Java and you will see this option right
6:17
here Java create Java project and simply
6:20
select this and here you can select
6:24
which type of java project you want to
6:26
create so I basically customized that
6:29
appearance of this Explorer I am just
6:31
repeating if you need to get this same
6:34
to same appearance and layout you can
6:37
watch my VSS code setup video where I
6:40
showed you from scratch how to set up
6:42
the extension settings to get this
6:44
appearance of vs code so the link is
6:46
given in the description so now here you
6:48
can select the type of java project that
6:50
you want to create right here so by
6:53
default if you don't want any build
6:54
tools you can even use Mayan Gradle as
6:57
well but I don't want to use any build
7:00
tools so I will say no build tools and
7:03
here you need to select the location
7:04
where you need to develop your project
7:06
so simply let me create this select the
7:10
project location and then you need to
7:12
give the Java project name so let me
7:15
say any name you can
7:18
choose and now it will open a new window
7:21
so it has created this project right
7:24
here which contains these four files
7:26
main two files are these two folders The
7:29
Source folder which contains the app.
7:31
Java files so this is a simple hello
7:34
world program and now you will see this
7:37
run
7:39
button and uh simply select so this
7:43
extension provides you with this run
7:45
button so run Java so now it will run
7:48
this
7:49
program in the terminal so you will see
7:51
the output here which is hello world so
7:54
we are simply run the Java here so you
7:57
need that only one extension install
8:00
that extension and create the Java
8:02
project and simply run it so you can see
8:04
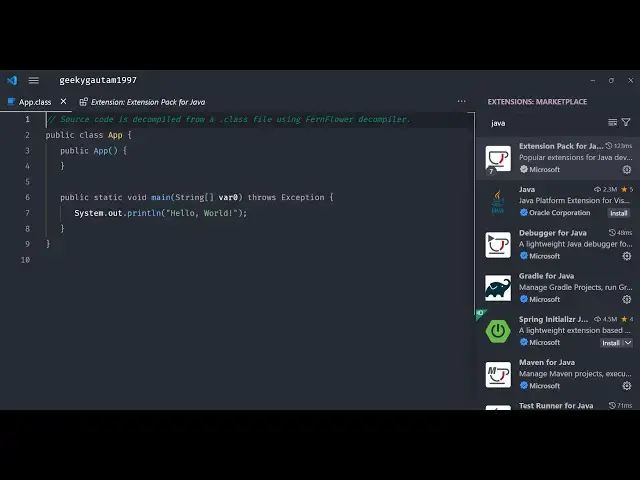
that so in this way it creates you can
8:08
see the bin folder is created it
8:11
converts this Java code to this class
8:13
file and then it executes it by the Java
8:17
compiler which is hello world or you can
8:21
also simply just type here
8:24
[Music]
8:26
Java
8:28
cab do
8:37
Java Java
8:44
C so it also does the same thing here
8:47
here you can see we basically executed
8:49
this command Java C provided the name of
8:52
the Java file which is it created this
8:55
app. class folder like this and now you
8:58
can run
9:04
this so the recommended way is to
9:08
actually use this run
9:13
button which is provided to you by the
9:15
extension so this makes it very much
9:17
easy to Simply select this run button
9:23
which so run Java so it will run your
9:27
pro uh project and simply print without
9:29
hello world so in this way guys you can
9:31
set up Java environment inside vs code
9:35
very simply first of all you download
9:36
the SDK then you install this extension
9:39
and simply create a Java project and run
9:41
this by using this run button which will
9:43
automatically appear whenever you
9:45
install that extension this extension is
9:48
important which is
9:50
Java if you just type Java you will see
9:53
this
9:54
extension which is the extension pack
9:56
for Java which contains various
9:58
extensions
10:00
one extension
10:02
is you can
10:04
see so it's a extension pack so it
10:06
actually also provides you with the
10:08
intelligence feature autocomplete for
10:10
Java MAV test
10:12
Runner debugger for Java so all these
10:16
extensions are provided inside this so
10:18
you only need to install this extension
10:21
so thank you very much guys for watching
10:23
this video and uh also visit my website
10:26
as well free mediat tools.com uh which
10:29
contains the thousands of tools
10:30
regarding audio video and image and I
10:33
will be seeing you in the next video
#Programming
#Java (Programming Language)
#Development Tools
#Computer Education