Up next in 10

Get the full source code of application here:
https://gist.github.com/gauti123456/52039657be45be00f25d7e3f6786b809
Show More Show Less View Video Transcript
0:00
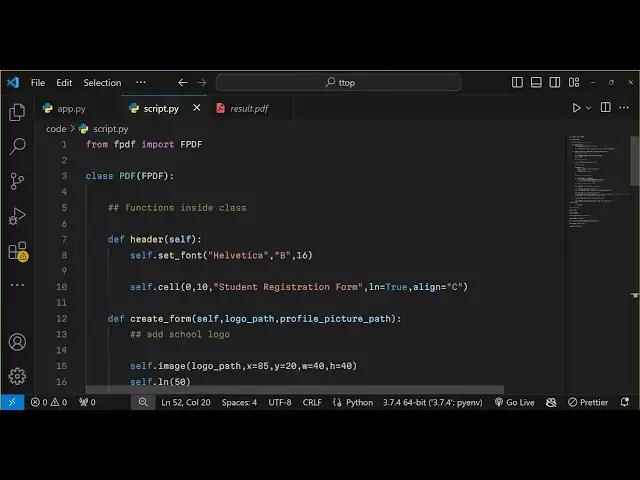
uh hello guys welcome to this video so
0:02
in this video we will actually generate
0:04
a PDF document which will contain form
0:07
fields of a student marksheet which will
0:10
contain such as name age gender and
0:13
profile picture and a student logo so
0:17
this is actually the python script we'll
0:19
be using and we'll be using the library
0:21
fpdf so let me show you uh by generating
0:25
this by running the script python
0:27
app.py so if I run this python script
0:30
you will actually see the PDF will be
0:32
saved as student marksheet F pdf.pdf you
0:37
can see that the PDF file has been
0:39
created and if I try to open this file
0:42
you will actually see this is actually
0:43
the student registration form we have
0:46
the logo of the school we have these
0:49
different fields right here which is
0:52
name age
0:53
percentage whether gender male female
0:56
and this is a profile picture of the
0:58
student so so if I just show you in the
1:01
browser this PDF document so it looks
1:04
something like this you will see that I
1:06
will be able to tell you how to generate
1:09
this uh student marksheet automatically
1:11
using this python script using fpdf so
1:15
you can change these values you can
1:17
change the name of the student age
1:18
percentage accordingly so all the source
1:21
code that I will use in this video is
1:23
given in the description the link is
1:25
given in the description you can check
1:27
out and uh in this way we'll be
1:29
generating a student marksheet and uh
1:32
now let's get started so for generating
1:34
this I'm using an open source python
1:37
Library which is fpdf basically it's a
1:40
PHP library and it but it can only also
1:43
be used inside python as well it has a
1:47
python module as well so we'll be using
1:49
this fpdf
1:51
library now to install this we have this
1:54
Command right here pip install fpdf this
1:57
is actually the command that you need to
2:00
execute in order to install this module
2:02
inside your computer so I've already
2:04
installed it so I will not install it so
2:08
you just need to install it and just
2:10
create app.py and let me just start from
2:13
scratch so
2:15
now what I will do I will simply create
2:18
a new file fpdf
2:21
dopy and uh right here first of all we
2:24
need to import the package from fpdf we
2:27
need to import the class here which is
2:29
fpdf
2:30
in all capital letters which is a base
2:33
class fpdf from this module and after
2:38
that we will actually define a
2:41
class which will we will call this class
2:44
as PDF and it will actually take an
2:48
argument whenever you invoke this class
2:51
we will pass an argument right here and
2:53
here it'll be defining some functions
2:55
inside this class so the first function
2:58
will be this will be a header function
3:01
which will take the instance of this
3:04
class and now to in this we will be
3:07
creating the we will be setting the
3:09
properties of let's suppose the font by
3:12
using the set font function which is
3:15
available and here we'll be using the
3:17
helvetica font helvetica you can use any
3:21
font of your choice and this will be
3:23
bold and the font size will be 16 and
3:26
then we will be creating a simple
3:28
heading on the PDF document by using the
3:30
cell method can see the cell method so
3:34
here you're passing this instance that
3:36
you see fpdf passing this instance to
3:38
this class directly so now we have all
3:41
the methods which are there in this
3:43
fpdf
3:45
module so fpdf is passed as a self
3:49
instance so we can call all these
3:51
methods which are there in order to set
3:52
the phone we use this method Now to
3:54
create a heading we use the cell method
3:57
so inside this it takes the arguments
3:59
that x coordinate which is zero the y
4:01
coordinate 10 and then the title so we
4:04
will simply say student registration
4:07
form you can call this anything and the
4:11
fourth one is actually in which is it
4:16
actually
4:18
is it should be on a different line so
4:21
this a Boolean parameter and if you want
4:24
to align it in the center position you
4:26
will simply provide this align property
4:28
as capital c which is stand for Center
4:31
so this will actually now add a heading
4:34
add a header reading so now whenever we
4:38
call this class right here so now at
4:41
this outside this so now we need to
4:44
create a PDF document so we will simply
4:46
create a new instance of this class we
4:49
will create an object like this
4:52
fpdf sorry
4:54
PDF so when we call this we are
4:57
instantiating a new instance of this
4:59
class right
5:01
here and uh after
5:04
this we are calling a method which is
5:08
PDF add page so this actually adds a new
5:13
page in the PDF
5:16
document so this add page method
5:19
actually adds a new page now to save
5:22
this we can simply invoke a method which
5:25
is
5:26
PDF output so output method actually
5:30
creates your PDF document we can call
5:33
this as result.
5:34
PDF and then we can add a print
5:37
statement that
5:39
uh PDF
5:42
saved so if I just now try to run the
5:46
script you will see in the left hand
5:49
side a PDF document will be created
5:54
fpdf e
5:59
so if you
6:02
see let me call this file name anything
6:05
else because fpdf is a library name so
6:08
let me call this as script
6:14
py so python script.py we calling it and
6:18
now if you see in the left hand side a
6:21
PDF saved we got this result. PDF and if
6:24
you open this you will get this heading
6:26
right here at the header position right
6:28
in the center position
6:30
if I try to open it in the browser you
6:32
will see this
6:33
heading so now we need to add the form
6:37
Fields so after this what we need to do
6:40
we need to create a new function right
6:42
in this class the second function so
6:45
with this function we'll be responsible
6:47
for creating the form so create form and
6:50
we'll be passing the self instance and
6:53
this logo path so we have the student uh
6:56
the School logo which you need to insert
6:58
and the profile picture of the
7:00
student so I have all these pictures
7:03
available inside my directory so you can
7:05
use any picture of your choice PNG or
7:08
jpg this is a student sorry School logo
7:11
this is my profile picture which we will
7:14
insert so now in this function what we
7:17
need to do first of all we need to add
7:18
the School logo so now to add that logo
7:22
we will use the image method to add a
7:26
image in the PDF document so you'll pass
7:28
this logo path as first argument the
7:31
second argument is the x coordinate
7:32
which is 85 y coordinate is 20 width of
7:37
the image is 40 and height of the image
7:39
is also
7:40
40 and then to
7:44
actually move this below the logo we'll
7:47
be using this
7:49
function you move it 50 coordinates
7:53
below so after moving below the
7:56
logo if you just do this and if you
8:00
also want to add the logo so we can
8:03
simply say after adding a new page we
8:05
will provide the path of the image of
8:08
the student logo it is present in the
8:10
same directory logo.
8:12
PNG and we will call this function
8:14
create
8:17
form and uh also here we also need to
8:21
provide the profile picture so it is
8:24
also present in the same directory so it
8:27
is sing profile. jpg so while when
8:30
create calling this function we will
8:32
provide both these arguments as Doo
8:35
image and profile
8:38
picture so if you
8:40
now run
8:42
this if you check out your result. PDF
8:45
you will see the logo of the school will
8:48
also get added you can see the logo now
8:51
we need to add the form
8:54
Fields so now for adding the form fields
8:57
we will add the
9:00
form Fields with sample data so first of
9:04
all we need to set the font Again by
9:05
using the set font function again we can
9:09
set Hela you can use any font of your
9:12
choice the text size will be 12 and here
9:16
will be the field data you can create
9:18
your own fields in this case I'm
9:20
generating a student marksheet for that
9:22
we will creating a form data array which
9:25
will contain three records first is a
9:27
first name
9:30
and the value will be let's suppose goam
9:33
Sharma the name of the student then the
9:36
age of the student let
9:39
me age is 27 and then it's a numeric
9:44
value but still you need to put double
9:46
quotes on the number same goes for
9:49
percentage as well it's a numeric value
9:52
but still you do need to put double
9:55
quotes So
9:56
90% so these my three fields which which
9:59
needs to be inserted now to align this
10:02
in the PDF document we will
10:05
simply use the for Loop so for
10:09
label data in this form data array we'll
10:14
Loop through each record and for each
10:16
record we will use this cell
10:18
method to actually add this in the PDF
10:21
document so the x coordinate will be 40
10:23
10 I've already calculated all these
10:26
math coordinates guys you just need to
10:28
copy this and the Border here will be
10:30
zero and we need to align it in the left
10:33
position now so align property will now
10:35
be l l stands for
10:38
left and then we need to align the value
10:43
inside this so x coordinate 0 y1 and the
10:47
actual data which is the first name last
10:50
name border
10:54
B you need to have some border and then
10:58
it needs to be below
11:02
the so now if you run this you will also
11:05
see the records will also get
11:07
added you will see that now these three
11:10
records first name age percentage has
11:13
all been added you can change these
11:15
values accordingly you can change the
11:17
name let's suppose I change this name to
11:20
John
11:22
Williamson again run this script a new
11:25
PDF file will be created with this
11:27
record can see that
11:32
so in this way you can create multiple
11:34
marksheets with a single python script
11:36
and for now showing the male gender you
11:41
need to have a radio button so for doing
11:45
that male or female uh radio
11:49
button for doing that again you'll use a
11:52
cell method and 20 10 X and Y and the
11:56
actual value here will be male
12:00
we need to go down so again we'll be
12:01
using this property
12:04
Ln to false because we don't need to
12:08
move down it needs to be side by side so
12:11
we'll use this ellipse ellipse method
12:14
which is used to actually draw a circle
12:17
but in a radio button way x coordinate
12:20
is 62 y will be getting from this
12:23
function self getor Y and we need to
12:28
increment it by three
12:30
and the width of the ellipse will be
12:33
four and the height will also be
12:37
four so I I already calculated all these
12:41
coordinates guys you just need to copy
12:43
this and the style will be empty it will
12:45
be
12:46
filled so it means that it will be
12:49
checked by default
12:51
ma same goes for the female as well so I
12:54
will simply copy this
13:00
same goes for female we have the
13:02
coordinates right here
13:04
calculated then we'll have a line break
13:06
after the gender field so if I run this
13:09
now you will also see the gender is also
13:12
added but we are missing that gender
13:15
field right at the top so we do need to
13:17
add the gender field
13:25
first I think
13:29
let me see sorry we missing that
13:34
yeah yeah we missing this one sell we do
13:37
we do need to create a before we add the
13:41
radio buttons we do need to create this
13:43
cell which is gender so if you now run
13:46
this you will see this gender you will
13:49
see gender colon and then male is
13:52
checked so if you want to have female
13:54
checked then what you will see you do
13:57
you just need to make this so style
14:00
property to Ft and this one to
14:06
F so now if you see both will be checked
14:11
but you only want the so you will simply
14:18
say this will be D and this will be
14:22
ft so now the female will be checked you
14:25
will see that so in this way you can
14:28
create radio buttons as
14:32
well let me rever back to the original
14:35
setting so now after doing this we need
14:38
to insert a profile picture of the
14:41
student so right in this function we
14:44
again need to use this cell method and
14:47
for x coordinate y coordinate we'll
14:49
simply say profile
14:56
picture side by side sir we'll use the
14:59
image method to now insert the image so
15:02
this path is already available to us we
15:05
are passing this path in this function
15:06
profile picture path and then these are
15:10
the actual coordinates here x coordinate
15:12
y coordinate width and height of the
15:13
image so I already calculated this
15:20
everything so after that we need to have
15:22
some spacing so
15:25
l 50 that's all this complete
15:29
application guys so if you now check
15:31
your profile picture will also get added
15:33
you'll see that side by side this is a
15:36
profile picture and a student marksheet
15:39
has been generated instantly we'll see
15:41
using a simple python script using
15:44
fpdf so in this way you can generate
15:46
this so if you like this video guys
15:49
please hit that like button subscribe
15:50
the channel as well and also do check
15:54
out my website free mediat tools.com so
15:57
which contains thousands of free tool
15:59
related to audio video and image so I
16:03
will be seeing you guys in the next
16:05
video
#Education
#Educational Software