live_tv
Livestream Starting Soon
00
Hours
:
00
Minutes
:
00
Seconds
Up next in 10

How to Connect to Remote SSH in VS Code and Transfer Files Over SFTP to VPS Server Full Tutorial
Jan 9, 2025
Hi Join the official discord server to resolve doubts here:
https://discord.gg/cRnjhk6nzW
Visit my Online Free Media Tool Website
https://freemediatools.com/
Buy Premium Scripts and Apps Here:
https://procodestore.com/
Show More Show Less View Video Transcript
0:00
uh hello guys welcome to this video so
0:02
in this video I will be actually be
0:04
showing a visual studio extension which
0:07
allows you to connect to remote server
0:09
SSS server if you have a virtual private
0:12
server if you are running a website I
0:15
will show you a extension in Visual
0:18
Studio code which allows you to actually
0:20
connect to that server and we can able
0:22
to download files upload files and make
0:25
changes directly inside Visual Studio
0:27
code you don't need to use these
0:29
software such as filezilla or puty we
0:32
have used in the past if you see puty is
0:35
actually used a SSH client and also file
0:38
Zilla for actually uh this is actually a
0:42
software which allows you to actually
0:44
upload and download files from your VPS
0:47
server so I will now be showing you an
0:50
extension in vs code which does the same
0:53
thing but it will offer you a lot of uh
0:57
easiness when working with the vs code
0:59
so coming back back to the topic guys uh
1:01
the extension is very simple if you just
1:03
go to the extensions tab let me just uh
1:07
show you from scratch there is this
1:09
option right here if you see this is a
1:11
settings option you need to click this
1:13
option and go to extensions and just
1:16
search for this extension called as
1:18
remote
1:19
SSH so if you just search for this
1:22
extension the very first link which
1:26
comes remote
1:30
you will see that the the official
1:31
extension developed by Microsoft we need
1:34
this extension remote SSH we also need
1:37
this extension remote Explorer and also
1:39
we need this one remote SSH editing
1:42
configuration file so we need these
1:44
three extensions simply install them
1:47
click the install button and then also
1:50
we need this one as well which is remote
1:52
X it will automatically install you will
1:54
see all these three extensions are
1:56
installed successfully if you just
1:59
install this first One automatically
2:01
these two FES will already be installed
2:04
automatically so now after installing
2:07
this
2:09
extension now we need to actually
2:12
configure our
2:15
file for for extension so now for
2:20
configuring the SSH connection we need
2:22
to Simply click this manage option and
2:25
go to the extension settings this is the
2:28
option that you need to go to
2:31
and here you need to provide your
2:34
configuration file for your SSS
2:36
configuration so basically this is
2:38
actually the address which looks like c/
2:42
user this file is located inside your C
2:44
drive user folder and this is your
2:47
username so in my case my username in is
2:50
Asus so you can basically replace your
2:52
own username right here inside your
2:55
computer this username you need to
2:56
replace it and after that SSH config so
3:00
if you just uh copy the address of this
3:02
and simply open your file explorer and
3:05
simply paste this address right here
3:08
just paste it and now it will ask you to
3:10
open this with vs code so I will simply
3:12
open this so right inside this file guys
3:16
this is actually if you see it's a
3:17
configuration file for SSH so now we
3:20
need to configure all this information
3:23
which will be your host name username
3:26
password everything so for this password
3:30
is not required at this stage it will
3:32
automatically ask you whenever you
3:34
connect so the very first thing which
3:36
comes right here which is the host
3:38
property let me just zoom in so right
3:41
here if you see the first thing you need
3:42
to write which is the host and you can
3:45
give any host name let's suppose my
3:48
website is freem mediat tools.com so I
3:50
will just write the name of the website
3:52
free media tools this can be anything uh
3:55
you don't need to copy my name you need
3:57
to replace your website name after the
3:59
second option you need to actually
4:01
provide the host name this will be the
4:04
actual IP address or website name so in
4:07
my case I will just copy the IP address
4:09
of my VPS server so this is my VPS
4:12
server IP address so I will simply paste
4:15
it 62. 72.1 2.22 this is the IP address
4:19
of my VPS server and then you need to
4:22
Simply replace your username and this
4:25
default username is my root here if you
4:27
have a different username just replace
4:29
it and then comes the port number so
4:31
which port number you need to connect so
4:34
I will be connected to 22 port number so
4:38
this is a default one for FTP so 22 and
4:42
then you need to Simply say identity
4:45
file and this file will be located
4:48
inside
4:50
c/
4:56
users users slash
5:01
my username which is Asus so here you
5:03
need to replace your own username so if
5:06
you have a different username you can
5:08
replace it and then come slash.
5:11
SSH SL
5:14
idore RSA so you need to replace uh just
5:18
your username right here this will be
5:20
different for you so just replace your
5:22
own username rest of the things will
5:24
remain constant right here that's all
5:27
that you need to do guys for the
5:28
configuration you can now close this
5:30
file and after you close this file now
5:33
there is an option right here if you
5:36
see uh let me just also close this as
5:39
well and restart my vs code so simply I
5:43
will open a
5:45
directory my project directory let me
5:48
just
5:49
uh reopen vs code so I will CD into vs
5:54
code extensions
6:02
or I can make a brand new
6:09
directory so I'm just opening vs code
6:12
you will see the vs code has opened now
6:14
there is an option right here if you see
6:17
if you just in this option open a remote
6:20
window if you see there is this is an
6:22
option that you need to
6:24
click just open
6:27
this and basically there is an option
6:30
which comes right here which is remote
6:32
SSH
6:34
and you can also there is a second
6:36
option as well F1 property uh F1
6:39
shortcut is there in vs code just press
6:42
the F1 key inside your vs code and just
6:45
type your
6:46
remote SSS so here you can select this
6:50
third option we need to connect to a
6:52
host and then we already configured if
6:54
you see free media tools is coming so we
6:57
can actually select this option and then
6:59
the new window will open right here if
7:01
you see so it is now setting up the SSH
7:04
host free media tools this is
7:06
initializing the vs code server so right
7:09
here it is asking us to which which
7:10
platform your website is hosted on so my
7:13
website is hosted on
7:15
auntu VPS so which is part of Linux
7:18
system so if you have a different VPS
7:21
which is running on Windows you need to
7:22
select Windows or Mac so I will select
7:24
here Linux so enter it and now you need
7:27
to actually enter your password of your
7:30
VPS server so I will simply enter the
7:34
password so this will be confidenti it
7:36
will not be shown to you so after
7:39
entering the password it will actually
7:40
download all the resources all the files
7:42
of your SSH server so if you see now
7:47
there is an option connected to remote
7:49
so I have successfully connected to my
7:52
VPS SSS server now there is an option of
7:55
open folder so you will simply click it
7:57
and if you see we have this so I need to
8:00
go to my website free mediat tools.com
8:02
this is a root folder where you you can
8:05
select your website folder I will simply
8:07
select it and then click on okay so I
8:10
just want to select this and now all the
8:13
files will get added to your vs code you
8:16
just need to again enter the password so
8:19
again enter the password for
8:23
this so after entering you just need to
8:26
trust the authors and click this option
8:29
yes I address the authors and now you
8:31
can see that guys you're successfully
8:33
connected to your SSH VPS server and you
8:36
don't need to use this puty every time
8:38
file Zilla don't need to use it just
8:41
install this extension follow the steps
8:43
that I showed you and now all these
8:45
files that I have in my VPS server is
8:47
there you can even show just if I
8:50
connect to my VPS server using file
8:53
Zilla you'll see all these files this
8:56
folder if you see it is there free
8:58
mediat tools.com if I navigate to it you
9:00
will see that same directory structure
9:02
is available in my VSS code as well so
9:04
we are successfully connected to a VPS
9:07
server and now we can make any any sort
9:09
of changes to my website so if I
9:11
navigate to my website free mediat
9:13
tools.com you will see that it it is
9:15
running here and uh let's suppose if I
9:18
want to make some kind of changes right
9:21
here I can navigate to my uh index. ejs
9:25
file which is the main file of my
9:27
website you will see that so what if I
9:30
make any sort of changes it will
9:31
automatically live update I don't need
9:33
to restart the application so this is a
9:36
very nice extension so we can simply add
9:38
a get route
9:41
of uh my name Gotham Sharma you will see
9:44
that so I'm just writing a simple get
9:46
request which will simply return a
9:49
response to me a Json response a message
9:52
of high world so you will see I have
9:55
written a simple get request to this
9:57
endpoint whenever we visit so you will
9:59
see that just give two five seconds and
10:03
again uh navigate to your website and
10:06
now just say
10:09
slash so you will basically see guys as
10:12
I'm just hitting this endpoint
10:13
automatically the changes have taken
10:15
place I am able to update my website
10:18
live from my vs code you will see high
10:20
world so whatever message that I put
10:23
right here it is coming as a Json
10:25
response so this makes it really easy
10:27
guys you don't need to require file
10:29
Zilla or puty the third party softwares
10:31
to connect to your SSH so this is a
10:34
onetime process once you are connected
10:36
to your SS it will automatically
10:39
whenever you open in the future it will
10:41
not ask your information you can
10:43
directly edit your files inside your VPS
10:46
server this can be digital ocean it can
10:49
be a either hostinger any hosting that
10:51
you purchase just need the credentials
10:54
the username the host name and the
10:56
password so once you are configured this
10:58
extension you can in the future you can
11:00
make changes you can add new files
11:02
inside your project in this way you can
11:05
do it and now the second extension that
11:08
I want to show you guys this extension
11:11
basically uh is uh more than enough for
11:14
you to actually make changes but uh we
11:18
can't directly open them in file
11:20
explorer if you want to transfer a lot
11:22
of files then this process is not
11:25
suitable for this because at one time
11:28
you can only create one file if you see
11:31
inside this directory let's suppose I
11:33
want to transfer a lot of
11:35
files I can't do that so we don't have a
11:38
drag and drop functionality right here
11:40
so for for that I have a second
11:43
extension in mind that I want to share
11:45
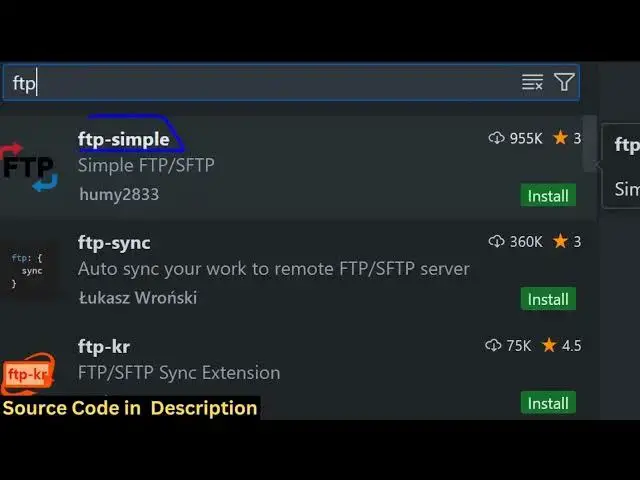
with you the second extension again go
11:47
to extensions and the second extension
11:50
is FTP just search for FTP the very
11:54
first extension which comes in which is
11:56
FTP simple we need to install this
11:58
extension
12:00
so the just click install and the basic
12:04
uh usage of this extension is that guys
12:06
you will be able to open the directory
12:09
directly inside your file explorer so
12:12
that if you want to transfer a lot of
12:14
files at once you can do that and now
12:17
after you do this again press F1 keyword
12:20
inside your keyboard and just search for
12:22
uh FTP simple and just select this
12:26
option configuration FTP connection
12:28
setting so here you need to configure
12:30
your setting again just select that and
12:35
here it will have your Json file this
12:38
will be a array you will see that this
12:40
is actually a Json file which is holding
12:43
information about your website in this
12:44
Json object if you have a lot of website
12:47
you can put a comma and again the second
12:49
object will contain the second website
12:52
for now I will only be concentrating on
12:54
my main website freem mediat tools.com
12:56
so here you need to replace the name so
12:58
I will simply the name free mediat
13:00
tools.com like this this is just the
13:02
name of the website it can be anything
13:05
now the host name so this host name once
13:07
again will be the
13:09
same so this is actually the IP address
13:12
of your VPS server simply copy this and
13:15
paste it and port number is uh actually
13:20
22 so we are actually using FTP protocol
13:23
so this type parameter will be FTP
13:26
username will be root and here you need
13:28
to replace your password so I'm just
13:30
hiding these details guys so that you
13:31
can can't see my password so here you
13:34
need to replace your
13:36
password so I'm just writing my password
13:39
so after I return the password you need
13:41
to replace the path so if you open this
13:44
uh you are using FTP the port number
13:48
will be
13:49
21 and uh whenever you are using the
13:52
port number 22 the protocol here will be
13:56
SFTP so just replace just change this
13:59
type parameter that you see right here
14:01
just change it to S just make it s s FTP
14:06
and rest of the things will remain
14:07
constant this is your IP address replace
14:09
it and port number will be 22 type will
14:12
be S FTP if you want to use FTP then
14:14
change it to 21 and username password
14:17
will be the same this will be your
14:19
username password and rest of the option
14:22
will remain constant just type F1
14:24
keyword on your keyboard and now just
14:26
select REM FTP simple remote directory
14:29
open to workspace so now it will connect
14:33
you will see it will connect it to this
14:35
root directory but we want to go to the
14:38
root directory right here so I can
14:39
simply mention the path to be/ root SL
14:43
free media tools to so it will now go to
14:46
this directory directly so again if I
14:49
open this FTP
14:52
simple so now it will go to this
14:54
directory if you see /root slf free
14:57
media tools so so what I will do I will
15:00
simply go to this
15:02
directory and now it will actually
15:05
download all the things which were
15:06
present in this directory inside your
15:08
local machine in vs code so it is just
15:10
downloading it so just wait it totally
15:12
depends upon how much files are there
15:14
inside your V VPS you can see it has
15:17
clone my directory inside my vs code so
15:20
now I can make changes I can add files
15:22
remove files directly so let me show you
15:26
a very simple example right here if if I
15:29
go to my public directory in my VPS
15:31
let's suppose if I want to add a file I
15:33
can simply add a file file.txt so if I
15:37
add this file I can just say this is a
15:40
simple text file added by vs code
15:45
extension that's all so after you add
15:50
this just open your
15:53
uh output right
15:56
here just open your
16:00
this one FTP
16:02
simple so you can see it is in the
16:04
background it is still downloading your
16:06
files so just make sure it is completed
16:10
before you add files so it is just
16:12
downloading it so it will happen for the
16:14
very first time and you just need to
16:16
give some ample amount of time before it
16:19
fetches all your files from a VPS and
16:21
store them inside your vs code so it
16:24
will give you a notification right here
16:27
output when it is completed so just give
16:29
the time for it so it is just
16:32
downloading it so just wait for this to
16:35
finish so once it finishes you can be
16:37
able to
16:39
directly actually download upload files
16:42
remove it from your VPS server so it
16:44
will just take some time for the process
16:47
to
16:49
finish so it is just doing its
16:56
process so I think it will hardly take
17:00
uh
17:02
25 to 30 seconds in a normal machine if
17:05
you have a lot of files but it will
17:08
take some more time as well so just give
17:12
ample amount of time to
17:14
complete so I will not pause the video
17:17
so you can just see the complete process
17:20
how this extension works so this will
17:22
only take for the very first time these
17:25
files have are being downloaded on your
17:27
machine locally
17:29
so this you just want to do it for the
17:32
very first
17:33
time you can see automatically all my
17:36
files are coming right here you will see
17:39
in my local file
17:45
system so you can see that everything is
17:48
cloned inside your machine so
17:52
that you can directly right click open
17:55
reveal in file explorer so you can
17:57
simply see
17:59
uh if you go to any directory right here
18:02
you will see that so all these files are
18:05
coming right here inside your
18:09
system so I will be back guys whenever
18:12
this
18:14
completes so guys you can see that uh if
18:17
I navigate to free mediat tools.com
18:19
file.txt this file is coming right here
18:22
this is a simple text file added by vs
18:24
code extensions and if you see still the
18:27
process is going on you don't need to
18:29
care about this you just need to
18:32
actually uh create your files if I just
18:35
now simply click on delete so there is
18:38
an delete option right here FTP simple
18:41
uh delete file or directory you can
18:44
simply select this option the file will
18:46
be removed if you again go to the same
18:48
path so now this file will not be there
18:51
you will see you will be able to upload
18:52
files delete files as well so if I again
18:56
create two more files this is file. TX T
18:59
and this is the second file file
19:02
2 file 2.txt
19:07
so I will say this is the first
19:10
file and this is the second file this is
19:14
the second
19:15
file so if you navigate to my VPS here
19:19
if I search for this uh file
19:24
one uh whatever I named it I let me see
19:28
I named it file
19:30
sorry I named it
19:34
file so you will see this is actually
19:37
the first file you will see that and if
19:39
I navigate to file 2
19:42
txt because it it is present in the
19:44
public directory so that I can directly
19:46
access it every any can access it if you
19:48
know the name of the file so this is a
19:51
second file so you can see that guys you
19:53
can simply directly add the files using
19:57
this extension directly I showed you
20:00
both the extension if you want to make
20:02
changes inside your files you can
20:04
directly do it by using this SSH remote
20:07
SSH which is developed by Microsoft
20:09
there is a second extension which is
20:11
easy uh FTP which simple FTP which makes
20:16
it really easy if you want to make uh
20:18
bulk if you want to drag and drop simply
20:21
open this directory in the file explorer
20:24
if you now have some files which are
20:26
available you can directly go to your
20:32
files so if you have a image file as
20:36
well you can
20:38
directly
20:40
uh if you want to transfer this so what
20:43
you can do simply copy and navigate to
20:46
the directory right here and simply
20:48
paste it so now you can see all these
20:51
two files have been transferred these
20:53
are PDF files you can do video files
20:55
image file PDF file any file you can
20:57
transfer and now now again if you open
20:59
sample.pdf
21:02
so now you can see that sample.pdf I
21:07
think this file is
21:09
transferred you can see that this file
21:12
is
21:13
transferred this is a
21:22
sample okay I think uh for this you do
21:25
you do need to actually right click this
21:28
and simp simply there is an option right
21:30
here of save so simply select this
21:33
option simply select the file and which
21:37
directory you want to upload this we
21:39
need to upload it to the public
21:43
directory so name of the file will be
21:47
this so once you do this your file will
21:49
be
21:55
uploaded so now you can see if you
21:57
navigate to it your file is successfully
21:59
uploaded sample.pdf and same thing you
22:02
need to do this for the second file as
22:04
well if you did it sample
22:06
2 so yeah so each and every file uh you
22:11
just there is an option right here you
22:13
can do
22:16
it there is this option right here save
22:21
option you can select
22:24
this in which directory you need to
22:26
upload them and this is actually the
22:28
option right here for bulk uploading
22:31
guys in my opinion fil Z still dominates
22:35
because you can directly drag and drop
22:37
so for if you have a lot of files that
22:40
you want to upload then you can use file
22:42
Zilla because every for every file you
22:45
can't do right click and everything this
22:47
is a very tedious process so for file
22:49
uploading I will still use filezilla but
22:53
for file modifications if you want to
22:56
create files if you want to work with
22:58
the file
22:59
this is SSH client which is developed by
23:01
Microsoft this is a fantastic extension
23:03
you can use this but for file bulk file
23:06
upload I will still use file Zilla so
23:09
this this is my honest opinion of these
23:12
two extensions guys I showed you step by
23:14
step on how to configure and implement
23:16
this thank you very much for watching
23:18
this video please hit that like button
23:19
subscribe the channel and I will be
23:21
seeing you in the next video
#VPN & Remote Access
#Programming
#Internet Software
#Development Tools