Up next in 10

Build a React.js WebRTC Video,Audio & Screen Recorder in Browser Using react-media-recorder Library
Jan 9, 2025
Get the full source code of application here:
https://gist.github.com/gauti123456/1991e3f351a61d5600ea72a79b8e8969
Show More Show Less View Video Transcript
0:01
uh hello guys welcome to this video so
0:03
in this video we will look to build out
0:06
a screen recorder video recorder or
0:08
audio recorder inside react Chas using a
0:11
specific library for react Chas only
0:14
which is re react media recorder and you
0:16
can see on your screen this is actually
0:18
the demo that we will be building so we
0:21
have three buttons first button for
0:23
video the second one for audio and third
0:26
is for
0:27
screen so you need to select whichever
0:30
thing that you want to record so if you
0:32
select video here and then we have two
0:34
buttons here start recording and stop
0:37
recording and if you click the start
0:39
recording button you need to Grant the
0:41
permission to let the your web camera
0:44
record yourself so you can see uh my
0:47
video feed is showing right here
0:49
and now we have these two buttons start
0:52
recording so if I click the start
0:54
recording button so you will see the
0:56
recording will start and uh so once you
1:00
want to click the stop button to stop
1:03
the recording you will click this button
1:04
and now the video will be generated and
1:07
you will see the video created and you
1:08
can play
1:14
this so you can see the video is playing
1:17
and the sound is also being recorded and
1:20
then you have the download recording
1:22
button automatically shown so you can
1:24
click the download button and your video
1:26
will get downloaded you will see that
1:29
now you can play your video in your
1:31
local video
1:35
play so in the same way we click the
1:38
second button if you want to record your
1:40
only your audio so you click the start
1:43
recording button and now your microphone
1:45
is recording your
1:47
audio so whatever you speaking right now
1:50
it has been recording and again if you
1:52
click stop recording now only this audio
1:56
player is showing you will see that if
1:57
you can play your audio
2:03
so whatever you speaking
2:06
right button and now your the audio has
2:10
been recorded and again we have the
2:12
download recording button so it actually
2:15
downloads the audio
2:17
here start recording button and now
2:21
your and lastly we have the screen
2:23
recording as well so it's all allinone
2:26
recorder and if you want to record your
2:28
screen
2:30
you can select which screen that you
2:32
want to record or you can select entire
2:35
screen so I will select entire screen
2:37
and then click share so you can now see
2:40
it is capturing all your screen all your
2:42
activities that you're doing on your
2:44
screen so you can switch tabs all will
2:47
be recorded and will be converted into a
2:50
video so once again you need to click uh
2:53
stop recording whenever you want to stop
2:56
this so now you can see your video has
2:59
been recorded you can now see it is
3:01
capturing all your screen all your
3:03
activities that you're doing on your
3:04
screen so you can see the audio is also
3:07
been recorded and again you can click
3:09
the download recording button to let it
3:13
convert into a
3:14
video so you can now see it is capturing
3:18
so it's you can see it's a very basic
3:19
application but it's a you will learn a
3:23
lot how to build a web RTC Allin one
3:26
media recorder so the library that we
3:29
using is if you go to npmjs.com just
3:32
search for this package which is react
3:34
media recorder this package let's you do
3:38
this very easily in react CH this is
3:42
actually the package here uh almost
3:44
22,000 weekly downloads are there and
3:46
there is a simple command npmi react
3:49
media recorder so I've already created
3:51
one project in react CH so this is a
3:54
command here npmi react media recorder
3:58
and also for building the interface just
4:00
install these two additional packages as
4:03
well react bootstrap and
4:06
bootstrap so the you need to install
4:09
this these three
4:11
packages let me start the application
4:13
I've already installed these
4:16
so now we'll be building it from scratch
4:19
so just inside your app level component
4:22
I will make a functional
4:25
component so it will refresh you will
4:28
see that app is showing so we we are
4:29
starting it from scratch all the source
4:31
code is given in the description of this
4:33
video so first of all for starting we
4:36
will import the module that we installed
4:39
which
4:40
is it is actually this hook which is use
4:43
react media recorder and it will be
4:46
coming from your react media recorder
4:48
it's especially a hook and then we can
4:50
import your
4:53
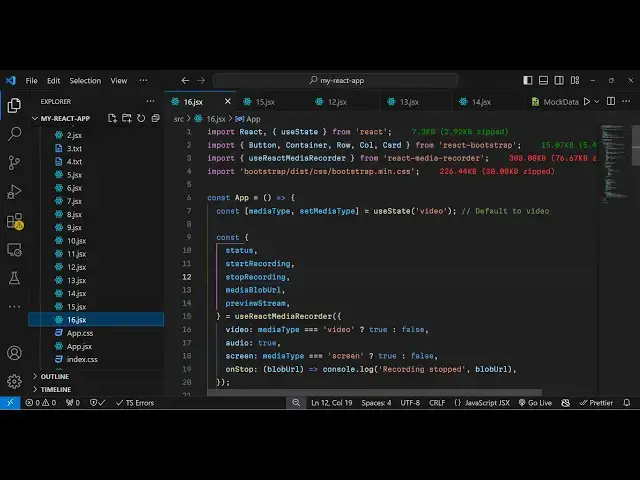
bootstrap CSS file main. CSS and also we
4:58
have
5:00
specific modules in react bootstrap
5:02
which we can use button container row
5:04
call card this is not mandatory for this
5:07
application I'm just using this for just
5:09
styling purpose and here we'll be
5:11
declaring some State variables first
5:14
will be media type for keeping track
5:17
which type of media that you want to
5:20
record so initial value here we'll be
5:22
using the UST State
5:25
hook and it will be
5:27
video so it has three options video
5:30
audio and screen by default video will
5:32
be
5:33
there so then we will
5:36
have some methods which are there inside
5:39
this
5:40
hook which is use react media
5:45
recorder and you can basically have
5:47
these
5:48
methods which is the
5:51
status we have the start recording
5:53
function as well so it's all built in
5:56
inside this module stop recording which
5:59
will stop stop the recording and then
6:01
media blob URL this is actually whenever
6:06
you click the stop button whatever is
6:08
your media it will be contained inside
6:10
this and lastly we will need to preview
6:13
this so we will preview the video by
6:16
using this function preview stream so
6:18
all this is coming inside this hook and
6:22
it contains some options we need to pass
6:25
first is a me video option so here the
6:27
media type if the media type is equal to
6:32
video we will have this Turner operator
6:35
and we putting it to true if not then
6:38
false same we need to do for audio as
6:41
well we need to record the audio
6:43
irrespective of whether we are recording
6:44
a video or screen so audio option will
6:48
be true if you don't want to record
6:50
audio you can put false here and the
6:52
third option is for screen recording and
6:55
screen recording we again need to check
6:58
the media type variable if the user has
7:00
selected screen only then only we will
7:02
say true else it will be false and then
7:06
we have the fourth property here so when
7:09
you click the stop button this function
7:12
will execute on stop and here we will
7:15
contain the blob
7:17
URL and inside this we
7:19
can console log a message to the user
7:24
that recording
7:27
stopped and then we will have the just
7:29
blob
7:32
URL like this so that's all uh this will
7:36
contain these five functions that we
7:39
have status start recording stop
7:42
recording media blob URL preview stream
7:45
so this is the configuration part of
7:47
this Library you just need to write this
7:49
so that the library should work now I
7:52
will come to the jsx if you want to
7:54
construct the UI for the UI you'll be
7:56
using the container element of react
7:59
bootst
8:01
inside this we will have the row
8:05
tag just give additional bootstrap
8:08
classes to it just to align it in the
8:10
center position so justify
8:13
content
8:15
Center and you'll have basically the
8:20
call and we'll be aligning it medium
8:26
8 and this container element will be
8:28
giving a class name of margin top
8:32
five so these classes are just for
8:35
alignment purpose so H1 here will be
8:38
having a simple web RTC media
8:46
recorder so we just need to align this
8:48
heading in the center position so text
8:50
Center margin bottom four so if you
8:53
check your browser uh it is saying that
8:58
bootstrap fail to resolve oh sorry we
9:02
have made a mistake right here so this
9:03
needs to be
9:05
bootstrap.min
9:07
docs so just refresh and you will see
9:09
this heading appearing in the center
9:11
position so after this heading we just
9:14
need to have three
9:17
buttons which will be responsible for
9:20
allowing the user to select which thing
9:23
that they want to record so right inside
9:25
this
9:27
column so we will have basic basically a
9:29
div
9:36
tag so we will give it give it a class
9:40
name of margin bottom
9:46
4 so here we'll be having three button
9:49
so the first
9:57
button so let me just paste it so this
10:00
is actually your first button which will
10:02
be responsible
10:05
for if you see we have this button we
10:08
are actually binding a on click listener
10:10
so when we click this we will change
10:12
your media type variable to
10:14
video so if you just see we have one
10:17
button and same in that case we will
10:20
have the second button which will be for
10:24
audio so here we are changing this media
10:27
type to audio and the third button is
10:29
for screen sharing
10:33
so we have these three buttons side by
10:35
side saying video audio screen so
10:39
depending upon which button that you
10:40
want
10:42
to select we are using this Turner
10:45
operator to change the media type
10:49
variable that we have if you see
10:52
initially initial value is video by
10:54
default but you can change it by using
10:57
these buttons
10:59
and now if you click any of these
11:01
buttons nothing will happen it will only
11:04
change your media type
11:07
variable so
11:09
now after this div we will have a
11:15
section just outside this div we will
11:19
actually show the status of the
11:21
recording whether it the recording has
11:23
started or not so in this
11:25
div so again we need to align it in the
11:27
center position so text Center margin
11:30
bottom four and here here we putting the
11:33
status we have the
11:36
variable we have the method that we
11:38
imported earlier on you can just put the
11:42
status so this status is coming from
11:45
this package react media recorder and if
11:48
you just see status is Idle so recording
11:51
is stopped here nothing is going on so
11:53
that's why the status is Idle then we
11:56
need to actually
12:01
do the recording so right here if you
12:04
see we need
12:07
to after this status we will have
12:12
another so if the stream is available to
12:16
us inside this preview stream if the
12:19
preview is available then we can show
12:21
the preview inside
12:23
this but here we haven't started the
12:26
recording so first of all we do need to
12:29
have the control buttons so right inside
12:32
this div
12:34
section we first of all allow the user
12:37
to start the recording so we will have
12:40
two
12:42
buttons first one for start recording
12:45
and the second one for
12:47
stop so we have these buttons here start
12:50
recording
12:52
and so the variant here will be a green
12:55
button success you will bind a on click
13:00
function which will be responsible for
13:02
starting the recording so all these
13:05
functions are coming from the
13:07
module so by
13:09
default we will disable this button
13:12
depending upon the status so if the
13:15
status is equal to recording then
13:18
this button will be disabled so you can
13:21
just see it will the condition will
13:23
become
13:24
true and same goes with the uh stop
13:27
recording button so you'll have the
13:29
second
13:34
button so this button will be for stop
13:38
uh stopping the
13:39
recording and the color of the button
13:42
will be red so danger we will be binding
13:45
an on click listener so this we will use
13:49
this function which is top
13:51
recording and again we will disable this
13:54
button if the
13:56
status is not equal to
14:03
recording so if you see now we select
14:06
video and click start recording so your
14:10
video feed will start you will see it is
14:13
starting my recording and if as I click
14:16
stop recording status has changed to
14:20
stopped so after this now to show the
14:24
recording in a media player so what we
14:26
can do right here we can simply have a
14:28
condition just before
14:31
this to show the actual stream we will
14:34
have the jsx expression inside curly
14:37
bracket so if the preview is available
14:39
to us inside this preview stream so you
14:42
can
14:43
see we are checking this if the stream
14:45
is available after the recording in that
14:49
case
14:51
only we need to print
14:54
out the video display the video in the
14:58
video play so margin bottom four inside
15:01
this in a card like
15:09
structure so we will have the video
15:11
element and uh this video element will
15:14
take a property which is for
15:27
reference so we have the
15:29
[Music]
15:39
reference let me just paste it so we
15:43
have this uh this video element try
16:03
so we have this video element if you
16:08
see so we are basically having just
16:12
manipulating the uh Source object here
16:15
letting the preview stream in the
16:18
video we autop playing the video and the
16:21
audio is muted it will play in in line
16:24
width of the video player will be 100%
16:26
so if you
16:33
refresh now click on start recording so
16:35
the media is recording right here if you
16:37
see the video player will
16:39
show so whatever I'm speaking so if I
16:42
click stop recording now status is
16:45
changed to stopped and now I need to
16:47
show the actual video which has been
16:48
recorded So now to show that video just
16:52
after
16:53
this section right here we will have
16:57
another section where you will showing
16:59
the actual recorded video so media blob
17:01
URL this variable is there so if this
17:05
variable is available then in that case
17:07
inside this
17:10
div I will just align it in the center
17:12
positions to text Center margin top
17:16
four so you'll have this H5 heading so
17:19
it will simply say
17:20
recorded
17:22
media and we'll have the download button
17:25
so download recording
17:32
so right here in the HF attribute you
17:35
assign the media blob
17:37
URL like this give it a file name here
17:41
which is
17:42
recording. webm you can change it to MP4
17:46
as well depending
17:52
upon so we can even show the actual
17:55
video in the video player so just after
17:57
this anchor tag
18:05
I think yeah so this anchor tag it
18:08
contains a button right here so we have
18:10
a button which says download
18:13
recording after this we will have actual
18:16
video tag and Source also will be media
18:20
blob
18:22
URL and it have the controls the video
18:24
player and give it a bootstrap class of
18:28
margin bottom three margin top three and
18:32
we will make this video player 100% so
18:34
width parameter is 100
18:44
perc so this completes the application
18:47
if I try to test it in the browser now
18:49
click on the video so the video is has
18:52
been recording so if I click the stop
18:55
recording button you will see the video
18:58
with have recorded here and you can play
19:00
the recording so if I click the
19:03
Stop and you can click the download
19:05
recording button so automatically your
19:07
video will get
19:09
downloaded has been recording so same
19:13
goes with the audio if you click audio
19:14
now click start
19:16
recording so it status is
19:19
recording so it has been recorded
19:22
recording so it status is recording so
19:25
same goes for the screen as well you can
19:28
select your entire screen click on share
19:32
status change to recording and then
19:33
again you can click the stop recording
19:35
button to can see status change to
19:39
recording and then can download
19:45
this so this is a very handy uh Library
19:50
guys in react chairs which is react
19:52
media recorder it contains all these
19:53
functions pre-made available in react
19:55
chair
19:56
specifically and I showed you step by
19:59
step how to configure this package and
20:01
use it to build this awesome application
20:04
all the source code is given in the
20:05
description and do check out my website
20:08
as well free mediat tools.com which
20:10
contains thousands tools regarding audio
20:12
video and image and I will be seeing you
20:15
in the next video
#Programming
#Multimedia Software
#Other