Up next in 10

Build a React.js QR Code Scanner with Webcam & Image Upload Step by Step Tutorial Using JSX
Jan 9, 2025
Get the full source code of application here:
https://gist.github.com/gauti123456/0438e8014b2fc06ab257d38669071294
Show More Show Less View Video Transcript
0:01
uh hello guys welcome to this video so
0:03
in this video we will look at how to
0:05
build a QR code scanner kind of an
0:08
application inside react Chas so this
0:11
application allows the user to Simply
0:13
select a image file which contains the
0:15
QR code or they can actually scan the QR
0:19
code as well so this is actually the
0:21
complete application uh let me run this
0:24
locally and show you a short little demo
0:27
right here
0:31
so I've used uh bootstrap for building
0:34
the interface you will see if there is a
0:36
choose file button so here you can
0:38
simply select any PNG or JPG file which
0:40
contains the QR code and let me select a
0:45
image here so it will now scan this QR
0:48
code it will show this QR code and this
0:50
is actually the result after scanning
0:53
so it will show like this or now if you
0:57
want to scan this QR code with your
0:59
webcam
1:00
you can even do that as well by clicking
1:03
this button so once you click this
1:05
button you will be need to Grant the
1:08
permission so once you grant the
1:10
permission if
1:12
you show the actual QR code you will see
1:15
it will scan this and it will Now
1:17
display the
1:18
result like this so both the options are
1:22
available either you can choose the
1:23
image or you can scan it with your web
1:25
camera as well so this is actually the
1:28
complete application all the source code
1:30
is given in the description so I have
1:32
used numerous packages for this so for
1:35
scanning the QR code for using the web
1:37
camera we are using this package which
1:39
is react QR reader and for scanning
1:43
through image we are using this package
1:45
QR Code
1:48
Reader so we just need to install these
1:50
third party packages so if you just go
1:52
to npmjs.com and just search for this
1:55
package react QR
1:58
Reader so this is specifically used for
2:01
scanning the QR code using the web
2:03
camera it is almost having 108,000
2:06
weekly downloads so this is actual
2:09
command here I've have already installed
2:11
it and then the second package is uh QR
2:14
code Das reader so this scans your QR
2:18
code if you provide any image almost
2:21
70,000 weekly downloads so this is
2:23
actually the command and we are also
2:26
using bootstrap for building the
2:27
interface so just in install this
2:30
package as well react
2:32
bootstrap which lets you use bootstrap
2:34
inside react Chas so this is actually
2:37
the
2:40
command so in the next section I will
2:43
show you how to build this
2:45
application so now to get started guys
2:48
we'll start building this application so
2:51
I will just make a simple functional
2:53
component in reactjs so now we just need
2:56
to import the packages that we will need
2:59
for this app applications so I will just
3:01
import the packages
3:03
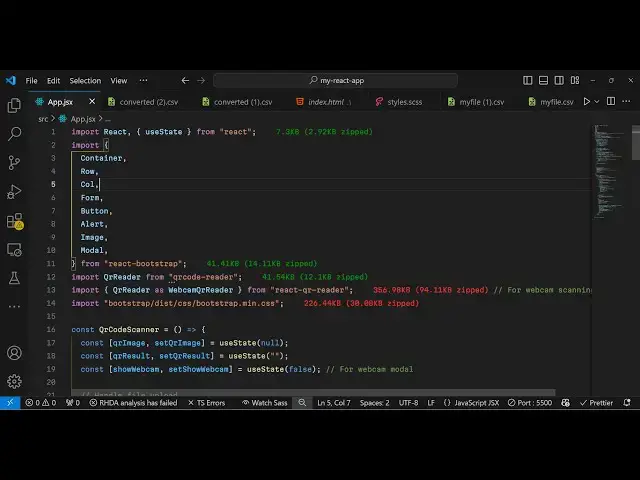
so so first of all I will import all the
3:06
necessary components which are required
3:08
for this application from react
3:11
bootstrap so you can see we are
3:13
importing it which is the container
3:16
component row column form button alert
3:19
image and
3:21
model and we also need to import the CSS
3:24
file which is part of this module which
3:28
is required so we are simply including
3:29
the CDM bootstrap bootstrap is not
3:32
required for building this I'm just
3:34
using it for styling purpose so for
3:38
keeping track of some variables now we
3:40
will be declaring the QR image variable
3:44
which will be required for keeping track
3:47
of the QR code which would be shown to
3:49
the
3:51
user so whatever image the user upload
3:54
we will have this variable we are using
3:56
the U State hook which is part of react
3:59
chair
4:00
similarly we'll be having a variable for
4:03
storing the result from the QR code so
4:07
whenever you
4:08
scan the QR code the result will be
4:11
shown in this variable so U State
4:14
initial value will be nothing and the
4:17
last variable which will be there for
4:19
this application will be a Boolean
4:23
parameter so if you want to show the
4:25
webcam you will have this Boolean
4:28
parameter and initial value will be
4:30
false so it is just used to keep track
4:34
of whether the user wants to scan it by
4:36
webcam and then we need to show the
4:37
webcam so it's a Boolean parameter so
4:40
now coming to the
4:43
jsx we will actually design the user
4:46
interface so in the interface we will
4:48
just wrap everything inside the
4:49
container component and I will just give
4:52
it a bootstrap class of margin top
4:56
five and I will just use the row class
5:00
and I will just give it a class name I
5:02
will align everything in the center
5:04
position so justify content
5:06
Center and will say call and I will just
5:10
give it a medium property of
5:15
six so right inside this we will have a
5:18
H2 heading which will say QR
5:23
code scanner and I will just align this
5:27
heading in the center position so text
5:34
Center so if you just refresh now you
5:37
will actually see this heading
5:41
appearing so after this we just need a
5:44
simple form where we allow the user to
5:47
Simply upload a image file so we'll use
5:49
theform group
5:51
class inside this we will have a form
5:53
label
5:55
component you'll simply say select an
5:57
image with a QR code
6:00
code and then the user will select this
6:04
image and he'll have this form
6:06
control and this will be a simple input
6:09
field type parameter will be of file
6:13
you'll only be accepting image file so
6:15
image/
6:17
star and bind an onchange event handler
6:20
so when we select the image file this
6:22
function will execute which will be
6:25
handle image upload so we just need to
6:28
Define this function so when we now
6:30
select image we will read actually
6:33
whatever image the user has selected so
6:36
we'll be defining a function for this so
6:39
e parameter will automatically get
6:41
passed in this argument right here
6:46
so now to read the file first of all
6:49
you'll resetting whatever is the
6:51
previous
6:52
result by using this function and then
6:55
we'll be reading the
6:56
file by this e parameter so e do target.
7:00
files and now we get the file so if the
7:03
file is valid in that case we will read
7:05
the file using the file reader API which
7:09
is available in the browser
7:11
built-in just instantiate a new
7:13
Constructor and does it contains a
7:15
onload function so when the image is
7:17
successfully loaded this event will fire
7:23
automatically and first of all we
7:25
execute this function which is read as
7:27
data URL so it will read the base 64
7:30
code of this
7:31
image in turn this will fire this
7:34
function so first of all we instantiate
7:36
new instance of file reader then we come
7:38
to this step we execute this function
7:41
and then it calls this function onload
7:45
and when the file is loaded we simply
7:48
set the QR
7:51
image to whatever is the result e.
7:53
Target R result and then we create a
7:56
custom function which will actually read
7:59
the
8:00
uh content of this image I will passing
8:03
this e. Target or result so now we just
8:07
need to make this function process QR
8:09
code which will
8:11
actually process the QR code from this
8:13
image so be defining this function it
8:15
will contain this image source passed as
8:18
an
8:21
argument so now to reading the QR code
8:25
content it's very easy first of all we
8:28
do need to
8:30
create this image we'll be creating a
8:33
image
8:34
element image. source and is equal to
8:37
image
8:39
source we're creating a dynamic Element
8:41
image tag and we are just putting the
8:43
source property whatever is the image is
8:46
passed and we have this image. onload
8:49
function available on this object so
8:52
what we will do we will
8:55
simply draw this image on the canvas for
8:58
drawing this image on the the canvas we
9:00
do need to create the canvas element
9:03
again we'll be creating using the create
9:05
element function and then we'll be
9:07
getting the 2D context by this canvas
9:11
element we have this function called as
9:13
get context and we'll be getting the 2D
9:16
context and whatever is your canvas
9:19
width which will be equal to the image
9:25
width and whatever is the height of the
9:27
canvas it will be equal to
9:30
image.
9:33
height and then this context contains
9:35
this function draw image so we'll draw
9:38
this image on the canvas x coordinate y
9:42
coordinate is zero image do width and
9:45
image. height so now I will draw this
9:48
image on the
9:50
canvas so after drawing this image on
9:52
the canvas now we can convert this image
9:54
to base 64
9:57
code by a function
10:00
available which is get image data so
10:02
this
10:04
function actually will return the base
10:07
64 code of this
10:10
image using this and now we can
10:13
instantiate our QR Reader package we
10:17
will instantiate a new instance of this
10:20
it will be coming from this package Q
10:23
react QR
10:25
reader and you will see that so it
10:28
actually contains this this function QR
10:30
reader and it actually contains a call
10:34
back
10:35
function so QR
10:40
reader and it has a call back function
10:43
right here so when the content has been
10:47
successfully decoded whatever is your QR
10:50
code this function will
10:52
execute and uh there is this first of
10:56
all we call this function which is there
10:59
is this decode function available and we
11:02
pass the result result.
11:06
result I
11:08
think yeah sorry inside this call back
11:11
function
11:15
sorry yeah so this line will be
11:19
contained in this call back
11:21
function so once we get this result we
11:24
will set the QR
11:27
result which will will be contained
11:29
inside this result. result and then we
11:31
will
11:36
call uh I think this
11:48
function let me just write this complete
11:51
function all the source score will be
11:53
given in the description
12:07
so now if I try to so you will see we
12:11
are actually using this
12:14
model it contains this function which is
12:17
called as decode which will actually
12:20
read or scan your QR code and store the
12:23
result in this function set QR result
12:28
whatever is the result result coming can
12:31
see we have this function decode so it
12:33
actually scans your QR code using this
12:36
image data and then stores this inside
12:39
this variable QR
12:51
result uh I think
12:55
yeah so if you want to now uh display
12:58
the result uh we come to the jsx
13:01
so after this input
13:06
field uh right here if you
13:11
see after this form group you'll simply
13:14
compare if QR image is there then we
13:18
need to first of all display the image
13:21
which is selected by the user in this
13:23
div tag so you'll be giving a bootstrap
13:26
class of text Center margin top
13:29
four and here we'll be selecting showing
13:33
the image which is the selected
13:36
image and for this we will be using the
13:39
image component inside bootstrap which
13:44
is so here it takes the style parameter
13:48
so I will just give it a width of 200
13:50
pixel
13:53
and a height of 200
13:56
pixel just give it a source which will
13:59
be QR
14:04
image and just give it a class name some
14:08
margin from the bottom position three so
14:11
now what happens when you select a image
14:13
which contains a QR
14:18
code so it is saying that fail to
14:20
execute read as data URL on file reader
14:34
okay I think we haven't passed uh when
14:36
we are calling this read as data URL we
14:38
do need to pass the actual
14:41
file so this is We we forgot to pass it
14:45
we do need to pass the actual file which
14:47
is selected by the user to this function
14:50
to read read the base 64 code so now if
14:53
you select your image file so the image
14:56
file will display and now to actually
14:58
show the result
15:01
the QR code result because we are
15:03
actually calling this hook function and
15:05
storing this result and now we just need
15:08
to display this variable in the jsx so
15:10
for displaying it it will just after
15:14
this image is
15:17
displayed just after this we'll compare
15:20
another condition that if the result is
15:22
available to us then we need to show
15:25
it and we will show it in an alert
15:28
component or boot strap
15:31
and we'll simply say QR code
15:38
result so here you'll be displaying this
15:40
result which will be inside QR
15:45
result and I will change this variant of
15:49
the Su alert to be success and a class
15:53
name of uh margin
15:57
top so what happens is that if you
16:00
select your QR code
16:04
image
16:08
so cannot read properties of
16:19
undefined uh just wait uh when we are
16:22
calling this Constructor of this package
16:25
if you
16:27
see right here it is created some kind
16:29
of problem so let me see so when we
16:31
create the
16:34
package uh let me just see let me paste
16:39
the full code right
16:41
here all the source code will be given
16:44
in the description
16:50
so let me just paste
16:56
everything so what happens is that if
16:59
you select now I think it was just a typ
17:03
of
17:15
mistake so if you select now you will
17:18
see the QR code will will display so now
17:21
we come to the second part which
17:24
actually to display a webcam where we
17:29
allow the user to Simply
17:32
select the webcam as well so we need to
17:34
show a button where the user can select
17:38
if they want to scan the QR code with
17:40
webcam so we will have a simple button
17:43
just after
17:47
this uh I think it
17:51
will just after this you'll have this
17:55
button we bind an on click listener to
17:58
this so when we click click the button
17:59
we will make this Boolean parameter
18:01
which will be set show webcam to from
18:03
false to
18:05
true so we'll have this button so once
18:07
we click the button nothing happens but
18:10
we do need to add a model
18:13
window so this will be coming from
18:15
bootstrap uh this is actually the
18:17
component responsible for showing model
18:21
window inside bootstrap so it contains a
18:24
parameter of show it's a Boolean
18:27
parameter so you'll be binding this
18:28
function to it so it depends upon the
18:31
value of this function so onhide is
18:35
again will be a function so again set
18:39
show webcam and I will put it to
18:43
false and it should be centered this
18:46
model
18:47
window and what this model window will
18:49
contain is
18:51
actually also a close Button as well so
18:54
the user can close the model window as
18:57
well and the tit T of this window will
19:00
be scan QR code with
19:11
webcam so after the header we will have
19:13
the
19:16
body of the
19:19
QR model window inside the body we'll be
19:22
rendering
19:23
the
19:25
webcam QR Reader so this will be coming
19:28
from it's a component for scanning the
19:31
QR code from the webcam so this will be
19:33
coming from this package
19:36
uh webcam QR Reader if you
19:44
see and it actually contains a function
19:48
on result so when the scanning is
19:51
complete this function will be executed
19:53
on result here will be binding an custom
19:56
function to it handle web cam result and
19:59
I will make this function and
20:02
constraint we also need to pass so
20:06
facing mode of the camera will be
20:11
environment because we need to scan the
20:13
QR code and then we also need to provide
20:17
the styling here I will just make the
20:19
width of the camera camera to be 100% so
20:23
now we just need to Define this function
20:25
which will be handle webcam result so
20:28
when the scanning is complete this
20:30
function will
20:32
execute this will hold the actual result
20:35
and the
20:37
error so now if you click uh the button
20:40
right
20:42
here so it is saying that handle webcam
20:45
result has already been
20:48
declared oh sorry we already declared
20:51
this you will see handle webcam result
20:54
and it actually set the QR code result
20:57
and it actually toggles the show webcam
21:01
again to false it Clos the model window
21:04
after a successful scan so if you click
21:06
the button now you will see it will ask
21:09
for the permission to for your web
21:11
camera so you just need to allow the
21:13
permission first of
21:16
all so then if you want to scan your QR
21:20
code so as you click the
21:23
button so your my web camera has been
21:27
started so here you need to
21:31
actually pull your actual QR code that
21:34
you want to
21:44
scan so as you scan
21:48
basically you will see the scan is
21:51
complete and now you see the result the
21:55
QR code result which is this website
21:57
htts freem mediat tools.com so you can
22:01
either upload a image or you can scan it
22:05
through your web camera as well so this
22:07
is a complete application and I shown
22:09
you step by step how to build this so
22:12
thank you very much for watching this
22:13
video please hit that like button
22:15
subscribe the channel and do check out
22:17
my website as well free mediat tools.com
22:20
which contains thousands of tools
22:23
regarding audio video and MH and I will
22:26
be seeing you in the next video
#Other
#Other