Up next in 10

Build a React.js One Tap Google Identity OAuth2 & JWT User Login & Show Profile in Browser Using JS
Jan 9, 2025
Get the full source code of application here:
https://gist.github.com/gauti123456/ab9ea42e5e6655a72f25bd38b4012969
Show More Show Less View Video Transcript
0:00
uh hello guys welcome to this video so
0:02
in this video I will show you how to
0:04
integrate One Tap Google authentication
0:07
using this nice little interface that
0:10
you have so it is actually the Google
0:12
identity Services SDK which is quite a
0:15
new phenomena inside Google Au so it's a
0:18
latest version of doing authentication
0:20
so if you visit any website you will see
0:21
this interface while you are on the web
0:24
page you will see this dialog box
0:25
appearing sign in with Google so if you
0:28
automatically click this any of these
0:30
two sections you will be logged in you
0:33
need to select your account similarly
0:36
this is Google o and then you will show
0:39
your profile information you will see
0:42
the we see the account name we see the
0:46
email address when we then we have the
0:48
log out button so in this way if I click
0:51
log out I will be redirected back to the
0:54
homepage or you can also click this
0:57
continue as so it will automatically one
1:00
type authentication so so I will showing
1:03
you how to integrate this inside your
1:06
application
1:07
so this is if you don't know about this
1:10
which is Google
1:14
identity authorization if you just write
1:17
this on
1:19
Google so this is
1:21
their actual docs you can read more
1:24
about it and for integrating this inside
1:27
react CH you just need to
1:33
install react bootstrap I'm just using
1:36
bootstrap for Designing the user
1:38
interface so just install these two
1:40
packages I've already installed it so
1:43
now to make this application you need to
1:45
create a functional component so right
1:48
here we will actually import first of
1:52
all the bootstrap using the import
1:54
statements at the
1:55
top so like this so we imported this now
2:00
need to make a state variable to keep
2:02
track of the user user set user and
2:06
you'll use the U State hook initial
2:09
value will be null so this variable will
2:11
store the user profile information once
2:13
you are authenticated will be displaying
2:16
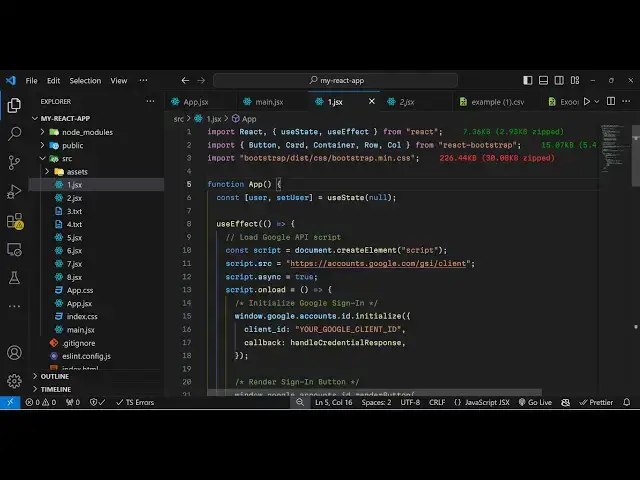
the user profile information now we need
2:18
to have the use effect hook so this Hook
2:22
is very much important in react CH so
2:25
this executes whenever your application
2:28
renders on the web
2:31
page so inside this hook we just need to
2:35
perform some authentication so here
2:37
we'll be creating a new script tag using
2:40
Create element and inside the script tag
2:44
we will be loading the SDK which is the
2:46
Google authentication
2:48
SDK Google ident identity Services SDK
2:53
so we can use this URL https
2:56
accounts.google.com
2:59
SL GSI client so this is actually the
3:03
URL of the SDK that we are loading here
3:05
in the script tag you can see that and
3:09
we just need to make it async so we can
3:11
put this property async property to
3:16
true and then we have this onload call
3:19
back function so when the script is
3:21
automatically loaded in the browser so
3:23
this callback function will execute and
3:26
inside this we need to
3:28
initialize the Google
3:31
signin so for this we have window.
3:34
gooogle
3:36
do so this xdk is available in the
3:39
window tag right here so window.google
3:42
doac accounts. id.
3:47
initialize so what we are doing in order
3:50
to load the SDK we are using the CDN so
3:53
now once the CDN is loaded this window
3:55
contains an object here of Google and
3:58
inside this we have account id.
4:00
initialize and this object contains two
4:03
properties first is the client ID and
4:07
secondly we need to give it a call back
4:10
URL call back function so this will be
4:13
handle
4:15
credential response so you can just call
4:18
this anything so this is essentially a
4:21
call back after you grant access to your
4:24
account this call back function will
4:26
execute now we just need to Define this
4:29
call call back function just
4:32
below so here the profile information
4:35
will come in the response
4:37
variable so we can simply console log
4:39
the response but before that we just
4:42
need to get the client ID you can easily
4:45
get the client ID by going to Google
4:47
Cloud console and just creating your
4:50
project here I've already created one
4:52
and then you need to goow to credentials
4:55
and you need to create a oo client ID
4:59
this is second option right here just
5:01
create a client ID and the application
5:04
type will be web application and in the
5:06
authorized JavaScript Origins you need
5:08
to paste your homepage URL so wherever
5:11
you are developing your application so
5:13
mine is Local Host
5:15
5173 you need to paste this URL right
5:22
here and also you need to add the Local
5:24
Host as
5:26
well because I'm developing it in Local
5:29
Host I will add add these two URLs this
5:31
is a full URL and this is only the local
5:34
host and then inside your authorized
5:37
redirect
5:39
Ur the same URL I will
5:42
paste so now depending upon your own
5:44
port number you can change it and then
5:47
click on Create and this will give you
5:49
your client
5:51
ID and simply copy this and paste it
5:55
right here so once you get the client ID
5:58
and we can simp
6:01
simply after we do this we just need to
6:04
write the render the signin button so
6:08
now to renter the signin button
6:09
automatically we need to make this
6:12
function window. google. accounts. ID
6:16
and it contains a function right here of
6:18
render
6:19
button and we will render the
6:24
button for this we need to have some
6:27
element in the jsx or in the
6:35
HTML so we have this container
6:39
element give it a bootstrap
6:42
class so inside
6:46
this we will
6:49
have a row and the column and in the
6:52
column we
6:55
will give it a class name of offset
7:01
this is just for the alignment purpose
7:04
aligning it in the center position and
7:07
here will be having an heading here
7:08
react Google
7:15
O2 login and here in the jsx in curly
7:18
bracket we will simply say if the user
7:21
is not available in that case we need to
7:24
show the signin
7:26
button so inside this d section section
7:29
will give it an ID here to this
7:33
div which will be Google signin so right
7:37
inside this div we will be displaying
7:40
the Google login button but if the
7:43
profile information is available in that
7:46
case you will simply say to the user
7:48
that you are
7:52
authenticated so if you refresh your
7:54
browser you will see nothing because we
7:56
are not authenticated so inside this
7:59
section if I write
8:01
something you will now see that so
8:04
instead of this we need to render the
8:06
login buttons we have given an ID to it
8:08
of Google signin so right here in this
8:11
render button
8:12
function we just need to render this
8:16
button inside that div section so for
8:19
this we will Target this by document.
8:22
getet element by ID and here you'll be
8:25
pasting the ID of that div element
8:27
Google signin like this
8:30
and then the second argument is the
8:33
theme of the button so the theme of the
8:35
button will be
8:36
outline and the size of the button will
8:38
be large so if you just refresh your
8:44
browser and we also need to execute one
8:47
more function after this which will be
8:50
window
8:51
do google. accounts. id. prompt
9:00
so this will add this button and lastly
9:03
we also need
9:08
to I think after this yes after this we
9:13
need to add the script because we
9:15
haven't added the script so for adding
9:18
the script in the body we use this
9:20
method document. body append child and
9:24
passing the script
9:30
and here it is empty bracket so just
9:32
also make this change if you refresh now
9:35
you will see your signin button
9:37
automatically appearing in these two
9:39
locations so you can simply click any of
9:42
these buttons so once you click you will
9:45
see this loog uh account screen where
9:47
you can select your Google account and
9:49
Grant the permission so once you grant
9:52
the permission you will get
9:54
a object in the console you will see
9:59
you will get this access
10:01
token credentials client ID all this we
10:04
need this credentials which is your
10:06
access
10:08
token so now inside this function which
10:12
is handle credentials
10:14
response we need to get the profile
10:17
information for this we will be decoding
10:20
the
10:21
JWT access token that we
10:24
got so we will simply use this function
10:27
Json dopar
10:30
and this function
10:31
aop and here we will simply get the
10:35
credentials that we got response.
10:39
credentials do
10:43
split 1 so in this way we can decode our
10:48
access token and then we can simply set
10:50
the user to decode
10:56
it so if you if I just console log this
10:59
so what does it is doing it is actually
11:02
decoding the profile information which
11:05
is hidden in the access token so using
11:09
this access token uh if you now see we
11:12
have this profile information about the
11:14
user which is email address the given
11:17
name profile picture account name this
11:20
so all these things are available to us
11:22
now you can display
11:25
this inside
11:30
right here so instead of this H1 heading
11:32
we can
11:33
simply display the
11:50
information so inside your card title
11:53
will
11:54
will say welcome and what the username
11:59
so if you refresh now you will see the
12:02
name right here
12:06
written then we can even show the email
12:09
address as
12:18
well this is the email property
12:20
available so if you now see email
12:23
address will also be
12:25
shown and then we can embed a simple log
12:29
of Button as
12:33
well so this handle logout function you
12:36
can Define
12:46
it so for log out we will delete the
12:49
user information set the user to null
12:52
and then we have this function window.
12:54
accounts. ID disable aut to select so
12:58
this will essentially clear out the
13:01
session of the user and log out
13:11
them so in this way you can display your
13:14
profile
13:16
information in
13:18
reactjs so this is the overall
13:21
authentication system that you can
13:22
develop using Google identity one tab
13:26
JWT authentication system so that thank
13:29
you very much for watching this video
13:31
all the source code is given in the
13:33
description and also check out my
13:35
website as well free media tools.com
13:37
which contains thousands of free tools
13:39
regarding audio video and image and I
13:43
will be seeing you in the next video
#Programming
#Internet Software
#Computer Education