live_tv
Livestream Starting Soon
00
Hours
:
00
Minutes
:
00
Seconds
Up next in 10

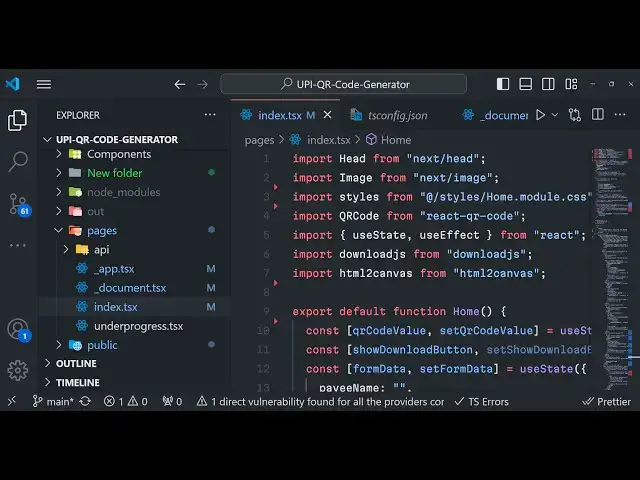
Build a Next.js Paytm & Google Pay UPI QRCode Generator Web App in Browser Using TypeScript
Jan 9, 2025
Buy the full source code of application here:
https://procodestore.com/index.php/product/build-a-next-js-paytm-google-pay-upi-qrcode-generator-web-app-in-browser-using-typescript/
Hi Join the official discord server to resolve doubts here:
https://discord.gg/cRnjhk6nzW
Visit my Online Free Media Tool Website
https://freemediatools.com/
Buy Premium Scripts and Apps Here:
https://procodestore.com/
Show More Show Less View Video Transcript
0:00
[Music]
0:00
uh hello guys welcome to this uh live
0:03
stream so in this live stream I will
0:05
actually show you an application that I
0:07
developed inside
0:09
nextjs which actually allows you to
0:12
generate UPI QR codes so it basically
0:16
supports uh each and every UPI app that
0:20
supports in India which is PTM Google
0:23
pay phone pay and beam UPI Amazon pay as
0:27
well so this is a kind of application
0:30
which works in India and also in
0:32
selected countries which uses Amazon pay
0:34
or Google pay as well so here is
0:37
actually the application it is publicly
0:40
accessible guys you can go to my website
0:42
free mediat tools.com
0:45
UPI QR code generator this is actually
0:48
the tool that I added if you go to my
0:50
website free mediat tools.com if you
0:53
just navigate to the section you can see
0:56
that PTM and Google pay UPI QR code
0:59
generator so many of times you need to
1:02
actually if you own a shop you need to
1:04
accept payments so for that you need to
1:07
actually generate QR code for your own
1:09
shop so what you will do inside this
1:12
application we have the Pay merchant
1:14
name UPI ID you need to fill out
1:17
transaction amount and
1:19
description so basically you can fill
1:21
out your Pi name let me fill out my
1:24
details you will see and then the UPI ID
1:28
so this can be your your own up ID you
1:30
need to replace here and then the
1:32
transaction amount this is not necessary
1:34
these options are not necessary but uh
1:37
optional so you can just provide them if
1:40
you don't provide them then also it will
1:41
be fine and now generate QR code so as
1:45
you generate this QR code it will
1:47
actually generate this random QR code
1:49
for you and there is also a download
1:51
button as well if you click the download
1:53
button your QR code will be downloaded
1:56
as a PNG image now you can open this
1:59
image you will see that now you can
2:01
actually get the hard copy of this image
2:05
and actually you can use it inside your
2:07
shop so that users coming in can
2:09
directly pay you and if you now want to
2:12
pay it let me show you the video you can
2:15
navigate to
2:16
any uh PTM app you can see that inside
2:21
the phone the user will directly pay you
2:24
by scanning this QR code right here from
2:26
the mobile phone and your you can see
2:29
that mine is coming right here you will
2:31
see that this is my
2:33
official this is my main UPI ID right
2:36
here and they can directly pay you you
2:39
can see that so automatically we have
2:42
filled 500 right here so it is filled
2:44
directly 500 you can also put the
2:47
transaction amount so it will
2:49
automatically the money will be
2:51
automatically be pre-filled for the user
2:54
so if you want the accept payment 2,000
2:57
3,000 specific amount you can use this
3:00
website guys the tool that I developed
3:02
and it is developed inside nextjs and we
3:06
are actually using HTML to Canvas
3:09
Library let me show you the project this
3:11
is actually the full source code of this
3:14
project if you are interested in
3:16
purchasing this first of all you can try
3:18
out the live demo the link is given in
3:20
the description if you are interested
3:22
the link is given in the description you
3:24
can directly purchase the full source
3:26
code from my website procore.com uh
3:29
after you purchase it you will be
3:31
getting this ZIP file uh where you can
3:33
actually extract the zip file you will
3:36
get the zip file right here you need to
3:38
Simply extract it and you can see I'm
3:40
running it on uh you can also run it
3:43
locally as well inside your machine so
3:46
you can simply open
3:48
it right here and simply if you want to
3:52
first of all you need to npmi so install
3:55
all the
3:56
modules so just invoke this command of
4:00
before you start this application so
4:03
when you extract the content of the zip
4:05
file simply execute this npmi command
4:09
and I already installed the so we can
4:11
simply run this development server by
4:14
executing the command which is npm run
4:17
Dev so this will actually start your
4:19
development server on Local Host
4:22
3000
4:25
so you can directly open Local Host 3000
4:29
and this will actually start your next
4:31
CHS application it will compile it and
4:34
it will run it this you will see that so
4:36
now the application is running you will
4:37
see the same
4:42
thing so you can see that you can
4:45
download it this is your QR code that is
4:48
there so this is a live demo guys you
4:51
can try out inside the tool is given the
4:55
link is given in the
4:57
description so just need to fill out the
5:01
details you will get a QR code you can
5:04
just use this QR code right
5:06
here so this is actually the script guys
5:11
and uh we are actually using
5:12
dependencies such as we are using this
5:14
next CH version which is
5:17
13.2.3 HTML to Canvas we are also using
5:21
and uh that's all we using this
5:23
dependency react QR code we're actually
5:26
generating the QR code inside your
5:28
nextjs application
5:30
and uh apart from that we have various
5:33
uh this is actual code right here and
5:37
you can see that this is actual code
5:40
that we have inside it is coded inside
5:43
typescript if you notice we have used
5:46
typescript for this
5:48
TSS so if you want to compile this
5:51
application it is very simple if you
5:53
want to deploy it simply run the command
5:55
npm run build this is a command npm run
5:59
build
6:00
so this will build build out your
6:02
application it will actually create the
6:05
next folder right here this
6:08
folder so it will actually compile all
6:11
the
6:12
assets and one other command I have
6:15
given if you don't want to deploy this
6:18
on digital ocean if you only want to
6:20
deploy it as a static website on a
6:23
ordinary hosting then I have given a
6:26
second command in the package.json file
6:28
which is npm run export so for this
6:31
command to work you need to first of all
6:33
build your project by this command npm
6:35
run build and now secondly will run this
6:38
command npm run export this will
6:40
actually convert your next year's
6:42
application into a static website so
6:44
that you can deploy this on any hosting
6:46
plan it will create this out directory
6:49
you will see that out directory so here
6:51
it will actually create your index.html
6:53
file and here you can actually deploy
6:56
this inside a hosting plan and or you
6:59
can use it inside nodejs as well simply
7:02
create a Express server and you can host
7:04
it so this is
7:06
actually the application guys if you are
7:10
interested in purchasing it the link is
7:12
given in the description and
7:16
uh so you can directly purchase it and
7:21
thank you very much for watching this uh
7:24
video guys if you like it please hit
7:28
that like button subscribe subcribe the
7:29
channel and I will be seeing you in the
7:31
next live stream
#Banking
#Mobile Payments & Digital Wallets