Up next in 10

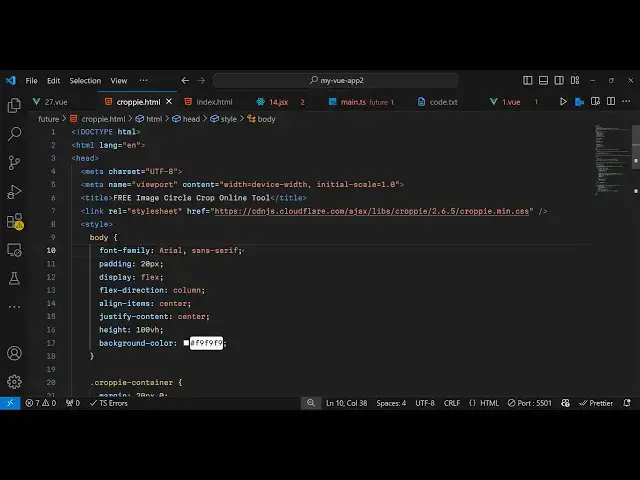
Build a Croppie.js Image Cropper Editor With Live Preview in Browser Using HTML CSS & Javascript
Jan 17, 2025
Get the full source code of application here:
https://codingshiksha.com/javascript/build-a-croppie-js-image-cropper-editor-with-live-preview-in-browser-using-html-css-javascript/
Show More Show Less View Video Transcript
0:00
uh hello guys welcome to this video so
0:02
in this video I will show you a
0:04
JavaScript library which is crappy JS
0:08
with the help of this Library you can
0:10
create a very awesome tool where you
0:13
select your image and then you can crop
0:15
your image into a form of a circle so
0:18
you can select any portion of this image
0:21
and you can create a circular Avatar you
0:24
can zoom on the image and select only
0:26
that portion that you want to select
0:29
like this and then click on crop and it
0:31
will crop your image into a form of a
0:33
circle and then you can simply save your
0:36
image inside your computer so now the
0:38
image is converted into a circle this
0:41
Avatar form so this is actually the name
0:46
of the library is
0:47
crop
0:50
JS so open source JavaScript image
0:53
Cropper Library so they do offer a nice
0:56
little demo on their
0:58
website so this is actually the package
1:01
copy so now to use this so I've have
1:05
given all the source code in the
1:07
description of this video so just create
1:09
a simple index.html file and we can
1:13
directly use it in the browser by using
1:15
the
1:16
CDN so now at the starting here we do
1:19
need to include the crappy CSS just
1:23
after the title paste
1:25
it and similarly we also need to include
1:28
the JavaScript CDN as well so just after
1:31
the body paste a CD so here copy min.
1:36
CSS and min.js so after you include this
1:39
[Music]
1:40
now we will have actually a simple input
1:44
field where we allow the user to Simply
1:56
select so here input type
2:37
so it'll only be accepting images and
2:43
uh that's all so after that here we will
2:47
be
2:50
showing the ID here which is crappy
2:53
container
3:01
so now we have a simple input field
3:03
where we allow the user to accept image
3:05
and then we have a simple div section
3:07
where we will initialize the
3:11
plug-in so after this now we will be
3:14
initializing this package
3:23
so so for initializing
3:26
it we will create a variable here which
3:29
is
3:32
copy instance and then we will simply
3:36
bind and on click listner to this on
3:39
change image Handler so whenever you
3:41
change your image this function will
3:51
execute you will get access to the file
3:54
here e. target. files
4:00
and here you'll be comparing the file
4:02
here and reading the file so for using
4:05
we'll be using the file reader
4:10
API and when the file is completed
4:13
loaded this onload function will execute
4:16
and we
4:18
just read the file the base 64
4:23
code and whatever is your crappie
4:25
instance
4:32
so initializing a new instance of cppy
4:35
so like this
4:36
cppy Constructor and we'll pass wherever
4:40
you need to initialize it so we have
4:42
given this crappy container ID here so
4:45
we directly passing this
4:50
reference so like here to this crappy
4:56
Constructor and the second parameter is
4:58
an object here and
5:00
options so
5:08
viewport so here you need to provide the
5:18
width so this is actually an object here
5:22
so what is your width so I will say 200
5:25
and a height of 200 and a type will be
5:29
of
5:34
Circle so if you refresh your
5:36
application
5:38
uh you will see this input field as you
5:41
select the
5:45
image and also it also takes some or
5:48
more options which is
5:50
enable XF to true if you also want to
5:54
enable the zoom functionality you can
5:56
put true as well can even Zoom Zoom your
6:02
images another option is if you want to
6:05
show the zoom then you can put this to
6:08
true as
6:11
well and then after declaring all
6:20
this we can bind this crappy
6:25
instance to the
6:27
URL that e. target. result so as you
6:31
read the image the base 64 code then we
6:33
simply binding this crappy instance to
6:36
this so after
6:39
this you also need to read this image so
6:42
you say Read that read as data URL
6:46
function the base 64 code so if you
6:50
refresh now as soon as you select the
6:53
image the zoom level will display you'll
6:56
see that so for also showing the live
6:59
preview of the image we go to the HTML
7:02
so wherever you need to show the
7:06
preview we will add this code just after
7:10
this just added this live preview where
7:12
we are showing this
7:18
image
7:25
so then as we crop the image
7:32
we have this crop button that we have we
7:35
have actually binded this all click
7:37
listener to this so whenever you click
7:39
the crop button so if the cppy instance
7:42
is there we simply use this result
7:44
function we provide the base 64 code
7:47
then the viewport and then the your
7:49
cropped image so if you see
7:52
now as soon as you select you can adjust
7:56
whatever portion that you want to select
7:58
for the image and then click on crop so
8:01
image is successfully cropped so all the
8:04
source code I've have given in the
8:05
description of this video you can check
8:07
out the entire source code of this web
8:09
application so it runs entirely in the
8:11
browser using the CDN so you can just
8:13
see you select your
8:16
image and then you can adjust the zoom
8:20
level whatever portion that you want to
8:23
select so thank you very much for
8:25
watching this video and do check out my
8:27
website as well uh free mediat tools.com
8:31
uh which contains thousands of tools
8:33
regarding audio video and MH and I will
8:36
be seeing you guys in the next video
#Online Goodies
#Clip Art & Animated GIFs