live_tv
Livestream Starting Soon
00
Hours
:
00
Minutes
:
00
Seconds
Up next in 10

Build a Canva Clone Image Watermark Editor to Overlay Text on Images in Browser Using Javascript
Jan 9, 2025
Buy the full source code of application here:
https://procodestore.com/index.php/product/build-a-canva-clone-image-watermark-editor-to-overlay-text-on-images-in-browser-using-javascript/
Show More Show Less View Video Transcript
0:00
uh hello guys welcome to this video so
0:02
in this video we will learn how to
0:04
actually build out a canva clone image
0:07
Watermark editor something like this I
0:10
also deployed this uh tool website on my
0:12
website freem mediat tools.com
0:14
SL mini text Watermark editor so it is
0:18
deployed right here let me show you a
0:20
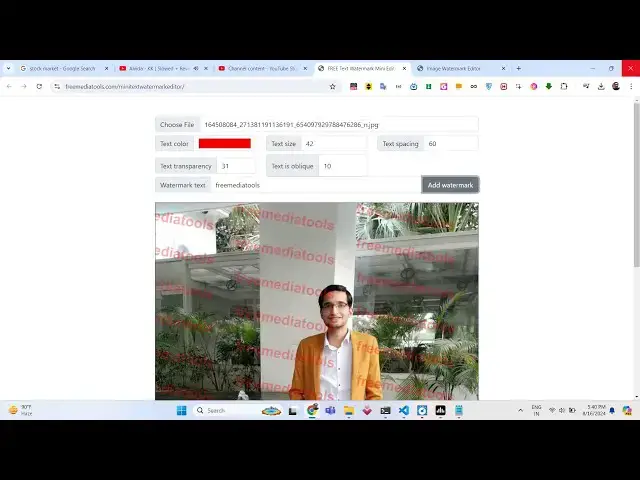
very short little demo of this tool so
0:24
here you can actually choose your image
0:26
file whatever image file you are editing
0:29
so all image extensions are supported
0:31
jpg PNG webp GF all files so here the
0:35
image file will be rendered in the
0:37
canvas now we have options to actually
0:39
add Watermark
0:41
logo on top of the image as an overlay
0:45
and we have all these options we can
0:46
control the color of the text rotation
0:48
text size transparency opacity of the
0:52
text so let's suppose if I give any sort
0:55
of
0:56
logo I give free media tools the channel
0:59
name let me want to put this logo inside
1:02
this
1:03
image the color of the text you can
1:06
choose here you can choose red color and
1:08
click on this button add Watermark so as
1:10
you click the add Watermark button you
1:12
will see the watermark will be
1:14
added the text will be added on top of
1:17
the
1:18
image so now you can control these
1:21
options if you want to increase the size
1:23
of the text you can increase it like
1:26
this if you want to decrease it
1:30
so it is modifiable and now you can even
1:32
control the spacing between the text if
1:35
you want the spacing to
1:37
be 60 you will now see it will look
1:40
something like
1:41
this transparency basically means the
1:44
opacity so you can control the opacity
1:47
as well so now it will be slightly lower
1:50
so now if you ready to actually export
1:53
your logo you can simply
1:56
click the bottom button right here which
1:58
is given generate image as you click
2:00
this button your image will be exported
2:03
and now you can see whichever
2:05
modifications you have made right here
2:06
you will see the text waterm Mark has
2:08
been successfully added to the image and
2:10
it has been showing right here in the
2:11
result so we will try to build this
2:14
application from scratch and we will not
2:16
be using any third party package we will
2:18
just be using the canvas API which is
2:21
built in in every browser so we will try
2:24
to build this application from scratch
2:26
so if you need the full source code the
2:27
link is given in the description of this
2:29
video and even you can also check out
2:32
the live demo link where I deployed this
2:34
website so you can go to my e-commerce
2:36
website and purchase the full source
2:38
code if you need this so you will have
2:40
this index HTML only a single file and
2:43
this is the overall code we will write
2:45
it from
2:47
scratch so now let's get
2:50
started by building this
2:54
application so what I will do I will
2:56
make a new file I will just make it
2:58
canva clone canva
3:02
HTML so just write a basic HTML template
3:06
and here you need to change the title
3:09
image Watermark editor and here you need
3:13
to include the CDN of bootstrap we will
3:16
also be using bootstrap for the UI user
3:20
interface so just after the title pasts
3:22
the CDN of
3:24
bootstrap that's all and now we will be
3:27
writing uh the interface of the
3:29
application
3:32
so just right inside the body we will be
3:35
giving a bootstrap class right here so
3:37
div which will be having a class of
3:40
container which is a bootstrap class and
3:43
again we'll be having row margin top
3:46
five so these are all bootstrap classes
3:49
call 12
4:00
so inside this we will have a simple
4:03
input field where we will allowing the
4:05
user to
4:09
actually
4:11
select the input image file so you'll be
4:14
giving an ID to it input file so that's
4:18
all so if you just open this now with
4:21
the live server you can open it locally
4:23
you will see now there is a choose file
4:25
button here you can click and select the
4:29
image file that you want to put the
4:31
watermark after this we will again be
4:35
having just after this again a diff
4:38
which will again have a class of call
4:40
call 12 call medium
4:43
4 margin from the y direction to inside
4:47
this you will have the input
4:50
group
4:52
class height will be 100 and here you'll
4:55
be having a span tag so here we'll be
4:59
having certain options to control the
5:01
watermark so input group
5:04
text so you'll be giving an ID to it of
5:07
pan color this simply will be
5:11
responsible for choosing the color of
5:13
the text so text
5:15
color so after this you'll be having a
5:18
input type of color so here the user can
5:21
choose the color using the Color Picker
5:23
so form control will be giving a
5:25
bootstrap class and height will be of
5:28
100 it will be giving an ID to it of
5:31
Color Picker Color Picker so here the
5:34
user can simply select which text color
5:38
that they want and the default value
5:40
will be selected automatically whenever
5:42
you load which will be white color so
5:44
hexadecimal value of why
5:47
is f f f f
5:53
6f so if you refresh now there will be
5:56
this color input text which will be
5:58
added so here here you can choose your
6:00
color using the Color
6:03
Picker so after this we will be
6:07
having
6:10
a so this is done uh we have
6:18
this so this is the input group class
6:21
which is ended now after this we will
6:24
have another the same
6:28
one so I will just copy this and paste
6:33
it one more
6:35
time so this time instead of text color
6:38
here we will be controlling the size of
6:40
the text so you replace it text
6:44
size and
6:50
uh and after this here we need to give
6:53
the ID here of phone
6:56
size so the value here will be default
6:58
value will be 30
7:00
minimum value will be
7:03
zero so input type will be this time it
7:06
will be
7:08
number so now there will be this text
7:11
field added here you can only enter the
7:13
numeric value so you can control the
7:15
size of the text next we
7:20
have the input field for controlling the
7:23
spacing of the
7:26
text so here you just need to copy one
7:29
more
7:46
time so this is actually the HTML which
7:50
is required so what I will do you will
7:53
find all this in the source code which
7:56
is given in the description so I will
7:58
not waste time in write this HTML
8:00
instead I will explain you the
8:02
JavaScript code which will be the
8:03
business know logic of the application
8:06
so here if you refresh now this is
8:10
actually the interface we have the
8:11
choose file button then we have various
8:13
Fields so controlling the color of the
8:14
text size spacing transparency opacity
8:17
oblique and this is a watermark text
8:20
that you will add
8:21
it so now this is actually the canvas so
8:26
canvas actually is where the image will
8:28
be residing so we also have a button
8:30
right here add Watermark so this button
8:34
will allow us to actually add the
8:35
watermark when we click this
8:37
button so this button which it will not
8:41
be
8:43
shown by default this will be hidden so
8:48
now we need to write some custom styles
8:51
to actually just after the head
8:54
tag so here we will make this canvas
8:58
size a little bit bigger so I will just
9:01
paste these Styles right
9:03
here so what it is doing it is actually
9:07
making this canvas size to be 100% Max
9:09
withd to be 800 pix pixel so just write
9:13
these custom Styles and refresh it and
9:15
now you will see the interface will
9:17
actually Center itself so if you
9:21
now resize your window it will be
9:24
responsive so the interface is now ready
9:27
now we need to write the logic behind
9:30
this application so right after the body
9:32
you need to make a script file and just
9:35
make a script.js file so right in the
9:38
same directory just make the file script
9:41
JS
9:43
so now first of all here in this
9:46
file we need to declare some
9:49
variables so image data will be one
9:52
variable so just declare it and just
9:54
assign this nothing value here we'll be
9:57
storing the base 64 code of the image
9:59
and we want to export the image so here
10:02
we'll be getting the
10:05
references by using document. get
10:07
element by ID you have given the ID to
10:10
the input file so which is input file
10:12
you'll be binding a event listener to it
10:15
so whenever the file is selected by the
10:17
user this event will automatically
10:19
trigger and this call back function will
10:21
trigger which will have the event
10:24
parameter so here first of all we need
10:26
to get access to the file so you'll
10:29
simply say event. target. files Z we
10:32
will get access to the file which is
10:35
selected by the user by e. target. files
10:39
zero and now we need to actually read
10:42
the input image file which is selected
10:44
by the user so for doing this we will
10:47
actually use the file reader API which
10:50
is built in inside the browser so for
10:54
reading this we'll be instantiating a
10:56
new instance of file reader class and
10:58
then we will simp use the onload
11:00
function so inside this function what we
11:03
need to do we need to actually
11:06
instantiate a new instance of image
11:08
Constructor and then we need to get the
11:11
base 64 code of the image which is there
11:14
inside e. target. result
11:19
so after this we just need to say when
11:22
the image is successfully loaded this
11:24
function will
11:25
execute this callback function will
11:27
execute whenever the image is
11:29
successfully loaded in the canvas so
11:32
right here we need to actually draw the
11:34
image on the canvas so for drawing
11:36
anything on the canvas first of all we
11:38
need to get access to the canvas element
11:41
so if you see we have given
11:45
the canvas element if you see we have
11:48
given this ID which is Art so we are
11:51
just targeting this canvas by this ID
11:54
and then we will need to get the context
11:57
to actually draw something on the canvas
11:58
so we need to say get context which is a
12:01
method to actually get the 2D context so
12:03
after we got the 2D context now we can
12:06
draw something on the canvas so for
12:08
doing this we need to calculate the
12:09
width and the height of the canvas for
12:12
getting the width and the height we need
12:13
to get the width and the height of the
12:15
image so we can simply say image do
12:17
width to actually get the image width
12:19
similarly for getting the height of the
12:21
image we can say image. height and then
12:23
we need to say context. clear so now to
12:28
draw a rectangle this is actually the
12:30
method which is there inside uh canvas
12:33
API so it will draw the rectangle as a
12:36
image x coordinate will be zero y
12:38
coordinate will be zero and the height
12:40
and the width of the canvas will be
12:42
equal to canvas. width. canvas. height
12:45
so after that inside that canvas we'll
12:48
be drawing the image by using the draw
12:50
image function and the first argument
12:52
will be the actual image and then the x
12:55
coordinate and the y coordinate
12:57
so after this
12:59
is if you just refresh now what will
13:02
happen right here if I choose a image
13:04
file right here you will now see as I
13:06
choose the image file uh nothing happens
13:10
let me see what is the
13:12
error uh this function hasn't been
13:16
called I
13:18
think okay oh sorry we have made a
13:21
mistake right here this needs to be
13:23
onload and
13:24
also if I make this change you will also
13:28
see this code will not work work there
13:29
is a reason for this you will see the
13:32
the code still doesn't work because we
13:34
need to call this function which is this
13:37
onload function we haven't called this
13:39
so now for calling this function there
13:41
is this
13:45
uh reader do read as data URL so this is
13:51
actual function we need to call and here
13:53
we need to actually pass the input file
13:55
input image file so now basically the
13:58
flow will remain like this this line
14:01
will execute first and then the process
14:03
will come to this line and this read as
14:06
data URL will call this function which
14:08
is onload function so the process will
14:11
do like this so now if you select the
14:13
file right
14:14
here you will now see the image will be
14:17
drawn in the canvas you will see that if
14:20
I change this image to any other image
14:23
the image will change in the canvas so
14:25
in this way the code is working so you
14:28
can see now the image is successfully
14:30
drawn in the canvas now we just need to
14:34
add the
14:36
watermark which is
14:38
there so now after we do
14:42
this we need to get access to
14:45
the watermark input element that we
14:49
given if you see we have given this ID
14:52
to it of Watermark text so whatever
14:55
Watermark that you written right here we
14:57
need to Target this first of all
15:00
inside JavaScript so similarly we need
15:02
to bind a onclick listener to it so
15:05
whenever it changes so document. get
15:08
element by ID which is
15:10
Watermark
15:13
text so we just need to
15:24
give you need to bind a event listener
15:28
to it add event list
15:35
now we can even do a on click listener
15:38
to the button as well so if you see we
15:41
also has
15:43
given we have this add Watermark button
15:46
so we have given this button an ID of
15:49
upload text so instead of we can simply
15:51
say upload text you can bind on click
15:54
listener to the button
15:57
instead so both the methods will work
16:00
but this method will be slightly easy so
16:02
you Bing on click listener so when we
16:04
click this button of add Watermark so
16:08
what we need to do we need to add the
16:10
watermark so now for adding it first of
16:12
all we need to get access to the canvas
16:14
where the image is located you again be
16:17
go document. get element by ID get
16:20
reference to
16:21
it so after that we need to get context
16:25
as well once again we simply need to say
16:27
get context once once
16:30
again 2D context we will get
16:34
it and now we also need to get the text
16:37
which the user has written so we can say
16:39
document do get element by
16:45
ID so whatever is the watermark
16:53
text we will actually get the value of
16:56
it by using do Val so it will actually
17:00
get the watermark which is written by
17:03
the user similarly we need to get the
17:06
color as
17:13
well so for the color once again this
17:16
will
17:18
be Color
17:25
Picker so this will actually get the
17:27
color and
17:29
same in the same way we will get all the
17:32
values which is uh there in the
17:35
HTML which is the phone size spacing
17:38
between the
17:40
text the opacity rotation angle so each
17:44
and everything we have given all these
17:45
IDs in the HTML you can cross
17:50
check we have given all these IDs if you
17:53
see this is
17:57
rotation this is OPAC capacity this is
18:00
spacing phone
18:02
size so we have given all this we are
18:05
getting all these values so after doing
18:08
this now comes the main part you need to
18:12
actually add the water mark before
18:13
adding it we will be simply be checking
18:15
if the watermark text is empty by using
18:18
this
18:20
function so this simply means that if
18:23
the text is not empty in that in that
18:26
case only we need to execute this code
18:28
so now now this if if condition
18:29
evaluates to true then only we will
18:32
be adding The Watermark so for adding
18:36
the waterm mark first of all we need to
18:38
clear out the previous content so for
18:40
deleting the previous content we need to
18:42
actually call this function which is
18:44
clear rectangle this is clearly the
18:46
opposite function clear rectangle will
18:50
actually erase the rectangle which is
18:52
drawn previously from the canvas so
18:56
again we need to pass the canvas with
18:58
and the can height in the third and the
19:00
fourth parameter and then we need to
19:03
call this function which is put image
19:06
data so here we'll be
19:09
putting the actual image
19:12
data that we
19:15
got inside the variable which is image
19:18
data and then the x coordinate and the y
19:21
coordinate which will be 0 comma 0 so
19:23
this image data variable we have
19:25
declared at the you can see globally so
19:28
this image data you can see that we
19:37
are using it right here image
19:44
data so after this we also need to
19:48
attach all these properties which is
19:50
actually the phone
19:52
size so bold so here we will be getting
19:57
the phone size which is ected by the
19:59
user so phone size is in pixel so phone
20:03
size pixel
20:05
areial and similarly fill style Remains
20:09
the color of the text you'll be getting
20:11
dynamically so you'll be assigning it to
20:13
the variable and then we have another
20:15
property which is global Alpha so this
20:19
represents the
20:21
opacity
20:23
Global so opacity we also are getting
20:26
dynamically we just be multiplying
20:28
opacity by
20:30
0.01 you can just modify accordingly
20:34
this code and then we'll be getting the
20:37
canvas
20:40
width so canvas width multiplied by two
20:44
similarly you'll be getting the canvas
20:46
height again multiplied by
20:48
two and then we'll need to calculate the
20:51
center coordinate Center X this is
20:55
slightly some mathematics which is
20:57
involved right here so you just need to
20:59
copy this
21:03
code so this is actually the center x
21:05
coordinate and the center y coordinate
21:08
you multiply it by the spacing that you
21:10
select how much space is between the
21:12
characters in the water mark so this
21:15
is this is that
21:18
thing and then we just need to run a
21:21
simple for Loop right here to actually
21:25
add the water marks so
21:28
this is actual code
21:30
so let me just copy paste and then
21:33
explain to you so here this is
21:47
actually the whole source code will be
21:49
there in the description can purchase it
21:53
so right here if you if I show you this
21:55
is actually the for Loop that we are
21:57
running we are
21:59
running until the canvas height phone
22:01
size plus spacing this is slightly
22:05
complicated but you can understand very
22:07
easily if you pause the video if you try
22:09
to run it multiple number of times then
22:11
you will know how the code is
22:16
executing
22:20
so if I show you
22:22
now if I choose the file right here
22:38
I think we are missing something right
22:51
here think there is just type typo
22:54
mistake right here in the on change
22:56
function right here if I now refresh and
22:58
try to choose a
23:02
file so now you can see as I click add
23:05
Watermark The Watermark is successfully
23:07
added and this repeating stuff right
23:10
here this Watermark is you can see it is
23:12
repeated uh it is repeated right here
23:16
right here right here this repetition it
23:18
is coming because of this for Loop that
23:20
we have written so this is the logic
23:22
that we applied right here this is a for
23:25
Loop so this repeating is coming because
23:27
of this for Loop but if you don't apply
23:30
this for Loop then the waterm Mark will
23:32
only be there on a single singular time
23:36
so if you want to repeat the watermark
23:39
at specific locations then you can use
23:41
the for Loop but if you only want the
23:43
watermark to appear at a single location
23:45
then you can delete that for Loop and
23:47
the water mark will only be appearing
23:49
for a single time but this uh looks cool
23:53
because you can see the watermark appear
23:54
in multiple locations so now the only
23:58
thing is remaining if I click the
23:59
generate image button I need to download
24:01
my output stuff as a image file so this
24:04
is slightly
24:09
simpler so here again we need to bind a
24:13
onclick listener to the export button so
24:16
we have given save
24:20
canvas add event
24:27
listener so when we click the download
24:30
button uh we need to export the canvas
24:33
so you'll be getting a reference of the
24:35
canvas after getting the reference we
24:38
just need to get the we need to call
24:42
this function to data
24:45
URL so this function will actually
24:48
convert your canvas and give you a base
24:50
64
24:51
code which you can download as a image
24:54
file so for downloading it as a image
24:56
file we need to create a new element
24:59
anchor
25:00
element by using this create element
25:02
function you can see we haven't used any
25:05
third party package we just written the
25:07
vanilla JavaScript code right here to
25:08
actually code this application and then
25:11
we just need to give the name of the
25:12
file which will let me give
25:15
example.png and then we need to
25:16
dynamically click this so a do
25:19
click so if you now refresh your
25:22
application if you select your image
25:26
file then if you add the waterm mark you
25:30
can change the color of the waterm mark
25:32
let's suppose you can see the water mark
25:34
changed to red color you can increase
25:36
the size of the water mark as well right
25:39
here you can see the size is increased
25:42
you can control the sizing right
25:45
here then you can even control the
25:47
spacing between the correctors in the
25:48
watermark as well so and then you can
25:51
even control the opacity as
25:56
well so once you done you can click the
25:59
generate image button so as I click it
26:01
you'll see that image is successfully
26:02
downloaded as an attachment so now you
26:06
can see the image is saved with the
26:08
modified changes that you have done the
26:09
watermark or logo is appearing right
26:12
here on top of the image as an overlay
26:15
so this is the overall application guys
26:17
the link is given in description you can
26:19
directly purchase the full source code
26:22
if you face any sort of issues before
26:24
purchasing it at the checkout page I
26:26
have given the link of my tool you can
26:28
try out this tool before purchasing
26:31
it so thank you very much for watching
26:33
this video and I will be seeing you in
26:35
the next one
#Design
#Clip Art & Animated GIFs
#Skins, Themes & Wallpapers
#Educational Software
#Computer Education