Up next in 10

Python 3 OpenCV Script to Detect Faces in Images and Hide them by Drawing Black Circles Over Them
Jun 3, 2025
Get the full source code of application here:
https://codingshiksha.com/python/python-3-opencv-script-to-detect-faces-in-images-and-hide-them-by-drawing-black-circles-over-them/
Show More Show Less View Video Transcript
0:00
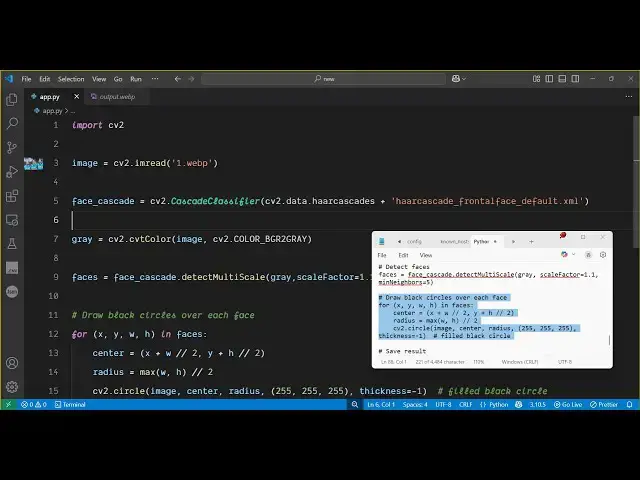
uh hello guys welcome to this video so
0:02
in this video I will show you a open CV
0:05
Python script which will automatically
0:08
analyze faces inside your images and
0:13
simply hide them so you can see inside
0:16
this image there are three people and
0:18
three faces are there so this is the
0:20
first person this is the second person
0:22
and this is the third person so what the
0:25
application will do it will analyze the
0:27
whole image and it will fa detect all
0:29
the three faces which are there inside
0:31
this image and it will hide these faces
0:34
it will draw these boxes white boxes on
0:37
these faces so now if I apply this
0:40
Python script here we are loading this
0:41
image as you can see we are passing this
0:43
image one webp image and just if I
0:46
execute this you will see the faces have
0:50
been hidden and saved as faces hidden
0:53
jpg so now a new file has been created
0:56
new image and if you see now all the
0:59
three faces now has been hidden it has
1:03
detected all the three faces and drawn
1:05
this boxes so this is really useful in
1:08
situations if you want to hide faces in
1:10
the image you can apply this open CV
1:13
script and you can even change the color
1:15
of this let's suppose if you want black
1:19
color you can change this from 0 0 so
1:22
now this will apply black color instead
1:25
of white so you can apply any color so
1:29
now this will be
1:31
black so the full script is given in the
1:35
description of the video
1:37
so let me apply to a different image so
1:41
this is
1:43
actually you will
1:45
see this was the image it detected the
1:49
face it works with singlephase
1:52
multiflace it works with all the images
1:55
now let me show you the actual script
1:57
the script is given in the description
1:59
of the video so first of all you just
2:01
need to install a
2:03
package Open
2:05
CV- Python so this is actually the
2:08
package name so simply install this
2:10
package it's a free open-source package
2:13
and uh it's a very powerful package
2:15
inside Python so first of all we will
2:18
import this package so we simply say
2:20
import cv2 after that we load the image
2:24
for loading the image we simply say cv2
2:27
it contains this function image
2:30
read and we simply load the
2:36
image uh after that we need to load the
2:39
models of open cv so it contains this AI
2:43
models cv2 dot cascade classifier
2:49
so we basically load this classifier
2:52
which will be necessary because with the
2:54
help of this it will analyze these faces
2:57
so after we load this we simply do the
3:01
face detection first of all we change
3:03
this image to grayscale image
3:07
by calling
3:09
this converting this image to grayscale
3:12
for detection and then we detect the
3:14
faces by calling this face cascade dot
3:17
detect multiscale and here we pass the
3:21
gray and the scale factor so all these
3:24
factors you can specify here so 1.1 I'm
3:28
specifying and then we have the minimum
3:32
neighbor
3:35
minimum neighbors I will set it to five
3:39
so this means that a total of five faces
3:42
will be detected you can change this
3:44
value if if if a image contain five
3:48
people then it can detect all those five
3:50
faces so here you can control how much
3:53
people you want the image and then we
3:55
need to draw black circles on all the
3:58
faces so here we will run this simple
4:03
loop so for all the faces we will run
4:07
this and draw a simple circular
4:12
box so x + w this is simple math going
4:17
on
4:25
so so after that we detect the center
4:28
and then we draw the box we put this
4:32
radius right here
4:37
divide by two then we draw the circle by
4:41
using the circle method and this image
4:44
center pass the radius as
4:47
well and here you specify the color so
4:50
255 255 255 this will be the white
4:54
color RGB and then you can even control
4:57
the thickness as well i will say
5:00
one so that's all after that we just
5:04
need to save this image so we save the
5:06
result by calling this function image
5:09
write and we simply say here output dot
5:14
webp and then we simply save this image
5:17
and print out
5:19
that image saved
5:22
as so that's all uh this script does so
5:27
let me delete this image and once again
5:30
run this
5:31
so as soon as I run this you will see
5:34
image saved as output
5:38
webp and you can see it detected these
5:43
faces first of all it detected these
5:45
faces now we need to
5:48
actually draw the circles here so for
5:52
doing this
5:54
uh I think I made some kind of mistake
5:57
here
6:05
i think a typo mistake is there let me
6:07
just
6:11
see the full script will be given in the
6:14
description of the video guys
6:18
so yeah so you can now see there was a
6:20
typo mistake so now it detected these
6:22
faces and drawn this white circles you
6:25
can change the color as well so this is
6:27
a very useful script guys you can do
6:29
this with any image if you don't want to
6:31
reveal the faces you can uh run this
6:33
Python script and it will detect the
6:36
faces and hide them so thank you very
6:39
much for watching this video and also
6:41
check out my website
6:42
freemediatetools.com
6:44
uh which contains thousands of tools